 Did we miss anything in this location? Is there something we didn't discover?
Let us know!
Notes
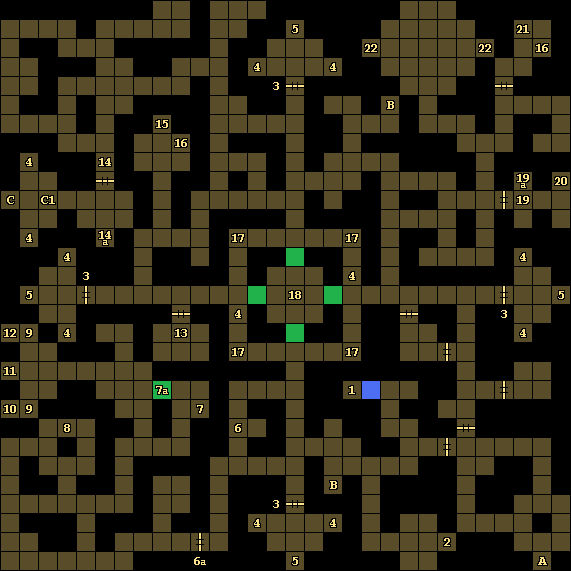
- Your goal in this level is to perform a purification ritual. To do this, you'll need to collect four Embers of Hope (#12, #18, #22) and put them inside four Beacons of Hope (#5). This will cause the Key of Faith to appear on an altar (#15). You'll need the key in order to ascend to
Level 4 (via Exit C) and face the Dark God.
- You won't be able to rest on this level until you've purified it.
- Spirit nagas can poison you, so be sure to have some Neutralize Poison spells memorized.
Enemies
- Groaning Spirits
- Spirit Nagas
Notable Loot
- Flail +4 "Mourning Star" (#8)
- Halberd +4 (#20)
- Shield +4 (#8)
Annotations
1 - Shelf / Copper Key
You'll find a Copper Key inside the shelf here.
2 - Statue of Lathander / Copper Key
Touching this statue will grant your party a small amount of healing. Also, the first time you touch the statue, a Copper Key will appear in the shelf next to it.
3 - Locked Doors
You'll need Copper Keys (#1, #2, #13, #21) to open these doors.
4 - Burning Plaques
Reading the plaques at these locations will cause your party to get burned by some minor fire damage.
5 - Beacons of Hope
You'll find Beacons of Hope at these locations. If you click on them, then you'll see that they're "devoid of warmth and light." To fix them, you'll need to place Embers of Hope (#12, #18, #22) into them. When you place embers into all four beacons, the Key of Faith will appear on an altar (#15), and plaques will stop burning you (#4). You'll need the key to reach Level 4. Also, the first time you interact with a beacon, Cups of Good Cheer will appear in the level (#17).
6 - Lever / Locked Door
Pulling the lever here (#6) will open a door to the south (#6a). But be careful. Pulling the lever will also cause Ice Storms to shoot at you from the north and south. So pull the lever and then back up one space to avoid taking damage.
7 - Hidden Button / Moveable Wall
Pressing the hidden button on the eastern wall here (#7) will remove a wall to the west (#7a).
8 - Loot
On the ground here, you'll find a Flail +4 "Mourning Star" and a Shield +4.
9 - Pressure Plate Traps
Stepping onto either of these pressure plates will cause you to get hit by an Ice Storm. To turn off the pressure plates, you'll need to pull the levers above them. To turn off the pressure plates without taking damage, simply throw an object at the levers.
10 - Shelf
Inside the shelf here, you'll find a Cleric Scroll of Fire Storm.
11 - Wall Censer
Burning a Bag of Incense (#16) here will heal your party for 5-10 hp.
12 - Shelf / Ember of Hope
Inside the shelf here, you'll find an Ember of Hope.
13 - Groaning Spirits / Copper Key
You'll encounter three groaning spirits in this room. One of them will drop a Copper Key when it dies.
14 - Pressure Plate Puzzle
Stepping onto the pressure plate here (#14) will close the door to the south. To keep the door open, you'll need to throw something through the door so it lands on the pressure plate in the room beyond (#14a). As long as the second pressure plate is weighted down, the door will remain open.
15 - Altar / Key of Faith
The Key of Faith will appear here once you've fixed the four Beacons of Hope (#5).
16 - Bags of Incense
You'll find a Bag of Incense at these two locations.
17 - Shelves / Cups of Good Cheer
You'll find shelves at each of these four locations. The first time you interact with a Beacon of Hope (#5), Cups of Good Cheer will appear next to the shelves. Putting the cups into the shelves will cause the nearby moveable walls to disappear, granting you access to the center of the level (#18).
18 - Lathander's Bounty / Ember of Hope
Each time you enter this square, you'll be rewarded with Lathander's Bounty, which will heal you, feed you, and cast Bless on you. You'll also find an Ember of Hope on the ground here.
19 - Pressure Plate / Lock
When you step onto this pressure plate (#19), the door behind you will close, and two groaning spirits will attack you. One of the spirits will drop an Iron Key when it dies. To disable the pressure plate so the door remains open, you'll need to use the key in the lock to the north (#19a).
20 - Loot
On the ground here, you'll find a Halberd +4 and a Potion of Healing.
21 - Copper Key
You'll find a Copper Key on the ground here.
22 - Ember of Hope
You'll find an Ember of Hope on each side of this large chamber. Surprisingly, nothing bad will happen when you pick them up.
Exits
- Stairs down to
Level 2.
- Stairs up to an isolated part of
Level 4 where you'll find a Magic Staff +4.
- Teleporter to
Level 4. To make this teleporter work properly, you'll need to throw the Key of Faith (#15) into it (as hinted by the nearby plaques, #4). If you step into the teleporter without throwing the key first (when it's pink rather than blue), then you'll just get moved back to the entrance of the room (C1).