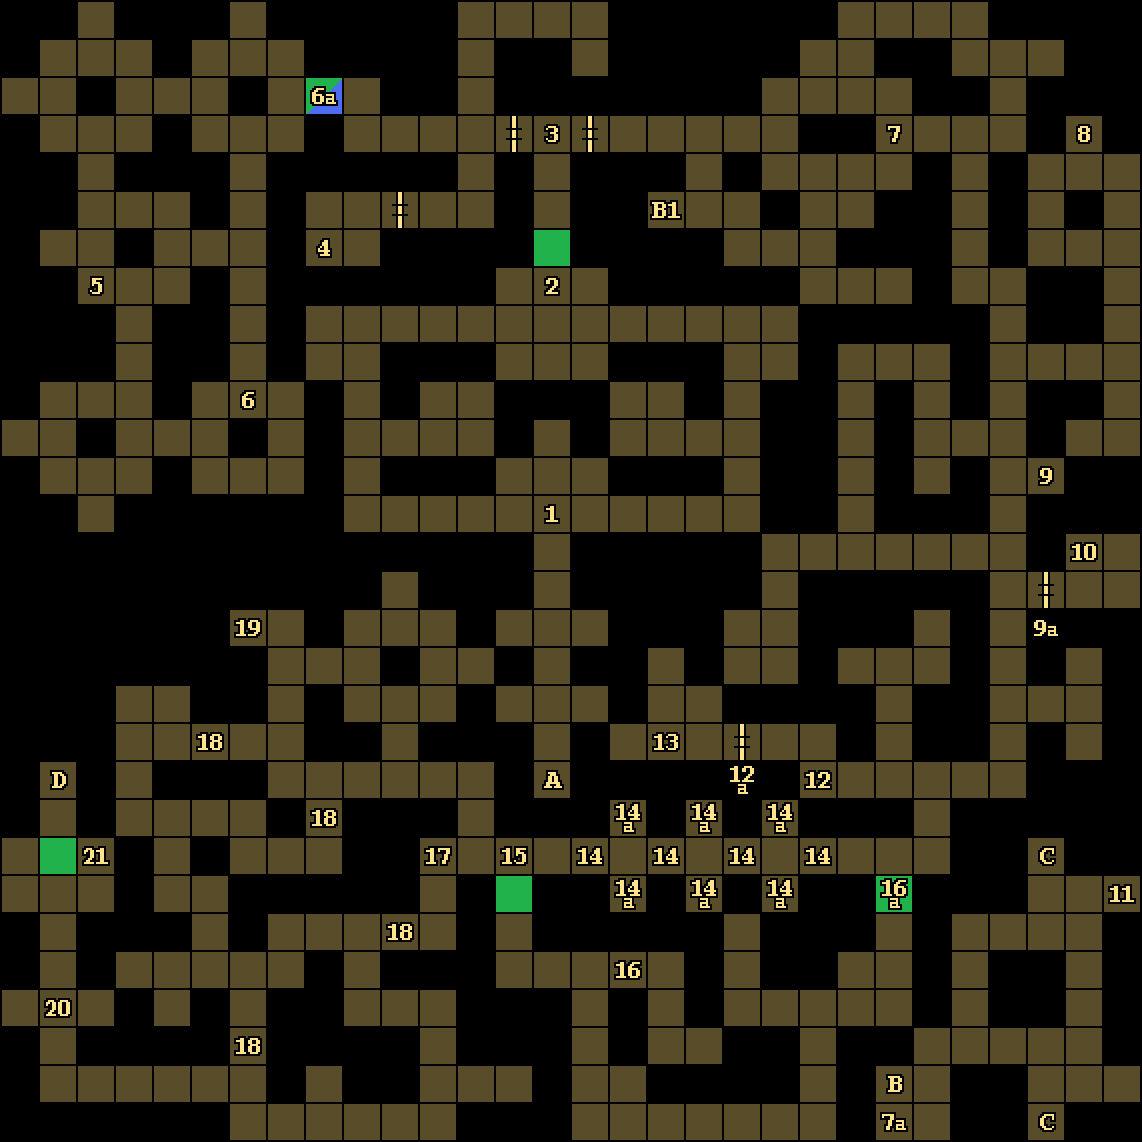
 Did we miss anything in this location? Is there something we didn't discover?
Let us know!
Note
Did we miss anything in this location? Is there something we didn't discover?
Let us know!
Note
- Scaladars resist or are immune to just about everything, except for blunt weapons. But while you're holding the Ring of Trobriand (from
Level 1), they won't attack you at all.
Enemies
Notable Loot
- Dagger +4 "Ocnor" (#11)
- Dart of Hornet's Nest (#5)
- Leather Armor +4 (#8)
- Rocks +4 (#13)
- Short Sword +3 (#19)
Annotations
1 - Bug
You'll meet a sprite mage named
Bug here. He'll join you if you're interested.
2 - Entrance Puzzle
The plaques on either side of the shelf here will inform you that "the way is revealed with the lure of the beasts." The lure in question is the Ring of Trobriand (from
Level 1). When you place it into the shelf, the wall behind it will disappear. This will cost you the ring, and without it, scaladars will start attacking you.
3 - Cord
When you pull the cord here, you'll open the gates to the east and west.
4 - Loot
On the ground here, you'll find two Arrows +2, a Club, a Magic Staff +1 (which is just a Staff +1), and four Rocks.
5 - Dart
You'll find a Dart of Hornet's Nest on the ground here.
6 - Cord / Illusionary Wall
Pulling the cord here (#6) will create an illusionary wall to the north (#6a).
7 - Cord
If you pull the cord here (#7), then you'll get teleported to a sublevel (#7a).
8 - Loot
On the ground here, you'll find Leather Armor +4 and two Rations.
9 - Cord / Gate
Pulling the cord here (#9) will open the gate to the south (#9a).
10 - Loot
On the ground here, you'll find two Potions of Invisibility, a Ring of Sustenance, and a Wand of Flesh to Stone.
11 - Shelf
You'll find the Dagger +4 "Ocnor" in the shelf here. A steel shadow will ambush you from behind when you take anything (including the dagger) from the shelf. So you can keep putting things into the shelf and then taking them back out to grind some xp if you want.
12 - Cord / Gate
Pulling the cord here (#12) will open the gate leading to the Weapons Laboratory (#12a).
13 - Loot
On the ground here, you'll find an Apple, three Potions of Poison, four Rocks +4, and a trapped Spellbook (which will deal minor damage to your party when you try to pick it up).
14 - Grate Traps / Scaladars
When you walk over these four grates (#14), long spikes will spring up from them, damaging your party and pushing you to the west. The spikes will also prevent you from walking back over the grates. Meanwhile, scaladars (#14a) will be waiting on either side to flank you. Don't try to fight the scaladars at this point, as they'll probably destroy your back row. Instead, just run through the grate traps to the other side. You can turn off the grate traps by pressing a button to the west (#17).
15 - Hidden Button
If you press the hidden button on the southern wall here, then you'll remove the wall.
16 - Button / Moveable Wall
Pressing the button on the northern wall here (#16) will remove a wall to the east (#16a).
17 - Button
You can use this button to toggle the nearby grate traps (#14, #18). If the button is "out," then the eastern traps (#14) are on and the western traps (#18) are off. If the button is "in," then it's just the opposite. There isn't any way to turn off all of the traps at the same time.
18 - Grate Traps
When you walk onto one of these grates, long spikes will spring up from it, damaging your party and pushing you backwards. You can turn off (or on) these traps by pressing a nearby button (#17).
19 - Short Sword
You'll find a Short Sword +3 on the ground here.
20 - Steel Shadow Thieves
When you step here, four steel shadows will appear to the east and west, and they'll steal all of your metallic items (because, you know, while steel shadows look slow and clunky, they're actually really quick). The steel shadows will drop your gear when they die, and then you'll get to have fun re-equipping your party. For best results, you should immediately take a step backwards when the steel shadows appear, so they'll all attack you from the front. There isn't any way to avoid this encounter.
21 - Cord
When you pull this cord, the wall to the west will disappear.
Exits
- Teleporter to
Level 1.
- One-way teleporter to B1.
- Teleporter.
- Stairs down to
Level 3.