 Did we miss anything in this location? Is there something we didn't discover?
Let us know!
Note
Did we miss anything in this location? Is there something we didn't discover?
Let us know!
Note
- Trolls resist physical attacks, but they're vulnerable to spells, especially fire spells.
Enemies
Notable Loot
- Bracers of Protection +2 (#10)
- Daggers +3 (#6)
- Polearm +3 "Zymoks" (#3)
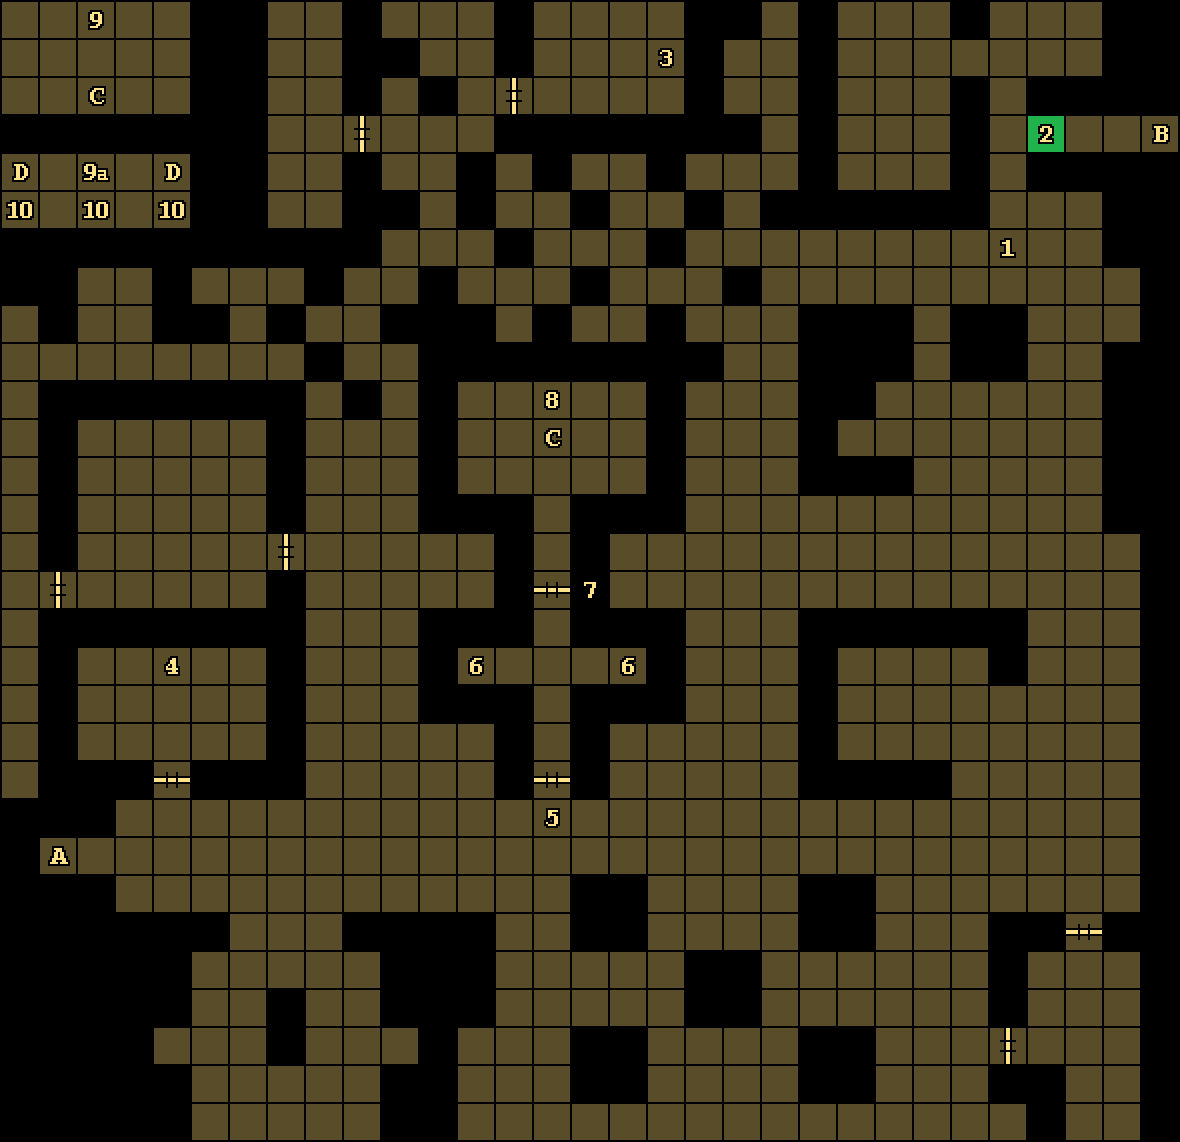
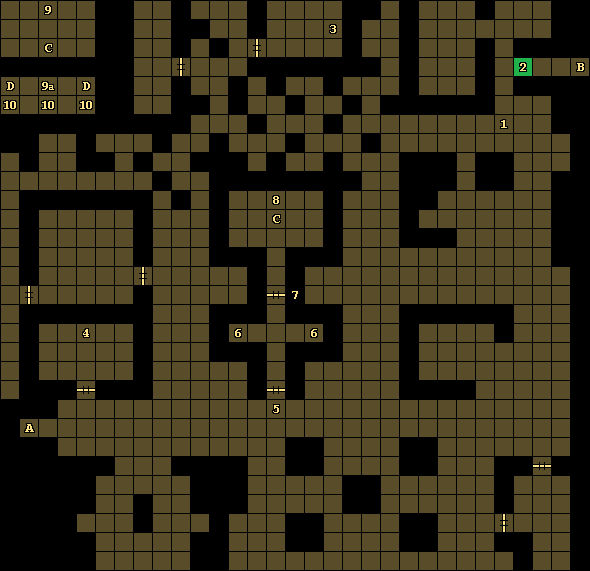
Annotations
1 - Starting Point
This is where you'll begin when you're teleported to the ruins by Acwellan in the
Mage's Guild.
2 - Moveable Wall
This wall will only disappear after you've completed the
Mages' Guild.
3 - Loot / Wand of Fear
On the ground here, you'll find the Polearm +3 "Zymoks" and a Wand of Fear. You'll need the wand in the ice chambers (#9), so be sure to pick it up.
4 - Shelf / Diamond
Inside the shelf here, you'll find a Cleric Scroll of Aid, a Cleric Scroll of Create Food & Water, a Cleric Scroll of Neutralize Poison, a Cleric Scroll of Prayer, a Cleric Scroll of Slow Poison, a Diamond, a Mage Scroll of Acid Storm, a Mage Scroll of Finger of Death, a Mage Scroll of Mordenkainen's Sword, a Mage Scroll of Power Word, Stun, and a Mage Scroll of True Seeing. You'll need the Diamond in the ice chambers (#8).
5 - Father Jon
At this spot, you'll meet a human cleric/mage named
Father Jon. If you're polite to him, then he'll tell you that he wants to cleanse the
Temple of Lathander of evil, and he'll offer to join your party.
6 - Shelves
Inside these two shelves, you'll find a Cleric Scroll of Cause Serious Wounds, three Cleric Scrolls of Heal, a Cleric Scroll of Neutralize Poison, a Cleric Scroll of Sol's Searing Orb, and two Daggers +3.
7 - Locked Door to Ice Chambers
You'll need a Crystal Key (from the
Guildhall Quarter Ruins) to open this door.
8 - Ice Puzzle
If you look at the plaques next to the shelf here, then you'll see a clue for what to put in it: "Ice, coveted ice." That is, you'll need to put a Diamond (#4) into the shelf. When you do, a teleporter (Exit C) will appear behind you. The teleporter will disappear when you return, but the Diamond will remain in the shelf. If you need to use the teleporter again, then you can just re-insert the Diamond into the shelf, and the teleporter will reappear.
9 - Fear Puzzle
If you look at the plaques next to the shelf here (#9), then you'll see a clue for what to put in it: "Do you fear for your child?" For this puzzle, you'll need to put a Wand of Fear (#3) inside the shelf. When you do, you'll get teleported to the south (#9a). The wand will remain in the shelf, so if you need to get teleported again, then you can just re-insert it.
10 - Prize Shelves
You'll find three shelves here, but the plaques in between them will warn you to "choose wisely." That makes it sound like you'll only be able to loot one of the shelves, but in reality you can loot all three. Here's how. When you loot one shelf, magical shields will pop up over the other two. But you can cast Dispel Magic on one of those shelves to loot it as well, and then repeat the process for the third shelf.
From west to east, here's what you'll find in the shelves:
- Bracers of Protection +2
- Three Wands of Cone of Cold
- Two Necklaces of Fireballs
Exits
- Exit to the
Guildhall Quarter Ruins.
- Exit to the
Temple of Lathander.
- Teleporter. This teleporter will only appear after you've completed the Ice Puzzle (#8).
- One-way teleporters to #8.