 Did we miss anything in this location? Is there something we didn't discover?
Let us know!
Notes
Did we miss anything in this location? Is there something we didn't discover?
Let us know!
Notes
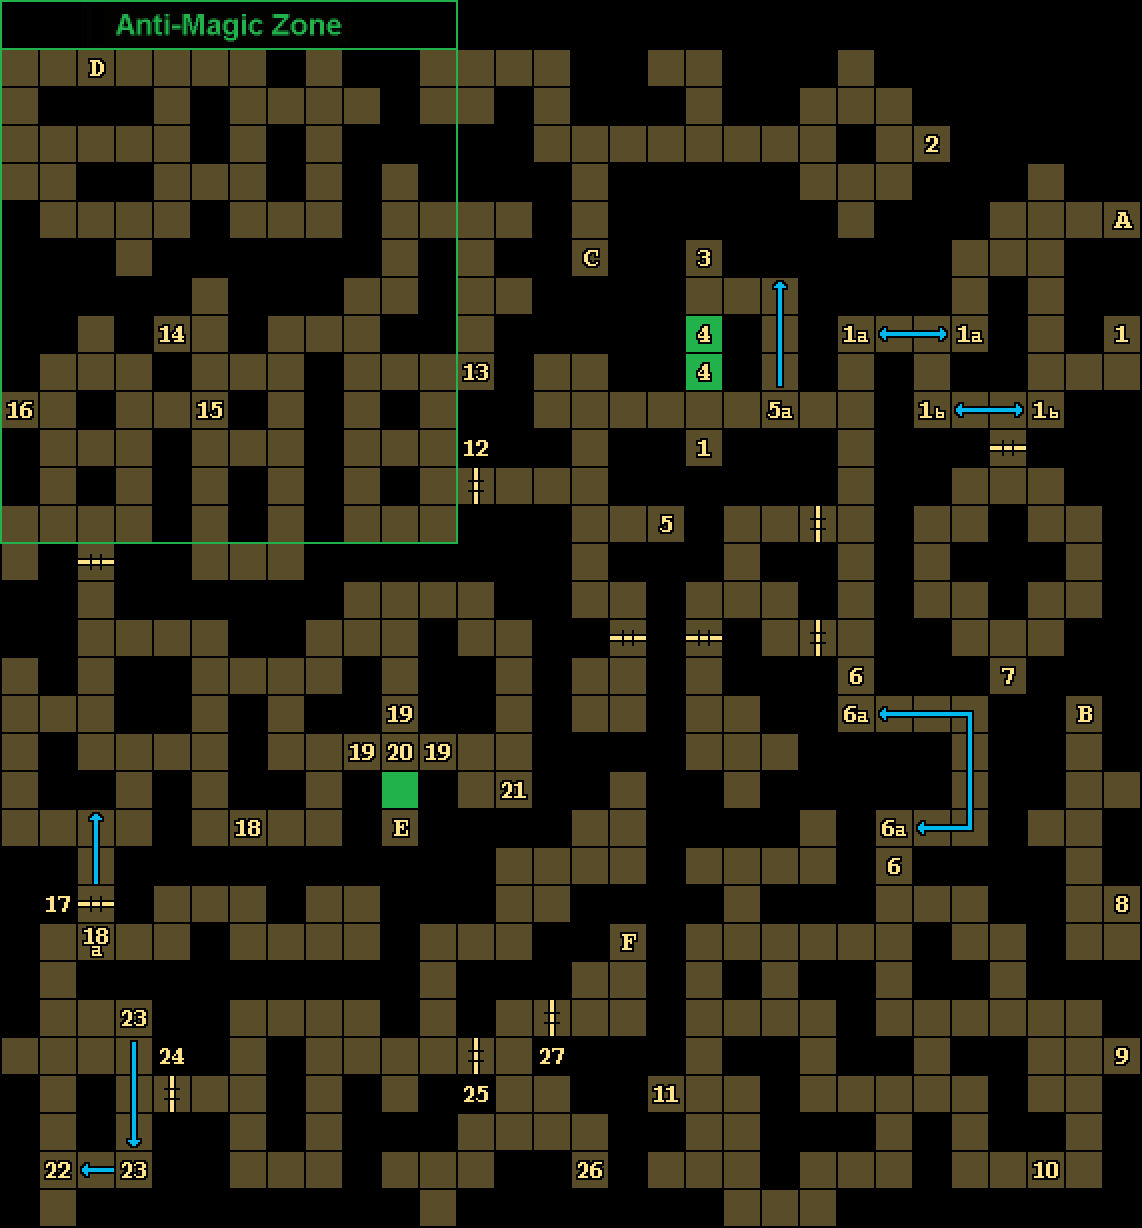
- This entire level is underwater. If you don't have a Water Breathing spell active, then your party will take 1-4 damage each time you take a step. Resting is safe, as long as you have Water Breathing active when you start. But the spell will expire at the end of the rest, and you'll need to cast it again before moving forward.
- The northwestern corner corner of this level is an anti-magic zone (outlined in green in the map above). You won't be able to cast spells while you're in this zone, and any buffs cast before entering it (like Water Breathing) will expire.
- Your goal in this level is to reach an exit back to
Level 3 (Exit F), where you'll finally be able to confront the lich Acwellan.
Enemies
- Water Elementals
- Slithermorphs
Notable Loot
- Arrows +3 (#16)
- Bracers of Protection +4 (#14)
- Daggers +2 (#9)
- Dagger +3 (#3)
- Dagger +4 "Ronco" (#15)
- Gauntlets of Hill Giant Strength (#10)
- Helm +1 (#13)
- Helm +2 (#7)
- Helm of Underwater Breathing (#16)
- Long Sword +4 (#2)
- Mace +2 (#7)
- Plate Mail +2 (#8)
- Ring of Protection +3 (#26)
- Scale Mail +2 (#11)
- Shield +3 (#8)
Annotations
1 - Levers / Water Valves
These two levers (#1) will start out stuck. To make them useable, you'll either need 22 strength, or you'll need to "pick" them with Thieves' Tools. Once freed, you'll be able to use the levers without restrictions. The levers themselves will toggle two nearby pairs of water valves (#1a and #1b), changing the flow of water between them. The valves will only push you in a direction if you walk right next to them.
2 - Loot
On the ground here, you'll find a Long Sword +4 and a Potion of Giant Strength.
3 - Loot
On the ground here, you'll find a Dagger +3 and a Wand of Ice Storm.
4 - Moveable Walls
Both of these walls can be removed by pressing a button on their northern side.
5 - Lever / Water Valve
Pulling the lever here (#5) will turn off the water valve to the north (#5a).
6 - Levers / Water Valves
Pressing either of these two levers (#6) will toggle the flow of water between the two nearby water valves (#6a).
7 - Loot / Yellow Gem
On the ground here, you'll find a Helm +2, a Mace +2, and a Yellow Gem. The Yellow Gem doesn't serve any purpose.
8 - Loot
On the ground here, you'll find a Long Bow, Plate Mail +2, and a Shield +3.
9 - Loot / Stone Key
On the ground here, you'll find two Daggers +2, a Long Sword, and a Stone Key.
10 - Gauntlets
You'll find Gauntlets of Hill Giant Strength here. They'll raise a character's strength to 19.
11 - Loot
On the ground here, you'll find two Potions of Healing and Scale Mail +2.
12 - Locked Door
To open this door, you'll need to put a Stone Key (#9) into the shelf next to it.
Beyond the door, you'll enter an anti-magic zone. You won't be able to cast spells while you're in this zone, and any buffs you might have -- like Water Breathing -- will disappear when you enter it. So you'll take drowning damage while you're exploring the zone, which means you should get in and out as quickly as possible.
Of course, you'll also find a few normal, magic-enabled squares on the edges of the zone. Take advantage of these to rest and re-cast Water Breathing.
13 - Loot
On the ground here, you'll find a Helm +1 and a Potion of Giant Strength.
14 - Loot / Copper Key
On the ground here, you'll find Bracers of Protection +4, a Copper Key, and a Wand of Lightning Bolt.
15 - Dagger
You'll find the Dagger +4 "Ronco" on the ground here.
16 - Loot
On the ground here, you'll find two Arrows +3, a Helm of Underwater Breathing, and two Potions of Healing.
17 - Locked Door
You'll need a Copper Key (#14) to open this door.
18 - Button / Water Valve
Pressing the button on the southern wall here (#18) will turn off the water valve to the southwest (#18a).
19 - Grate Trap
Stepping onto any of these three grates will push you into the square between them (#20) and shoot a lightning bolt at you from the north. To escape the location -- and the lightning bolt, if you're quick -- you'll need to press the hidden button on the southern wall, which will open the way to a teleporter (Exit E). When you return from the teleporter, the trap will be deactivated, allowing you to leave.
20 - Hidden Button
Pressing the hidden button on the southern wall here will remove the wall, granting you access to a teleporter (Exit E).
21 - Loot / Crimson Key / Red Gem
Between the shelves and the ground here, you'll find a Crimson Key, four Darts +1, Leather Armor, a Mage Scroll of Power Word, Kill, a Mage Scroll of Time Stop, and a Red Gem.
22 - Plaque
23 - Water Valves
These two water valves will prevent you from reaching the door to the east (#24). If you read the nearby plaque (#22), then you'll see a clue for how to get past them: "A wall shall serve to stay the flow." So what you'll need to do is stand one square west of the northern water valve and cast Wall of Force at it. This will turn off the northern valve for good.
Note: You can pick up a Mage Scroll of Wall of Force by visiting the Grate Trap (#19).
24 - Locked Door
To open this door, you'll need to place a Red Gem (#21) into the shelf next to it. The nearby plaque (#22) gives the clue for this.
25 - Locked Door
To open this door, you'll need to press the hidden button on the (southern) wall next to it.
26 - Loot
On the ground here, you'll find two Rations, a Ring of Protection +3, and a Shield +1.
27 - Locked Door
To open this door, you'll need to place a Crimson Key (#21) into the shelf next to it.
Exits
- Grate up to
Level 3.
- Grate up to
Level 3.
- Grate up to
Level 3.
- Grate up to
Level 3.
- Teleporter to an isolated part of
Level 1, where you'll find a Mage Scroll of Wall of Force.
- Grate up to
Level 3, where you'll finally meet Acwellan, an ancient lich.