 Did we miss anything on this map? Is there something we didn't discover? Let us know!
Zaramoth's Horns
Did we miss anything on this map? Is there something we didn't discover? Let us know!
Zaramoth's Horns is a big place, and you'll have to do plenty of fighting to get through it, but
the focus of this quest is the Archmage. You'll find him in the Archmage's Chamber at the top of
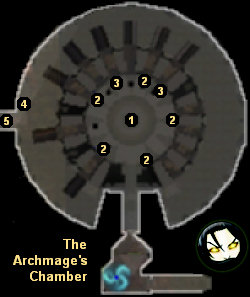
the Horns (#1).
The Archmage is a level 40 elite with 90,000 hit points. Surprisingly, his spell attacks are kind
of wimpy -- except for one. From time to time he'll activate one of the five obelisks in the room
(#2), and he'll warp it to his own use. That means that after a short delay, the obelisk will start
firing out skulls towards the center of the room. If a skull hits one of your party members, the
character will die outright.
There are two ways to deal with the skulls. If you put your party into mirror mode, then you can
simply try to dodge them. The skulls move pretty slowly, and you might be able to kill the Archmage
before he can get very many skulls into action. The other option is to attack the activated obelisks.
If you put your party into rampage mode, then you can have one of your characters (preferably a
ranged attacker) take out obelisks while the rest of the party attacks the Archmage. The obelisks
take a few seconds to charge up, and they only have 500 hit points, so you should be able to "kill"
them (that is, deactivate them) before they can shoot out a skull. Either way, as long as you can
deal with the skulls, defeating the Archmage should be no problem.
When the Archmage dies, a couple things will happen. The Archmage will drop some equipment for you
to loot, the staircase surrounding the room will move into place (allowing you to continue on towards
Valdis), and the quest will end. But don't forget to open up all of the chests on the upper level of
the chamber before you leave, including the big chest (#4) next to the exit (#5).
1 - Archmage
2 - Agallan Obelisk
3 - War Pedestal
4 - Big Chest
5 - Exit


