 Did we miss anything on this map? Is there something we didn't discover? Let us know!
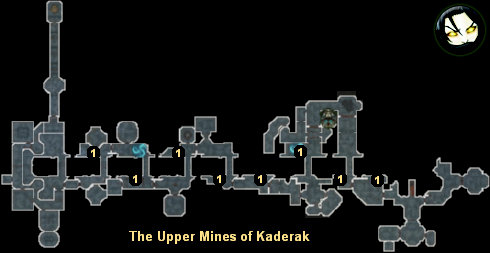
This quest has two parts. In the first part, you'll need to flip a bunch of switches (#1) in the
Upper Mines of Kaderak. Each time you flip one of the switches, a cart filled with explosives
will roll farther into the mine, and at the end it will collide with a large soul shard, destroying
it.
In the second part of the quest, you'll need to deal with a trio of Dark Wizards. You'll find the
wizards by going up an elevator at the back of the Lower Mines of Kaderak
(
The Lower Mines of Kaderak, #5).
For the most part, the three wizards will act just like the one you fought during the primary quest
Princess Evangeline. That is, they'll conjure crystal shields to protect themselves, and they'll
summon help. The difference is that the wizards will work together when they summon, and that will
allow them to bring forth a creature called a Xzeihoranth.
The Xzeihoranth is big and nasty (and hard to see), and it has 35,000 hit points. If you have a
sword and shield fighter in your party, then you might be able to handle it simply by repeatedly
provoking it while the rest of your party kills it. With other kinds of fighters (or no fighters),
you'll probably have to get creative and do a lot of dancing around to keep your party alive.
Note: While the Dark Wizards are controlling the Xzeihoranth, they won't cast any other spells. So
if you can handle the Xzeihoranth well enough, you might want to ignore it a bit and see how much
damage you can do to the Dark Wizards. As soon as one of the Dark Wizards dies, the summoning spell
will end.
Another note: Each time a Dark Wizard dies, the other wizards will return to full health, so don't
spread your attacks around. Use the "mirror" stance and keep all of your attacks together.
Once the Xzeihoranth is dead, the Dark Wizards will focus mostly on casting offensive spells on your
party, including a nasty-looking area-effect death magic spell. From our experience, these offensive
spells will take out your spellcasters right away, but they won't do a lot of damage to your fighters
and rangers (assuming that they have reasonable amounts of health steal and magical resistances). So
be sure to take plenty of potions with you when start the fight.
Note: When we played through this battle in Broken World, the Xzeihoranth only had 3500 hit points, making it a total pushover, but the Dark Wizards were more powerful, so even our shield fighter had to be careful and avoid the "death circles."
When all three wizards are dead, the protective sphere around the
Aegis of Life (Quest Item
92) will disappear, allowing you to take it. However, when you return to Lord Kalrathia to report
on what has happened, you'll find the young lord dying, and then dead, and then the quest will end.
1 - Switch


