 Did we miss anything on this map? Is there something we didn't discover? Let us know!
Background
Did we miss anything on this map? Is there something we didn't discover? Let us know!
Background
When you talk to Barkeeper Drudwyn in the Aman'lu inn
(
Aman'lu, #2), if you ask him for a glass
of his summer wine but then decline to tell him stories on the subjects he names, he'll suggest
that you should get out more, and he'll tell you about the Aman'lu arena.
Walkthrough
You'll find the arena under the Aman'lu inn. You'll first have to go down the elevator located
behind the bar, then you'll have to pull a lever to reveal a secret room, and then you'll have
to tell Tristeth the code word (given to you by Drudwyn). Tristeth will open a second secret
door, this one revealing a long staircase leading down to the arena.
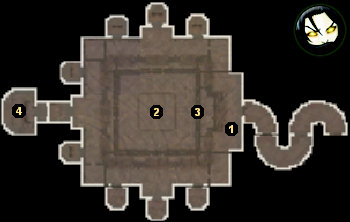
At the arena, you'll meet an elf named Daesthai (#1). He's the one who will actually trigger the
quest, and he'll also describe the arena to you if you need the information. Basically, the arena
challenge is broken down into ten rounds. To start a round, you'll need to buy a special token
from Daesthai and then proceed to the middle of the arena and click on the "arena token activator"
there (#2). That will cause the arena to lower and several enemies to appear inside and start
attacking you. To exit the arena, press the "arena forfeit lever" (#3). If you won the round,
then you'll earn a key to one of the treasure rooms surrounding the arena. The last treasure
room (#4) is attached to the ninth room.
Note: Most rounds contain at least one elite enemy. If you don't mind paying the token fee, then
you can kill the elite, pull the lever to forfeit the round, and then repeat the process. That
will net you a lot of random high-level equipment.
The table below summarizes the ten rounds of the challenge:
| Rnd | Token Cost
| Elite Enemy | Minion Enemies
| Reward
| 1 | 1000 | Level 24 decorated Taclak tracker
| Two level 22 Taclak bashers | Black key of the first (Quest Item 30)
| | 2 | 1500 | Level 26 forest Va'arth glacial avalancher
| Three level 24 forest Va'arth barbarians | Blue key of the second (Quest Item 31)
| | 3 | 2000 | Level 28 An'tul Vai'kesh seer
| Four level 26 Vai'kesh zealots | Turquoise key of the third (Quest Item 32)
| | 4 | 3000 | Level 30 undead Azunite mage hero
| Four level 28 undead Azunite soldiers | Green key of the fourth (Quest Item 33)
| | 5 | 4000 | None
| Five level 33 plagued Snowbrook Haven soldiers, one level 33 plagued Snowbrook Haven sorceress
| Yellow key of the fifth (Quest Item 34)
| | 6 | 6000 | Level 38 mythic Korven blightwalker
| Five level 36 Korven boneslayers | Orange key of the sixth (Quest Item 35)
| | 7 | 8000 | Level 34 Ganth
| Seven level 37 Morden-Durvla enforcers | Red key of the seventh (Quest Item 36)
| | 8 | 12,000 | Level 39 blazing Uhn scorcher
| Seven level 37 Uhn blasters | Purple key of the eighth (Quest Item 37)
| | 9 | 16,000 | Level 40 Qatall attendant
| Seven level 39 Qatall minions | Iron key of the ninth (Quest Item 38)
| | 10 | 25,000 | Two level 40 Qatall runeshapers
| Ten level 37 rustguards | Daesthai's gold key (Quest Item 39),
two bonus skill points
| |
The rounds can be difficult, especially if you try to complete them in Act Two, because then some of
the enemies are guaranteed to be at least five levels higher than your party. So for sure you should
create a town portal next to the arena, which will make it easier to return to your corpses should
your party die.
You can also use the portal to quickly teleport to Aman'lu so you can use the incantation shrine
there. Because the rounds are fixed, you can use the shrine to recite the chant that will best
help you in the current round. For example, in Round 7, which features ranged attackers, you could
use the
chant of ranged awareness (Chant 41), which gives you 30% ranged resistance. Or
you could use one of the chants (Chants 34, 35, 37) that instantly recharges powers for 60 seconds.
(If you're quick, the chants will give you free powers for about the first 20 seconds of the round.)
The rewards for the quest are pretty good. At the end of the challenge, you'll receive two bonus
skill points, and inside each of the treasure rooms you'll find a chest that will drop at least
rare items. The final treasure chest will probably drop two unique or set items, in addition
to the
Mysterious Token. The token can be used in the
Mysterious Quest.
Note: After the quest, Daesthai will turn into a pet shop merchant, and he'll offer to sell you the
light naiad pet.
Another note: If you want to be very careful about the equipment you find, you might want to collect
all of the reward keys, then save your game, and then open up all of the treasure rooms. Then if you
don't like what you find, you can always load your game and try again.


