 Did we miss anything in this location? Is there something we didn't discover? Let us know!
Area Note
Did we miss anything in this location? Is there something we didn't discover? Let us know!
Area Note
You won't be able to get into Ulm right away. First you'll have to start the Way of the Tiger quest
in Arindale, and then you'll have to complete the Trial of the Ancient Elders. At the end of the
trial, Lord Galebriad should give you
Galebriand's letter, and that will grant you access into
the fortress.
Once inside, you'll have four objectives: to kill Myrus Fathien and claim the
Fathien keep key
(#3), to kill Elder Demus Fathien and claim the
Fathien tomb key (#8), to free Vetrian Malvolin
from his prison (#15), and to acquire the
Argalia
armor (in the lower level of the keep). Once you've acquired the armor, you'll need to take it
back to Lord Galebriand in the House of Lords in Arindale.
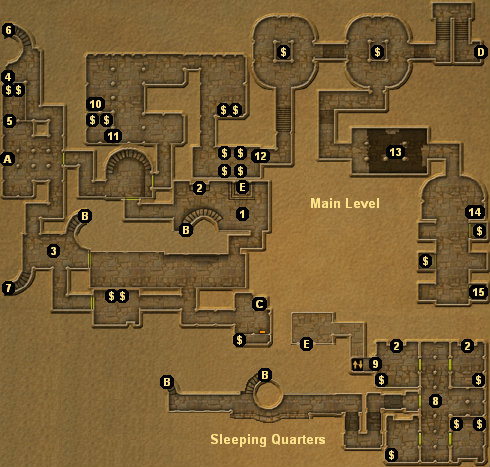
1 - Audience Chamber
When you enter Ulm, soldiers will open doors for you and basically lead you into this room. You should
see Elder Demus Fathien at his throne, but when you approach him he'll talk about how you're
about to stumble and fall on your sword. Soon after that, Demus will disappear through the secret door
behind the throne (Exit E), and the entire keep will go hostile against you.
The first battle can be nasty. All the soldiers in the audience chamber will attack you, elves might
move in from the upper level to the south, and of course random encounters will start up while you're
fighting, adding fuel to the fire. Fortunately, there is a fireplace (#2) within easy reach, and you
can run over to it and rest every time you get overly damaged. You'll heal, but none of the soldiers
attacking you will. The only downside to using the fireplace is that all equipment on the floor will
disappear, so try to pick up stuff (especially potions) when you have the opportunity.
2 - Fireplace
There are a few fireplaces scattered throughout the keep. So use them frequently to heal damage
and regenerate spells.
3 - Myrus Fathien
Myrus patrols the western side of the keep, so you might find him in here, and you might find him
elsewhere. He might even wander into the audience chamber (#1) during the big initial battle, making
it much more difficult. When he dies, Myrus will drop the
Fathien keep key, which unlocks a
few doors on this level of the keep.
4 - Loose Brick
Pushing in the loose brick will open the secret door at #5. A scout skill of 2 is enough to detect
the brick (if the brick needs to be detected at all).
5 - Secret Door
6 - Tower Stairs
The stairs lead up to a tower room where you can find a few crates and barrels, and a level 6 chest.
7 - Tower Stairs
The stairs lead up to a tower room where you can find a few crates and barrels, and a level 4 chest.
8 - Elder Demus Fathien
When you go through the door here, Elder Demus Fathien and several Fathien soldiers will attack you.
The easiest way to deal with them is to lead them back to the audience chamber (#1) and then use the
fireplace there as much as you need to. When he dies, Demus will drop the
Fathien tomb key,
which unlocks a couple doors on the lower level of the keep plus the door at #12, and he'll also
drop a magical katana of some sort plus a
silver wakizashi.
9 - Secret Door
The button that opens the door is on the wall right next to it. The button can be detected with a
scout skill of 2 (if the button needs to be detected at all).
10 - Loose Brick
Pressing the loose brick will open the secret door at #11. The loose brick can be detected with a
scout skill of 2 (if the loose brick needs to be detected at all).
11 - Secret Door
12 - Locked Door
If you have the
Fathien tomb key (#8), then you can use that to unlock the door. If you don't
have the key, then it's possible to pick the lock.
13 - Broken Columns
The floor has collapsed here, leaving some broken columns behind. Although it's not obvious, each
column has a narrow ledge around it, and so you can use the columns to jump across the broken floor.
If you miss a jump, then you'll end up in the water in the lower level of the keep.
Note: The wall is slightly contoured in the room, and your character can actually jump onto it and
walk along it to bypass the column jumps.
14 - Prison Key
Here you'll find a pair of beds propped up against the wall. One of the beds
is leaning so that you can jump onto it and then climb up it. If you do, you'll find the
Fathien
prison key hanging on the wall. The key opens the three locked cells in the prison. (You can also
pick open the cells if you want. The cell doors are protected by level 5 traps.)
15 - Vetrian Malvolin
Vetrian will tell you how he's been kept in the prison for about year, and how the jailers stopped
coming when he heard a loud "boom" a couple months ago (the sound of the floor collapsing in the room
to the west). He'll also tell you that the
Argalia
is "safely concealed inside a secret chamber down in the tombs." Once the conversation is over,
Vetrian will leave for home, and you'll never see him again. If you're playing version 1.4/1.5,
the exchange will also net you 10,000 experience and a point of honor.
Exits:
-
Exit from Ulm. You won't be able to leave until you've picked up the
Argalia
armor from the lower level.
- Spiral Staircase between the main level and the sleeping quarters.
- Lift to the lower level.
- Passage to the lower level.
- Throne / secret door. The secret room behind the throne leads up to the sleeping quarters.


