 Did we miss anything in this location? Is there something we didn't discover? Let us know!
Area Note
Did we miss anything in this location? Is there something we didn't discover? Let us know!
Area Note
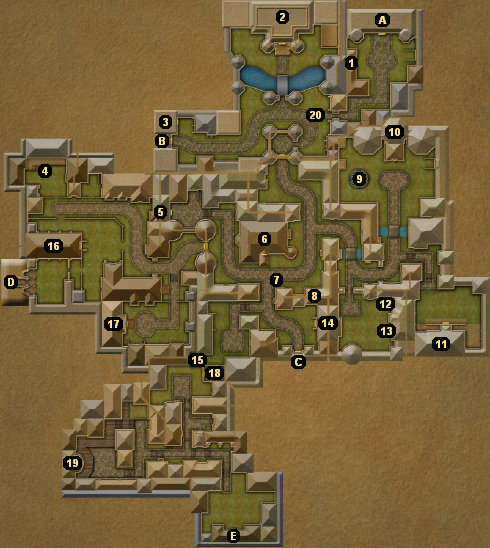
You'll start in Fargrove in front of the Abandoned Theater (Exit A). Your goal in town is to
meet up with the Celestial Order (#16). They'll tell you about the Relics of Power and ask you
to collect them, thus giving you your main quest for the game. After you've picked up
Galdryn's
Horn in the Temple Catacombs (Exit D), you'll be sent on to Arindale to continue your search
there.
While in town, you should also join up with a pair of guilds. During the game you can gain five
classes -- two first tier classes, two second tier classes, and one third tier class -- and the
first tier classes are associated with guilds. So you should join the guild represented by your
starting class (a first tier class), and you should join another guild to gain your other first
tier class. For example,
if you started the game as a fighter, then you should join the Guild of Fighters, and if you wanted
to add the adept class, then you should also join the Celestial Order. Our
classes page
gives a little more detail for how the class progression works.
Note: A lot of the doors in Fargrove are just for show (including every "door plain" one). If
you hit the SHIFT key and nothing happens, then the door isn't important.
1 - Moat Exit
Here you'll see a closed grate with a ladder behind it. This is how you can exit from the castle
moat, should you fall or jump in.
2 - Davenmor Castle
You won't be able to enter the castle right away. After completing a quest for the Celestial
Order (#16), you'll eventually end up with a letter for Lord Davenmor from Aleister at the
Arcane Emporium (#10). If you show the letter to the guards, they'll let you into the castle.
Once inside the castle, Lord Davenmor will ask you to investigate the disappearance of his
daughter Ellowyn, and he'll suggest you talk to her chambermaid Sharia. Sharia is upstairs,
and she'll readily admit to helping Ellowyn flee the castle. She'll even implicate the "girl
who works in the tavern." However, Sharia will also mention that Ellowyn was supposed to have
sent word when she reached safety, but nothing has yet arrived.
Back downstairs, when you tell Davenmor that his daughter has already escaped the castle (it
doesn't seem to matter if you give up Sharia or not), he'll ask you to talk to Emmindor in
Arindale and ask for his help in the matter. He'll also give you
Davenmor's orders.
When you show these orders to the gate guards in town, they should open the gates for you and
allow you to leave.
Note: In early versions of the game, your quest log won't update after you've delivered Aleister's
letter to Davenmor, and his quest will remain open. It's a bug, but it doesn't seem to interfere
with anything.
Another note: If you fall into the moat, you can swim to the ladder to the east (#1) and exit it
from there.
3 - Jailhouse
The jailhouse is run by a jailer named Morgus. If you're playing an early version of the game,
then from time to time Morgus will move out from behind the counter and check on the cells in
back. You can then follow him to check out the cells yourself. If you're playing a more recent
version of the game, then you'll have to talk to Morgus and pay him 25 gold to visit the cells.
In one of the cells you'll meet Derlinger. He'll offer to tell you about the Guild of Mystery
(the rogue guild) if you pay his bail of 200 gold. Derlinger's information is well worth that
amount, so head on back to Morgus to pay for his release. When you return, Derlinger will tell
you the pass phrase "Lady of Evorgrav" that will allow you to enter the Slums District (see #15),
and he'll tell you to talk to Deliah Irons in her curio shop once you've arrived there.
If you're playing the Collector's Edition, then freeing Derlinger should also net you 2500
experience and a point of honor.
4 - Lady Loriea
You'll find Lady Loriea here being attacked by some goblins, including a goblin mage named Qrink
the Stink. Loriea can't be killed, so don't try to protect her. Just kill her goblin attackers
one by one.
After the battle, if you talk to Lady Loriea, she'll give you a reward -- maybe. If you're female,
then she'll tell you about the Sisterhood, and she'll tell you to see Sister Dhara at the Apothecary
(#17). If you're playing the Collector's Edition, then regardless of your gender, you'll also receive
200 experience, 1000 gold, and a point of honor.
Note: Lady Loriea will disappear forever after you've left the yard where the battle takes place.
So be sure to talk to her first.
5 - Seer Augustus' Sanctum
You'll only be able to enter the sanctum after you've been given the key to it by Seer Paulus at
the Temple of the Circene (#16).
Once inside, you'll witness a pretty cool-looking scene. On one side you'll see a specter with
things flying around it, and on the other side you'll meet Seer Augustus, choking and asking you
for help. You won't be able to talk to Augustus yet, but he'll give you some hints about his
situation -- "the specter has disrupted my magic ward of protection" -- and how to save him --
"replace the candles upon the altars."
The candles that you'll need are some of the things flying around the specter. The other things
are flaming skulls. What you'll have to do is stand near the specter and hit the SHIFT key to grab
objects as they fly by. If you get a flaming skull, it will explode and damage you. If you get
a candle, then you'll add it to your inventory.
Once you've grabbed four candles, move to the four corners of the room. In each corner, you'll find a
celestial ward. Just hit the SHIFT key each time you get close to one to put a candle on it.
Once you've placed all four candles, the protection ward will be restored, and you'll be able
to damage the specter (it was immune to damage before). When the specter is dead, you'll finally
be able to talk to Augustus.
Augustus is dying, so he won't tell you much. In fact, he'll just ramble on about signs and how
you "will rise to confront a great evil," but mostly he'll just give you a
crystal of life
and send you back to the Temple of the Circene. If you're playing the CE, then rescuing Augustus
will net you 1000 experience and an honor point.
In the original versions of the game, the
crystal of life worked sort of like the "revive"
command, except it didn't cost you an attribute point. In MMXII, the crystal will save you an
attribute point when you revive (meaning death will no longer cost you anything), but it's also
a quest item that you can invoke by placing it in your hotkey bar. The invocation will heal you
fully and remove adverse status effects (like poison) from you, but you'll have to wait a half
hour before you can use it again.
Note: In the Collector's Edition, you'll find a locked door in Augustus' sanctum. If you pick
the lock, then in the room beyond you'll find some barrels and crates and a level 4 spell chest.
6 - Fargrove Tavern and Inn
Inside you'll meet Gileah the barmaid and Old Red Ghar the innkeeper. Ghar will talk to you
about a few things right away, but if you want to exhaust all conversation options with him,
you'll have to rent a room (50 gold), and you'll have to buy ale (5 gold) for each topic. Ghar
probably won't tell you anything that you don't already know, so you can save some money if you
want.
However, you should still rent a room. The room is on the second floor of the inn, and inside
you'll find a
heal potion, a
cure poison potion,
light chain mail, and a
spell book of magic missile.
That's worth 50 gold, easy.
Note: The room isn't as useful in MMXII, and you might want to avoid renting it so you don't end up
with the Fargrove Inn Key in your inventory for the rest of the game.
Gileah is also involved in a couple quests.
Ellowyn's Disappearance: After completing a quest for the Celestial Order, Lord Davenmor
will ask you to investigate the
disappearance of his daughter Ellowyn. One person you can talk to about the matter is Gileah.
She'll inform you that she helped Ellowyn escape, and she'll tell you that Ellowyn was supposed
to have traveled to Bolen Fields to meet up with Lord Graemare (Valdane's father).
Valdane's Location: When you speak to Lord Graemare in Bolen Fields, he'll tell you to talk
to Gileah to learn the location of an agent of his named Mara, who might be able to help you find his
son. If you visit Gileah before Fargrove is locked down by Captain Okatta, then she'll tell
you to come back later. However, after you've dealt with Okatta, Gileah will tell you that Mara went
to Harrow Fields, and that you should seek her there.
Note: If you're female, then Gileah will also mention that she'll give you a quest once you've joined
the Sisterhood, but nothing ever comes of it.
If you're playing the Collector's Edition, then in the tavern you'll also meet Taluk. Taluk will ask
you to buy him a drink, and, if you spend the 5 gold necessary to do so, he'll tell you the story of
how he and his partner discovered an ancient tomb. The tomb was full of gems and gold, but it also
contained a vampire. The vampire killed his partner, and it chased him to Fargrove. Taluk will ask
you to kill the vampire for him. If you can complete the task, then he'll offer to give you a
"fortune in gold."
The vampire encounter is described in #20. When you return to Taluk with the
vampire's heart,
he'll give you 1396 gold, and you'll also earn 2000 experience and a point of honor. However, Taluk
will warn you that other vampires might be out there, and that they've probably taken a dim view
of your actions. But as far as we can tell, you won't find any more vampire encounters in the
game.
7 - Montre Falore
Here you'll find Montre Falore being mugged by a pair of thieves. Falore tends to run away
either during or after the fight, but if you can catch up to him after dispatching the thieves,
he'll reward you with 50 gold. If you're playing the Collector's Edition, you'll also receive
500 experience and a point of honor for helping Falore out.
8 - Frybone's House
Inside the house you'll run into Frybone, who will immediately attack you. If there's a story or
quest behind the encounter, we haven't found it. Also inside the house you'll find a level 5 chest.
The chest is likely to contain
lockpicks plus other useful items.
9 - Moon Bridge
The first time you approach the moon bridge, four of Barrowgrim's men will use it to teleport
into the town. The soldiers aren't very difficult, but try to draw them off the moon bridge so
you'll have an easier time picking up the loot they drop.
You won't be able to use the moon bridge yet, but later the bridges will allow you to teleport
around the world.
10 - Arcane Emporium
Inside, you'll meet Aleister, "seneschal of magic great and small." He's a shopkeeper and a
guildmaster for the Guild of Mages. If you exhaust all conversation options with him, then
among other things you'll learn that you can get
moonstones from the Lost Lake north of
Arindale.
Moonstones will allow you to use moon bridges (such as the one at #9).
If you want to join the Guild of Mages, then ask Aleister about "guild of mages" (whether it's
your first conversation with him or not). Once you've paid the 100 gold fee, that will put you
in the guild, and Aleister will give you your initiation quest. See the Guild Quests section for
details.
Note: Aleister sells
scrolls of dispel spirit barrier. These are "letters" rather than
scrolls or spell books, and they don't seem to have any purpose in the game.
11 - House of the Dragon
Although this house seems like a guild, it's not, so go ahead and talk to Master Ahn-Po and let
him give you a quest. He'll ask you to steal a fire drake egg from the drake breeding grounds
west of Arindale, and to deliver the egg to the House of the Tiger in Arindale. You'll earn a
heraldry bonus if you do.
Note: There's a "cabinet chest" here that you can pick open for loot.
12 - Old Hetta
Old Hetta will offer to tell you your fortune for 25 gold. You should definitely take her up
on the offer. The fortune is random, but the last card you receive will give you a heraldry
bonus. There are four possible cards you can receive (one for each first tier
class), so you might want to save your game before talking to Hetta and then load until you
get a card that suits you.
13 - Silas and the Troll
On the porch of the building here you'll see Silas Arkerbey and a chained-up troll. Silas will
try to charge you 5 gold to see the troll, but there isn't any difference between paying and not
paying. If you get close to the troll and swing your weapon, you'll break its chains and then
be able to fight it.
The best way to deal with the troll is to back up while using a ranged attack, and to lead it back
towards the main part of the city where the city guards will help you. Generally, if you can
get some guards between you and the troll, the troll will stop and fight the guards, allowing
you to pelt it safely from a distance. The troll is worth about 50,000 experience, and you'll
get it whether you land the killing blow or not.
14 - Arms of Argus Armory
Nothing like a little alliteration to put you in the mood for shopping, right? Anyway, inside
the armory you'll meet Grunmeir, a shopkeeper and a guildmaster for the Guild of Fighters.
If you want to join the Guild of Fighters, then ask Grunmeir about "fighters guild" (whether
it's your first conversation with him or not). Once you've paid the 100 gold fee, that will
put you in the guild, and Grunmeir will give you your initiation quest. See the Guild Quests
section for details.
15 - Mister Gribbs
When you talk to him, Mister Gribbs will ask you for a password. You can get the password by
freeing Derlinger from the jailhouse (#3). Once you've learned the password, it should show up as a
dialogue option when you talk to Gribbs.
Speaking the password to Gribbs will cause him to open the door of the nearby shanty (#18),
allowing you access into the Slums District.
16 - Temple of the Circene
Inside the temple you'll meet Seer Paulus. He's a shopkeeper and a guildmaster for the Celestial Order.
However, unlike the other guildmasters, he won't offer to let you join his guild. You'll have to
complete a quest first.
Speaking of that quest, when you show Paulus the summons you received at the start of the game, he'll
tell you that it was Seer Augustus who sent for you, and that you should meet him at his private
sanctum (#5). He'll also give you the
Augustus sanctum key so that you can get inside.
After meeting with Augustus and learning that you're the subject of some sort of prophecy, Seer Paulus
will finally ask you if you'd like to join the Celestial Order. If you say "no" now, you can get him
to ask you again later by choosing the "celestial order" dialogue option. The initiation quest for the
order is covered in the Guild Quests section.
After the conversation, Seer Paulus should lead you to the chambers of the Celestine, the "living
apostle of the Celestial Order." The Celestine won't be much more helpful than Augustus, mentioning
your "extraordinary path" and how you're "guided by a unique configuration of the stars." But she will
give you your main quest for the game, to seek out the hidden Relics of Power and protect them from
the Forces of Darkness. To that end, the Celestine will give you the
cemetery key, which will
allow you to enter the Temple Catacombs and claim
Galdryn's Horn, the Relic of Power stored there.
After acquiring the horn, when you return to the Celestine, she'll tell you to talk to Aleister in
the Arcane Emporium (#10). If you're playing the Collector's Edition, you'll also receive 2000
experience and a point of honor. Aleister, in turn, will tell you to seek out an elven
mage named Emmindor in Arindale, for only he "may know how to unlock the secret of the horn." Aleister
will also ask you to deliver a letter to Lord Davenmor (although you'll have to ask him about "letter"
to actually get the letter). You'll need to deliver the letter before you can exit Fargrove.
Note: On the lower level of the temple you can find the Altar of Peace. In early versions of the
game the altar didn't do anything, but in the Collector's Edition you can use it to heal your
character.
Another note: If the door to the Celestine is closed, just talk to Seer Paulus and he should open it
for you again.
17 - Fargrove Apothecary
Inside, you'll meet Lady Chana, who sells potions and nether kataals. If you're female, and if you've
rescued Lady Loriea (#4), then Lady Chana will reveal herself to be Sister Dhara, and she'll ask you if
you'd like to join the Sisterhood. Like the House of the Dragon (#11), the Sisterhood seems to be a
guild but isn't, and so you can join it without worrying about locking yourself into something you
can't get out of.
If you join the Sisterhood, then Sister Dhara will ask you to deliver a
special package to
Elvithra in her apothecary shop in Arindale. This quest, and the other Sisterhood quests, are
covered in the Guild Quests section.
18 - Shanty
The only way into the Slums District is through this shanty, and Mister Gribbs (#15) will only open
the door for you if you know the password. You can get the password from Derlinger in the jailhouse
(#2).
Note: In some versions of the game, the fireplace in the shanty actually works.
19 - Deliah's Curio Shoppe
Inside you'll meet Deliah Irons, a shopkeeper and a guildmaster for the Guild of Mystery (the
rogue guild). Not just anyone can join the Guild of Mystery -- to get in you'll have to pass a
pre-initiation test. Nicely, anyone can take the test and then elect to join the guild or not.
The test involves Custard Mansion (Exit E). One night, it is rumored, the Custards killed each
other (she by chopping off his head, he by poisoning her) but afterwards nobody found their
treasure, which was rumored to be buried somewhere on the property. For the test, you'll have to
enter the mansion and find a map leading to the treasure. If you accept the quest, then Deliah
will give you a key to the mansion.
The mansion is fairly small, and it is covered in its own section. Once you've acquired the
Custard treasure map and shown it to Deliah, she'll offer to let you into the guild for
500 gold. If you pay the fee, then you'll be given the real initiation quest for the guild.
That quest is covered in the Guild Quests section.
Note: The curio shoppe is on the second floor of the building. You can only reach it by using
the walkway that leads to it from the north. Under the curio shoppe you'll encounter a bunch
of thieves, and in the Collector's Edition you'll find that they're guarding a level 6 chest.
20 - Mystery Woman (Collector's Edition)
You'll find a mystery woman pacing the streets here. If you talk to her, she'll offer to "show you
some sights" and she'll claim that "we could have a good time" if you visit her in her house near
Custard Mansion (Exit E).
This is a trap, just in case it wasn't obvious from looking at the woman's overly pale skin. When
you approach Custard Mansion, the woman will reveal herself to be a vampiress, and she'll attack you.
The battle with the vampiress is tough. The vampiress summons minions (including spiderlings and bats),
casts spells, knocks you unconscious, turns invisible, and, every so often, turns to vapor and moves
herself to a different part of the Slums. And if that wasn't enough, you'll face a constant stream
of thieves in the Slums, no matter what you set your encounter frequency to in the options menu.
So we wouldn't recommend that you face the vampiress right away. Go do the quests for the Temple of
the Circene (#16) first, and try to bulk up your character a little. When you do face the vampiress,
you'll pretty much have to cheat, or else you'll probably never be able to defeat her. So each time
the vampiress puts you to sleep, press the ESCAPE key to bring up the save game menu, and then leave
the menu there until your character wakes back up. (Bringing up menus stops fights but doesn't pause
the game.) You should also save your game regularly during the fight, because it'll take a long time
to whittle away the vampiress's health.
When the vampiress dies, she'll drop a
crypt dagger (that's what kept putting you to sleep), a trinket called
wings of night, and a
vampire's heart. If deliver the heart to Taluk in the Fargrove
tavern (#6), he'll give you a reward. You'll also earn around 50,000 experience for the vampiress's
death.
Exits:
- Abandoned Theater.
- West Gate. The gate starts out locked, and you'll have to complete a quest for the Celestial Order
(#16) before you can leave the town. Use this gate when you want to go to Arindale.
- South Gate. The gate starts out locked, and you'll have to complete a quest for the Celestial Order
(#16) before you can leave the town. Use this gate when you want to go to Skuldoon.
- Temple Catacombs. You'll eventually get a key from the Temple of Circene (#16), which will allow
you to get in. You'll start out in a small graveyard before getting to the catacombs (aka mausoleum)
itself. See the Temple Catacombs section for details.
- Custard Mansion. You'll get the key to this mansion from Deliah at Deliah's Curio Shoppe (#19).
In early versions of the game, the door was labeled "door exotic," but now it should be called
"Custard Mansion -- locked." See the Custard Mansion section for details about what to do inside.


