 Did we miss anything in this location? Is there something we didn't discover? Let us know!
Area Note
Did we miss anything in this location? Is there something we didn't discover? Let us know!
Area Note
All of the treasure rooms in the southern part of the level will generate large fights. For the
"outer" treasure rooms, your best bet is to stand in the doorway so you'll only have to face a couple
enemies at a time -- that is, unless the enemies inside are poison slimes, and then you should jump
back into the water and hit them with ranged attacks. The slimes won't follow you into the
water.
The "inner" treasure rooms are traps. After you've entered the room, the door will shut behind
you, and a wraith will attack you. Several skeletons will also be summoned into the room over
time, and while they'll attempt to help the wraith, mostly all they'll do is get in the way
of the wraith's spells. The door to the treasure room should open again after you've defeated
the wraith.
Note: In early versions of the game, if you load your game while fighting a wraith in one of the
inner treasure rooms, then the door to the treasure room will never open again, and you'll have
to load your game from some point before the fight. This appears to have been fixed in versions
1.4/1.5.
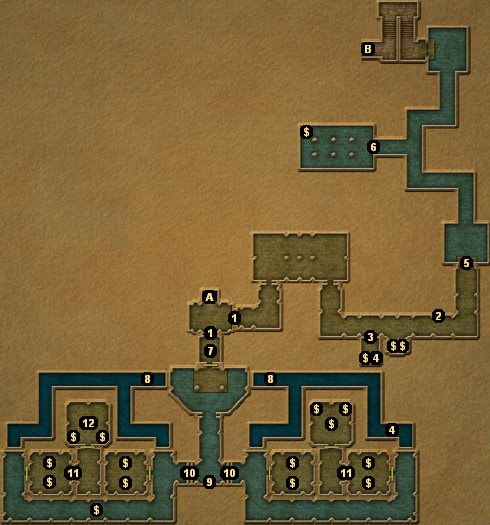
1 - Locked Doors
You'll need the
Fathien tomb key to open these doors.
2 - Loose Brick
If you push the loose brick, then you'll open the secret door at #3. A scout skill of 2 is enough
to detect the brick (if the brick needs to be detected at all).
3 - Secret Door
4 - Skull Lever Rods
You'll find
skull lever rods in two places on this level of the keep. They can be used in the
mechanism at #9.
5 - Closed Grate
You can only open the grate by pulling the lever just south of it. That means
you'll need to approach the grate from Exit A rather than Exit B.
6 - Half-Closed Grate
You can swim under the grate to get into (or out of) the room. The room is where you'll end
up if you miss a jump while attempting to cross the broken columns in the main part of the keep.
7 - Lever Room
You'll find four levers in this room. The idea is to put the levers into the correct positions so that
the door to the south will open. Since there are only four levers, there are only 16 combinations for
how you can position them, and so you can probably solve the puzzle just through trial and error. But
if that doesn't work, place the northeastern and southwestern levers in the "up" position, and place
the northwestern and southeastern levers in the "down" position.
Note: Whatever you do, don't close the door after you've positioned the levers to open it. If you end
up on the southern side of the door with the door closed, then you'll be stuck without any way to
escape.
8 - Underwater Passages
You'll have to swim underwater to go through the passages to the east and west of the platform. If you
want to explore everywhere then you'll have to do this, but if you just want to grab the
Argalia (#12)
and get out of the keep, then use a
skull lever rod (#4) on the west slot in the mechanism
(#9) to open the west door (#10). That will allow you to bypass the underwater passages and just wade
through the water to get to the
Argalia.
Note: If you use the underwater passages, then you'll probably run out of air before being able to
surface. If that happens, use
heal potions as necessary to keep yourself alive.
9 - Mechanism
The mechanism has two slots. If you insert the
skull lever rods (#4) into them, then
you'll be able to use the resulting levers to open the grates to the east and west (#10).
10 - Closed Grates
You'll only be able to open these grates by finding rods for the mechanism at #9.
11 - Secret Doors
You'll find the buttons to open these doors on the walls right next to them. A scout skill of
3 is enough to detect the buttons (if they need to be detected at all).
12 - Argalia of Eryldorn
The wraith in this treasure room won't appear until after you've taken the armor.
Exits:
- Lift up to the main level.
- Stairs up to the main level.


