 Did we miss anything in this location? Is there something we didn't discover? Let us know!
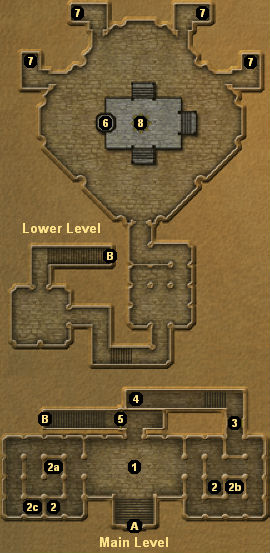
1 - Minotaur Spawn Point
Did we miss anything in this location? Is there something we didn't discover? Let us know!
1 - Minotaur Spawn Point
Minotaurs will spawn here when you first enter the sanctum, and stepping onto some of the pressure
plates (#2) will spawn them as well.
2 - Pressure Plates
You'll need to step on three of the pressure plates in the correct order to open the grates at #3.
3 - Closed Grates
If you look through the three grates here, you might see some rune images lit up on the far wall. This
is a hint for how to open the grates. You must step on the pressure plates with the images of the
runes on them. That is, you must step on the plates in this order: purple (#2a), orange (#2b), and then
blue (#2c). That will cause the three grates to rise, allowing you access to the final pressure plate
(#4).
4 - Pressure Plate
When you step on this pressure plate, the closed grate at #5 will open.
5 - Closed Grate
You'll have to solve the pressure plate puzzle (#2 and #3) and then step on the pressure plate at #4 to
open this grate.
6 - Fire
You'll have to jump up to the edge of the fire to actually use it.
7 - Soul Spheres
Soul spheres are required to defeat Ikrella the Witch (see #8). Each
soul sphere is guarded by
a demon gazer, which is a more powerful version of the fire gazer that you might have seen before.
Since you'll need to grab the
soul spheres while dealing with Ikrella, you're probably best
off just ignoring the gazers, and doing your best to run past them on your way to and from the
soul
spheres. The demon gazers won't chase you (it doesn't look like they can fit through the
doorways).
8 - Confrontation
When you arrive here, you'll find three people on the platform in the center of the room: Ellowyn
(imprisoned in a ward of confinement), Ikrella the Witch, and Lord Barrowgrim. Ikrella will immediately
begin taunting you. Lord Barrowgrim will chastise the witch, but to no avail, and he'll quickly leave
for Talendor. That means you'll have to battle the witch one-on-one, which is no easy thing.
If you've chosen Sisterhood classes for your character, then Ikrella might seem a little familiar.
She's like a more powerful version of Greneuvenia the Pox (from the War Witch ascension quest).
Ikrella casts a lot of nether spells, including "slow," "gripping vines," "choking cloud," and "locust
swarm." If you have the
gas mask from the Naga Temple, then you can ignore the locusts and
the clouds, but the vines can be a major problem. Usually, they'll disappear as soon as you're hit,
but sometimes they won't disappear ever, and you'll have to load your game. So be sure to save your
game during the battle, and if you have
crystal wards of petrification or
crystals of
unpetrify, so much the better.
Of course, Ikrella is no ordinary witch, and simply hacking on her won't work. Every so often while
you're fighting Ikrella, she'll teleport to a different part of the room, and she'll become fully
healed. Fortunately, Ellowyn will tell you how to defeat her. You'll need to take each of the four
soul spheres (#7) and throw them into the fire (#6). (You'll have to jump up onto the edge of
the fire to do this.) Once you've placed all four
soul spheres into the fire, Ikrella will stop
regenerating, and you'll be able to kill her. Once Ikrella is dead, she'll drop a fifth
soul
sphere, and dropping that one into the fire will free Ellowyn.
After the battle, Ellowyn will describe how she came to be imprisoned by the witch, and how, in an
effort to protect Vadane, she gave her word to wed Lord Barrowgrim. She'll then ask you to travel to
Fargrove and inform Lord Davenmor of what's going on. However, when you tell Ellowyn "it is the day
of days" she'll hand over the
Ring of Protection to you,
and Emmindor will arrive. Emmindor will send Ellowyn to Fargrove, where she'll be able to deliver her
message herself, and he'll send you to Talendor, where you'll finally be able to face Lord Barrowgrim.
Note: Emmindor will teleport you away right after you've spoken to him. So if there's anything left in
the room that you'd like to kill (such as those demon gazers), or if you need to set up your equipment
for the upcoming battle (such as putting on the
Ring of Protection), then you should do that first. It's also possible Emmindor will just speak to
you on his own, not giving you the chance to do anything.
Another Note: For a much easier time in the battle against Ikrella, simply go to the pressure plate
at #5. There's a window there that overlooks the platform where Ikrella is standing, and you can
attack her from there with ranged attacks. Ikrella won't disappear or regenerate or do anything but
stand there if you attack her from the window, and she'll still drop a
soul sphere when she
dies. The only downside to this approach is that it will mess up the dialogue you would have seen
if you had approached her normally.
Exits:
- Main door to the sanctum.
- Stairs between the main level and the lower level.


