 Did we miss anything in this location? Is there something we didn't discover? Let us know!
Shadow Realm (1)
Did we miss anything in this location? Is there something we didn't discover? Let us know!
Shadow Realm (1)
When you go through the shadow gate that leads to the final area, you'll start in a room with three
shadow gates. All three gates will take you to the same place
-- another set of those purple islands in the shadow realm. To get out of the area, go through the
eastern gate, then the southern gate, and then the western gate.
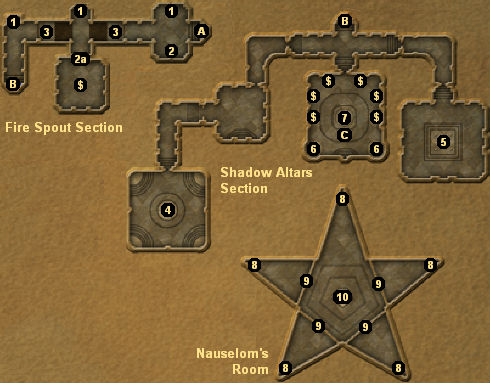
Fire Spout Section
You'll find yourself at the eastern end of a long corridor. Your objective here is to get to the
western end. However, unlike some similarly-themed puzzles in the Shadow Ruins, this one is pretty
easy. Simply press the SHIFT key at the templar knight statues (#1) to briefly raise the platforms
(#3) to shorten the gaps so you can jump to the west. Complicating matters slightly is that fire
spouts line the walls and spew out fire every few seconds, but the fire spouts do little damage, and
they're mostly there to distract you rather than hurt you.
If you miss a jump and land down below, you'll have to head north, climb a ledge, and then enter a
shadow gate leading to another set of purple islands. To get out of this set, go through the eastern
gate, then the eastern gate, and then the western gate.
Finally, if you use the southern templar knight statue (#2), then you'll briefly open a secret door
(#2a). To get to the door in time,
you'll have to use the northern statue (#1), then use the southern
statue (#2), and then quickly jump to the west and run to the door. Inside, you'll
find some crates and a level 9 trinket chest.
Once you're finished with the section, head through the shadow gate on the western side (Exit B) to
move to the next section.
Shadow Altars Section
Your goal in this section is to acquire two
shadow crystals (at #4 and #5) and place them in the
shadow altars (#6) in the central room. Once you've done that, light beams will activate the central
altar (#7), and a staircase will form around it. At the bottom of the staircase you'll find a shadow
gate that leads to the next section.
The eastern
shadow crystal (#5) is easy to get. All you'll have to do there is defeat an Athena
giant and grab the crystal from its corpse when it dies.
The western
shadow crystal (#4) is more complicated. In that room you'll meet a pair of shadow
wraiths that can't be killed, and you'll find the crystal floating in the air near the ceiling. The
center of the room is actually some sort of weird wind machine, and it will blow you around when you
get near it. What you'll have to do is jump towards the center of the room, let the wind machine push
you upwards, and then grab the crystal. There seem to be two ways to do this: do a backflip into the
machine, or else take a running leap into the machine from one of the platforms in the corners of the
room. Once you've grabbed the
shadow crystal, you'll then be able to kill the two
shadow wraiths if you want.
Shadow Realm (2)
Here it is -- the last set of purple islands in the game! Hooray! This set is fairly large, but if
you head through the eastern gate, then the southern gate, then the northern gate, then the western
gate, and finally the southern gate, you'll get through it and enter the last section, where you'll
find the Lord of Shadows waiting for you.
Nauselom's Room
You'll find yourself in a room shaped like a pentagram, with a "plume of protection" in the center (#10).
Nauselom, the Lord of Shadows, will also be there, and he won't be thrilled to see you. At the start
of the battle, what you'll have to do is dodge or block Nauselom's spells, and then attack him in
between casts. Once you've done enough damage, he'll disappear and drop a
shadow stone.
You can use this "intermission" to finish killing off any of Nauselom's minions who happen to be
left in the room, and to save and heal. But once you put the
shadow stone upon a guardian
knight statue (#8), one of the walls (#9) will disappear, revealing a new guardian knight statue,
and you'll have to battle Nauselom again to get another
shadow stone.
After placing five
shadow stones upon the statues, two things will happen. The "plume of
protection" will disappear and be replaced by the
rod of divinity (a Relic of Power), and you'll be able to start fighting Nauselom for real.
Nauselom can be tough to fight. He casts a lot of spells, he summons minions (including wraiths and
banshees) to help him, and he's resistant to magic.
However, we've heard some conflicting reports about what it takes to kill Nauselom. Some have said
that only the
rod of divinity
works against him, while others have claimed that they've had success with
regular weapons. From what we can tell, you have to hit Nauselom once with the
rod of divinity
(to stop him from regenerating his health), but after that, you can use anything you want to
kill him.
Note: You don't have to attack Nauselom's minions, unless you find them really annoying. Nauselom will
spray so many spells around that he'll kill them himself.
When Nauselom dies, he'll drop a
scepter of shadows. If you're playing the Collector's Edition, then he'll also drop a
shadow lord amulet. If you take that amulet to Staroxia in the Forbidden Lands, then
she'll offer you a quest to become a shadow lord (a third tier class).
Finally, after the battle a "gate of ascension" will appear in the center of the room (#10). You can
use the gate to exit from the Shadow Ruins.
Note: In MMXII, the battle with Nauselom is a little bit buggy, and you'll be able to take the
Rod of Divinity as soon as you enter the room.
1 - Templar Knight Statues
2 - Templar Knight Statue
3 - Platforms
4 - Shadow Crystal Room
5 - Shadow Crystal Room
6 - Altars of Shadows
7 - Altar of Shadows
8 - Guardian Knight Statue
9 - Wall
10 - Plume of Protection / Relic / Gate of Ascension
Exits:
- Shadow gate to the Main Room in Kingston's Area of the ruins.
- Shadow gates between the Fire Spout Section and the Shadow Altars Section.
- Shadow gate to the shadow realm (2). The stairs to this gate will only lower after you've
placed shadow stones in the nearby altars of shadows (#6).


