 Did we miss anything in this location? Is there something we didn't discover? Let us know!
Paintings Section
Did we miss anything in this location? Is there something we didn't discover? Let us know!
Paintings Section
You'll start out in a small room with four paintings on the walls (two of knights and two of monsters),
plus shadow gates to the east and west. This is a maze area. Your objective here is simply to make
your way to the next section. To do that, just go through the shadow gate closest to the knight
paintings in each room. You should find your way to the shadow realm relatively quickly.
Shadow Realm
Unless you haven't activated any rune glyphs yet, these islands should look all too familiar. Your
objective with this set is the same as with all of the other sets: make your way through the islands
until you find the exit gate.
For this area of the shadow realm, go through the western gate, then the southern gate, then
the northern gate, then the southern gate, and then the eastern gate.
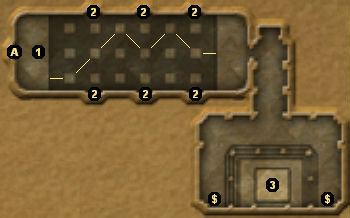
Wind Jumping Section
You'll start in this area at #1. Your goal here is similar to that of the jumping puzzle in the
Shadow Ruins hub: you must jump from rune to rune to reach the opposite side of the chamber.
If you
jump to the right rune, then you'll be blown to the next rune in the sequence. If you jump to the wrong
rune, then you'll be blown close to one of the Athena bashers (#2), which will proceed to fight you until
it has knocked you into the area below. If you get knocked down or make a bad jump, then you'll find a
shadow gate down below on the eastern side. It will take you back to #1.
The idea of the puzzle is to end up at the middle rune each time you come to a set of Athena bashers
(so they can't reach you). To reach that safe rune, you must jump on the same rune in the previous
row. Then the wind will kick in and blow you to the safe rune. In other words, you must first jump
to the dark blue rune, then the light blue rune, and then the dark blue rune.
Note: You can also kill the Athena bashers. They won't move, so you can just sit a safe distance away
and pelt them with ranged attacks, or you can run up to them and attack them until you get knocked
down, and then run up to them again and repeat. Each basher is worth about 400,000 experience, so you
can gain 2-3 levels if you kill them all.
After making it to the eastern side of the puzzle room, it's just a short walk to the rune glyph (#3).
Once you've activated it, no new shadow gate will show up to take you back to the Shadow Ruins hub
(this might be a bug). So you'll have to return to the wind jumping puzzle chamber, jump down to the
bottom of the chamber, use the shadow gate down there to return to #1, and then use Exit A to return to
the hub.
1 - Wind Jumping Puzzle
2 - Athena Bashers
3 - Rune Glyph
Press SHIFT to activate (light up) the rune glyph.
Exits:
- Shadow gate to the Shadow Ruins hub.


