 Did we miss anything in this location? Is there something we didn't discover? Let us know!
Moon Bridge
Did we miss anything in this location? Is there something we didn't discover? Let us know!
Moon Bridge
After defeating Ikrella the Witch in the Irynthabl Sanctum, Emmindor will show up and teleport you to
the moon bridge in Talendor. When you arrive there, you'll be greeted by Lord Barrowgrim and a bunch
of his soldiers. The soldiers are the same ones that you've fought in Talendor before -- which means
that they should pose absolutely no threat to you now, especially if you're wearing the
Ring of Protection.
Lord Barrowgrim is more challenging, but only because he has more hit points. Strangely, you'll find
that he's using a
fangtip blade, a low-level weapon that might not even dent you. The only thing Barrowgrim does
that's interesting is summon a troll to help him, but summoned trolls aren't as powerful as regular
trolls, and all they'll do is distract you for a few seconds and extend the length of the battle.
If you're playing the Collector's Edition, then you'll also face a couple of huge war trolls in the
battle. The war trolls are more powerful versions of regular trolls, and so you might need to do
some bobbing and weaving to defeat everything. We'd recommend that you take out the soldiers and
non-summoned trolls before concentrating on Barrowgrim.
Chamber of Spirits
When you place the
Ring of Protection onto the last remaining pedestal, Galdryn's visage will appear and congratulate
you, but then Volgar will show up as well. He'll thank you for collecting the relics for him, and then
he'll disappear with them all! Immediately after that, Galdryn's visage will tell you to chase him,
and you'll be teleported to the Demon Realm.
Note: It's a one-way trip to the Demon Realm, so if you need to identify some equipment or buy
some potions, you should do that before placing the
Ring of Protection on its pedestal.
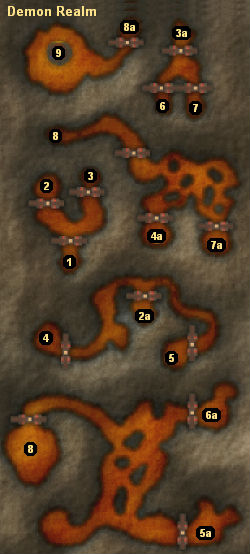
Demon Realm
The demon realm is very dark. If you're playing a version earlier than 1.3, then you'll probably
have all sorts of trouble moving around and seeing where you'll need to go. Hopefully, the map
shown above will make things easier for you. If you're using version 1.3, then the automap feature
should make this a non-issue, and you should be able to move around using the automap.
Here's what you'll need to do. You'll start out south of a gate at #1.
To the left and right of the
gate you should see two spawn points. After you've killed the demons / succubi / gazers / cacodemons
that appear, the gate should open, allowing you to find... another gate. Beyond this gate you'll find
a teleporter that will take you to another area where you'll find... another gate. Do you sense the
pattern yet? You'll have to go through several gates and teleporters. The path to the end branches,
but it doesn't matter which route you take.
After the last gate (#8), you should come upon Volgar and a demon named
Shaduroth (#9). You might even notice Galdryn nearby, encased in a "crystal of confinement." Volgar
will threaten the demon with the Relics of Power, and he'll demand that he be given a drink from the
Cup of Immortality. But the demon will inform Volgar that he doesn't have the cup, that Volgar can't
even use the Relics of Power, and that Volgar has been invited to lunch -- as the main course.
With Volgar dead, the relics will drop to the ground. You should immediately pick them up and wear
the
Ring of Protection
and the
Shield of Retribution.
If you're playing a version of the game prior to 1.3, then Shaduroth will be a pushover, and you'll be
able to kill him easily if you're wearing the
Ring of Protection
or even the
gas mask.
If you're using 1.3 or later, then Shaduroth will be tougher to kill, since he'll get a more powerful
version of the "locust swarm" spell, plus cast nova spells and summon demon minions. But
still, with all the gear you should have by this point, he won't be able to damage you that much
(just buffet you around mostly), and so the battle will simply be longer rather than more
difficult.
Note: If you have trouble with Shaduroth, then move over to Galdryn and invoke
Galdryn's Horn.
Galdryn will break out of the crystal, and he'll help you in the battle.
After the battle, if you haven't freed Galdryn yet, then do that. Galdryn will take the time explain
how he tricked Volgar and Shaduroth, and how he manipulated the Celestial Order to get you involved.
Eventually, you'll be teleported to Davenmor Castle, you'll be named Lord of the Order of the Five
Relics, and the game will end.
Another note: Although the ending message will claim that you can continue exploring with your
character, this doesn't seem to be the case.
1 - Starting Point
2 - Teleporter
The teleporter will take you to #2a.
3 - Teleporter
The teleporter will take you to #3a.
4 - Teleporter
The teleporter will take you to #4a.
5 - Teleporter
The teleporter will take you to #5a.
6 - Teleporter
The teleporter will take you to #6a.
7 - Teleporter
The teleporter will take you to #7a.
8 - Teleporter
The teleporter will take you to #8a.
9 - Final Battle


