 Did we miss anything in this location? Is there something we didn't discover? Let us know!
Area Note
Did we miss anything in this location? Is there something we didn't discover? Let us know!
Area Note
Your objective in the Tomb of Souls is to make your way to Voraatus and then "bargain" with him to get
Vartugg's eye back. You'll have to face some tough creatures in the tomb, including many demons,
so if you haven't purchased any
crystal wards of fire from the Temple of the Empyrean in
Arindale, you might want to do so before going inside.
You'll also find several high level chests inside the tomb. Remember that chest contents are
semi-random, so if you save your game before opening one, you can load your game until the chest
gives you something that you need. But be wary; many chests here release creatures (typically bats
and succubi) when they're opened.
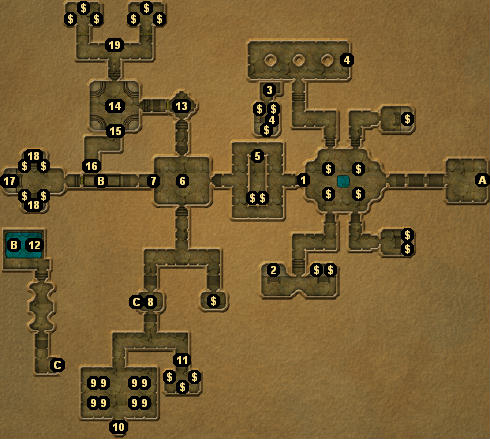
1 - Locked Door
You'll need to acquire a
gold key (#2) to unlock the door.
2 - Sarcophagus
When you open up the sarcophagus, a demonic guardian will pop out.
The guardian will drop a
gold key when it dies.
You can use the key to unlock the door at #1.
3 - Secret Passage
You must press one of the nearby buttons (#4) to open up the secret passage.
4 - Buttons
5 - Secret Door
The secret door will open once you've moved close enough to the next room. A bunch of
mummies and skeletons will come out of the secret room and attack you.
6 - Enkhar of Evil
"Enkhar" must come from the same dictionary that contains "chunneler." Anyway, the enkhar is some
sort of lock, and when you place the
eye of evil (#10) in it, the door to the west (#7)
will open.
7 - Locked Door
You must place the
eye of evil (#10) in the enkhar of evil (#6) to open the door here.
8 - Sepulcher
When you approach the sepulcher, several succubi and bats will jump out of it and attack you.
9 - Sepulchers
The sepulchers can't be opened. Enemies will pop out of them when you take the
eye of evil (#10).
10 - Eye of Evil
You'll need the eye to open up the door at #7.
11 - Locked Door
To open this door, you'll need to have the
demon key from the Naga Temple.
In the room beyond, you'll discover the Fiend of Ghazbu. The fiend is a big, bad demon. It will cast
two different fire spells, plus some other spell. If you have a decent level of celestial magic, then
you can use
crystal wards of fire to block most of the fire damage, but the demon will still
be tough to kill, just because its endless stream of spells will continually knock you back and knock
you down.
However, there's a trick for the demon. If you retreat back the way you came, the demon will get
stuck at the sepulcher (#8). Then you can stand in the hallway to the north and zap it with
ranged attacks. Strangely, not only will the demon not move beyond the sepulcher, it will also
largely forget that it can cast spells, and so you'll be able to attack it in peace, except for
the odd random encounter that will pop up during the fight.
The demon won't drop anything when it dies, but if you can kill it, you'll receive well over
a million experience.
Note: The fiend was changed in the Collector's Edition. It now summons demons to help it, and
it was given an insanely powerful magic attack. This makes it much tougher to kill (the
summoned demons will cause it to move around, taking it out of the "sweet spot" behind the
sepulcher). If you can kill it at all, it will probably take lots of loading and saving.
12 - Treasure Chest
The chest is underwater. Inside the chest you'll find a
skull key.
You can use the key to unlock the door in the fire room (#13).
13 - Fire Room
Two statues will blast fire into the room every time you enter. That sounds bad, but running into this
room is an excellent way to get rid of any pesky bats that might be following you.
The door on the western side of the room starts out locked. The lock isn't right next to the door, but
it's nearby, in the northeastern corner of the room between the two fire statues. To unlock the door,
you'll need the
skull key (#12).
14 - Watcher Challenge
In order to meet with Voraatus, you'll have to pass a challenge in this room. To take the challenge,
talk to the Watcher on the western wall and agree to its terms. You'll have to defeat four spirit
fiends (demons) without healing yourself. No doubt there are a lot of strategies that work here, but
we just used a
crystal ward of fire before talking to the Watcher, and then we whacked away
at the spirit fiends until they were dead. Summoning is probably effective here as well.
Once you've defeated the fiends, talk to the Watcher again, and it will open the secret door to the
south (#15).
15 - Secret Door
16 - Button
Pressing this button will raise the collapsed bridge (Exit B), allowing you to cross it and bargain
with Voraatus (#17).
17 - Tomb of Voraatus
When you open the tomb, Voraatus will walk out. He's not necessarily an enemy, so don't start swinging
your weapon. Instead, talk to him to learn what it'll take to get
Vartugg's eye back. Voraatus
will tell you that you'll have to play a game that involves guessing the first five tortures that
Vartugg will experience when he enters Voraatus' realm.
The game is essentially Mastermind, if you've ever played that. Each time you make a guess, Voraatus
will tell you how many tortures you've gotten correct, and he'll take away attribute points for each
one you've gotten wrong. The order of the tortures is random, so you'll have to figure it out on your
own. However, realize that you can select a torture multiple times per guess. For example, if you
guess "fire and ice" three times and "disease" twice, then if Voraatus tells you that you've gotten
two or zero tortures correct, you'll have learned a lot about where those tortures go.
Of course, even if you're good at the game, you'll still lose quite a few attribute points. Plus,
after you've completed the game, you'll have to fight off a bunch of Voraatus' minions, who will slowly
spawn in the room at the two sarcophagi situated against the northern and southern walls (#18).
If this all sounds like something you'd rather not deal with, then you can simply fight Voraatus.
He's a big demon, he's tough, and a bunch of his minions will appear in the room to help him, but his
battle is easier than the one with the Fiend of Ghazbu (#11), if you got to experience that. We'd
recommend that you at least attempt to kill Voraatus, and if that
doesn't work, then feel free to lose attribute points playing his game. Whichever way you end up
dealing with Voraatus, you'll receive
Vartugg's eye as your reward.
Note: You can also make your own deal with Voraatus. He'll let you pick one of your attributes, and
then he'll add X to it (where X seems to be a number between 15 and 20). But then he'll remove X from
your honor attribute, and he'll remove X more from your other four attributes combined. In other
words, this doesn't seem to be a great deal, but if you have one attribute that is very high (and thus
very expensive) it's possible the deal could save you some advancement points.
18 - Sarcophagi
The sarcophagi can't be opened.
19 - Watcher
After bargaining with (or killing) Voraatus (#17), this Watcher will offer you a reward, either the
"demon's steel" or the "demon's spell." If you pick "steel," then the Watcher will open the treasure
room to the right (east), and you'll find a
darkwing helm, an
angelic destroyer, and a
blade of death,
and you'll also be able to loot two chests. If you pick "spell," then the Watcher will open the
treasure room to the left (west), and you'll find the nether spell "summon deathlord," plus be able
to loot two chests. If you're playing version 1.4/1.5, then you'll also find the arcane
spell "cataclysm" in the demon's spell room.
Note: As far as we can tell, this is the only place in the game where you can get the "cataclysm"
spell. But if you sell the spell to a shopkeeper, then you'll be able to buy it back as many
times as you'd like.
Exits:
- Exit from the tomb.
- Collapsing Bridge. The first time you try to cross the bridge, it will collapse, sending you
into the water below. To keep the bridge up, you'll need to pass the watcher's challenge at #14
and then press the button at #16.
- Secret Door. The only way to open the door is to press the button on the western side. That
is, the secret door is only intended as an exit from the collapsing bridge trap (Exit B).


