 Did we miss anything in this section? Is there something we didn't discover?
Let us know!
Enemies
Did we miss anything in this section? Is there something we didn't discover?
Let us know!
Enemies
- Dimensional Eye
- Giant Arachnids
- Noximanders
- Raptor
Notable Loot
Annotations
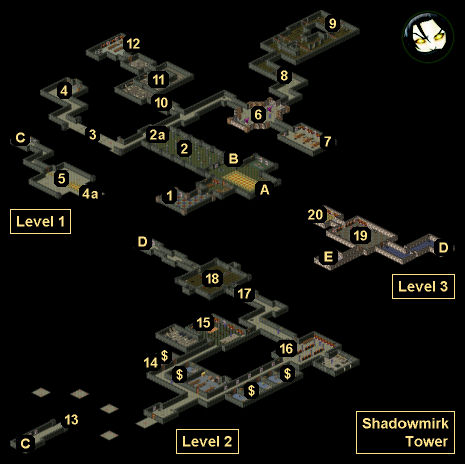
1 - Egg Stand
If you place the three
Easter Eggs in this stand, then you'll instantly receive enough xp to gain a level (so wait until right after you've gained a level to do it). See the
Easter Eggs section for information on where to find the
Easter Eggs.
2 - Dimensional Eye Chamber / Gates
In this chamber (#2) you'll encounter a Dimensional Eye. You'll have to kill it to get the gates in the back of the chamber (#2a) to open.
3 - Pressure Plate Puzzle
In this hallway you'll find five rows of three pressure plates. If you step on the right pressure plates, then nothing will happen. But if you step on one of the wrong pressure plates, then you'll get teleported back to the start of the hallway, and you'll have to try again. If you label the columns of pressure plates 1-3 from left to right, then the correct sequence to get through the hallway is 1-2-1-3-3.
4 - Chest Puzzle / Portal
In this room (#4) you'll find two chests, one with the sign "give me strength" above it, and the other with the sign "ease my pain" above it. If you place a
Potion of Ogre Strength in the former and any type of
Healing Elixir in the latter, then you'll activate the portal in between them. The portal will take you to another part of the tower (#4a).
Note: You can find a
Potion of Ogre Strength (#12) and some
Healing Elixirs (#9, #14) in the tower.
Another Note: The potions won't disappear from the chests, so you can retrieve them on your way out of the tower.
5 - Explosive Barrel Room
In this room you'll find an explosive barrel and a locked door. To open the door, you can either pick the lock, or you can destroy the barrel (with a ranged attack hopefully), and then loot the
Golden Key from inside it. The
Golden Key will unlock the door.
6 - Atrium
Inside the atrium you'll meet Walter. He isn't involved in any quests, but if you're honest with him, then he'll mention that he dropped the key to the Necrotic Studies Lab (#10) in the Arachnid Chamber (#9).
7 - Chest
Inside this chest you'll find
Demon Oil I,
Demon Oil II, and a
Grand Helm.
8 - Entrance to the Arachnid Chamber
You'll need to pull the lever next to the entrance gate to go inside.
9 - Spider Eggs
If you loot all of the spider eggs in this part of the chamber, then you'll find a
Healing Elixir II, a
Healing Elixir III, a
Heavy Key, a
Mana Potion II,
Mithril Alloy Chain Boots, and
Spider Silk (x3). The key will get you into the Necrotic Studies Lab (#10).
10 - Entrance to the Necrotic Studies Lab
The door to the lab will start out locked. You can pick the lock if you want, or you can use the
Heavy Key (#9) on it.
11 - Chests
You'll find four chests in this part of the lab, but they'll just contain
Skulls and
Femurs.
12 - Chest
Inside this chest you'll find a
Bone Dagger, a
Mana Potion II, a
Mana Potion III, a
Master Wizard's Hat, a
Potion of Ogre Strength, and a
Scroll of Turn Undead. But be aware: after looting the chest, several Skeletons will rise up in the lab and attack you.
|
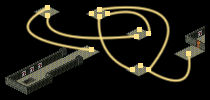 |
| The solution to the portal puzzle. |
|
13 - Portal Puzzle
To navigate your way through this puzzle, you'll need to step onto the first portal and then go to the southern portal, the eastern portal, either the northern or the southern portal, and finally the eastern portal. The correct paths are shown in the insert to the right.
14 - Cabinet
Inside the cabinet here you'll find a
Healing Elixir III and a
Mana Potion III.
15 - Chest
Inside this chest you'll find
Ectoplasm (x2),
Magicka Divine, and a
Scroll of Smite.
16 - Chest
Inside this chest you'll find a
Mana Potion II and a
Scroll of Invisibility.
17 - Entrance to the Proving Chamber
To open the gate here, you'll need to pull the lever right next to it.
18 - Lever
When you pull the lever in the center of this chamber, the exit gates will close, and cages containing a Raptor and two Noximanders will open. Once you've defeated the creatures, the exit gates will open back up.
19 - Erubor's Chamber
This is where you'll meet Erubor, the head wizard of the tower. See the main quest entry for
Shadowmirk Tower for more information.
20 - Erubor's Chest
Inside this chest you'll find a
Green Goblin Key, a
Scroll of Detox, a
Scroll of Fireball, and a
Widget. You'll need the
Green Goblin Key later in the game when you reach the
Goblin Citadel, so don't lose it.
Note: The
Widget indicates a broken item. You're supposed to find Adamantine Studded Leggings in the chest, but that item doesn't actually exist, and so you get a
Widget instead.
$ - Random Treasure Chest
Local Exits
- Front entrance.
- Back entrance.
- Stairs between Level 1 and Level 2.
- Stairs between Level 2 and Level 3.
- One-way exit portal. This portal will take you back down to Level 1.


