 Did we miss anything in this section? Is there something we didn't discover?
Let us know!
Enemies
Did we miss anything in this section? Is there something we didn't discover?
Let us know!
Enemies
- Giant Arachnids
- Goblin Archers
- Goblin Bombthugs
- Goblin Hackers
- Goblin Warlords
- Tauraxes
Notable Loot
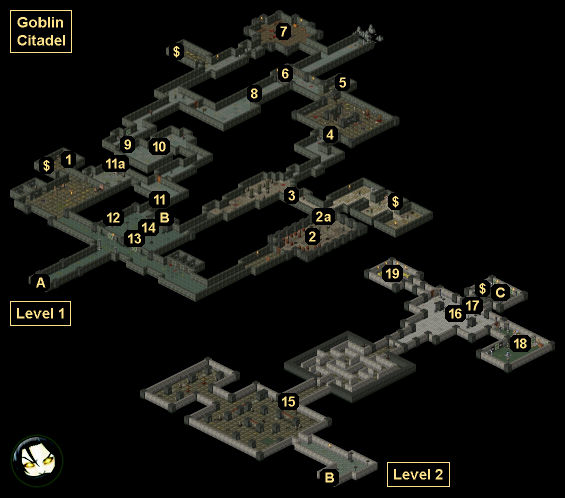
Annotations
1 - Well
If you drink from this well, then you might catch a disease.
2 - Explosives Room
In this room (#2) you'll find lots of explosive barrels, plus some Goblin Bombthugs and a Goblin Hacker. The easiest way to defeat the goblins is to set off a chain reaction of explosions. If you blow up the explosive barrels in the back of the room (#2a) then you'll blow a hole in the wall, which will allow you to access the closed off part of the citadel.
3 - Gate / Lever
To open this gate, you'll just need to pull the lever right next to it.
4 - Gate / Lever
To open this gate, you'll just need to pull the lever right next to it.
5 - Chest
The code for this chest is 66. If you enter that code after learning it from Gruzz in the
Whistling Cave, then you'll earn 400 xp when you open the chest. Inside the chest you'll find
Skullsplitter, the best mace in the game.
6 - Levers / Gates
You'll find two levers and two gates here. The lever on the right will open the gate on the right. The lever on the left won't do anything. The gate on the left can't be opened.
7 - Demon Statue / Chest
Each time you click on the demon statue, it will try to curse you, and three Goblin Hackers will show up and attack you. In the nearby chest you'll find a
Sacrificial Dagger.
8 - Chest / Traps
The chest here will always be empty. It's just the bait to get you to step on the traps next to it.
9 - First Trapped Doorway
If you step onto the pressure plate in the doorway here, then you'll suffer 350 points of damage and die. To disable the trap, you'll need to pull the lever just before the door.
10 - Second Trapped Door
This trapped doorway is just like the first one (#9), except you'll need to shoot the lever in the room beyond the doorway in order to pass through unscathed.
11 - Gate / Lever
To open this gate (#10), you'll need to pull the lever to the west (#11a).
12 - Lever / Portal
The lever here will activate the portal right next to it, which will take you to the portal building in
Rotwood.
13 - Lever
The lever here will open up the gates in the chamber, which will make it easier for you to get back to the main exit from the citadel (Exit A).
14 - Obelisk
The obelisk here has keyholes for the four
Goblin Keys, and when you place them inside, the gate blocking the stairs to Level 2 (Exit B) will open, allowing you to ascend to the top level of the citadel.
15 - Gate / Lever
To open this gate, you'll need to pull the lever right next to it.
16 - Gramuk
Instead of attacking you on sight, Gramuk will wait for you to talk to him, and then he'll make you an offer. If you agree to hand the
Crux of Ages over to him and leave the goblins alone, then he'll give you "enough gold to last you the rest of your life." You'll have two ways to respond:
- You can agree to the deal. For this case Gramuk will give you 83,510 gp and escort you out of the citadel. You'll then travel to the west and buy a farm, and you'll watch as the goblins take over Thaermore. That's not a very exciting ending, which means...
- You can turn down the deal. For this case Gramuk will summon a few Giant Arachnids, and he'll start attacking you with spells. Gramuk isn't too powerful in his goblin form, but when he dies he'll turn into a Dirachnid, which has about 260 hit points. It might give you a few more problems, so be prepared with some potions on hand, and be sure to cast some buffing spells before you talk to Gramuk. When the Dirachnid dies, you'll earn 2500 xp, and you'll find a
Silver Key on its corpse. The
Silver Key will allow you to unlock the door right behind Gramuk (#17).
17 - Locked Door
This door has the toughest lock in the game. If you don't feel like picking it, then you can always unlock it with the
Silver Key (#16).
18 - Gramuk's Chamber
In this chamber you'll find two chests (one random, and one containing two
Healing Elixirs III and two
Mana Potions III), plus a random cabinet.
19 - Treasure Room
In this room you'll discover seven chests containing lots of random loot, plus over 6500 gp.
$ - Random Treasure Chest
Local Exits
- Exit to
Western Crakamir.
- Stairs between Level 1 and Level 2.
- Portal to Bastion Spire.


