 Did we miss anything in this section? Is there something we didn't discover?
Let us know!
Enemies
Notable Loot
Annotations
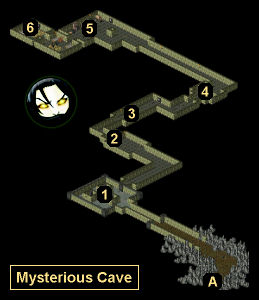
1 - Puzzle Room
Did we miss anything in this section? Is there something we didn't discover?
Let us know!
Enemies
Notable Loot
Annotations
1 - Puzzle Room
To open the door in this room, you'll have to place a
Torch in all six wall sconces and then step on the pressure plate on the eastern side.
2 - Trap
This trap consists of a pair of explosive barrels with a pressure plate in between them. If you step onto the pressure plate, then the barrels will explode and almost certainly kill you. To defeat the trap, simply destroy the barrels with a ranged attack before stepping onto the pressure plate.
3 - Trap
This trap consists of an explosive barrel sitting behind a door. You won't be able to shoot the barrel through the door, so instead you'll need to open the door while standing one step to either side. That way the wall will protect you from the blast. You can also just open the door and take your lumps. One explosive barrel probably won't kill you.
4 - Dead End
At this spot you'll come to a dead end with some explosive barrels situated next to the wall. To continue forward, you'll need to destroy one of the barrels, which will trigger a chain reaction and blow a hole in the wall.
5 - Bandits
In the living quarters of the cave, you'll face no fewer than six Barrea Mercenaries. This will probably be a tough fight for you, so if necessary retreat back to the hole in the wall (#4) so you can fight the mercenaries one at a time.
6 - Chests
In the two chests here, you'll find the axe
Executioner plus some
Divine Ore. You'll need the ore for
Gunther's side quest.
Local Exits
- Exit to
Northeastern Crakamir.


