 Did we miss anything on this map? Is there something we didn't discover? Let us know!
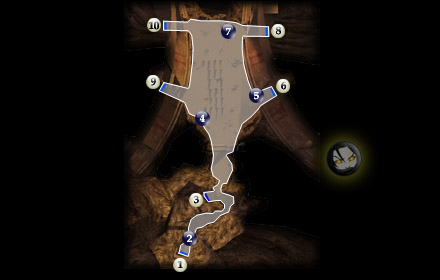
1 - Exit
Did we miss anything on this map? Is there something we didn't discover? Let us know!
1 - Exit
Exit to
Sith Academy (#14).
2 - Calo Nord or Darth Bandon
If this Star Map would be your second or fourth (including Dantooine), you'll fight either Calo Nord if it's your second, or Darth Bandon if it's your fourth. This is assuming you haven't fought the one that should be here on a different planet already.
If this would be your Second Star Map (including Dantooine):
You'll fight Calo Nord and four of his goons here as soon as you exit the Academy. This can be a difficult battle. Calo will likely begin by tossing a grenade and throwing on an energy shield of his own. Don't use lightsabers against him until his energy shield is broken. Instead use vibroblade-type weapons. Before you do anything however, buff your party up with stims or force powers as time permits. Begin the actual battle by tossing a few grenades into the fray; concussion work well here, and all his helpers will be firing their blasters. Since Calo is very difficult you can approach this in two ways but I found it easiest to dispose quickly of the enemies at his side quickly and one at a time before focusing on Calo, as he can down life-support packs. Have one of your party hang back and continue to throw grenades or attempt to incapacitate the others. Then focus all of your might on Calo. After the 650xp you get from killing Calo, his remains holds, among other things: a pair of Mandalorian Heavy Pistols, 2000+ credits and Calo Nord's Battle Armor.
If this would be your fourth Star Map of five (including Dantooine):
You'll fight Darth Bandon and two Dark Jedi here as soon as you exit the Academy. This battle's difficulty varies from easier to much harder than Calo Nord, but is normally not as difficult. Darth Bandon wields a double-bladed lightsaber and will attempt to paralyze you and your party continuously. By the time you fight him, you should have powerful force attacks, weapons and stims of your own. Force Breach or Immunity can help immensely, and so do the Stun, Fear, Shock and Push line of attacks, though he resists the Stun series often. For this battle, I would concentrate on the two Dark Jedi at his side first, as they can be incredibly annoying with their own force powers, if Bandon isn't destroyed quickly. Included on his remains will be: a Double-Bladed Lightsaber and Darth Bandon's Fiber Armor and 3000 credits.
On your return from Naga Sadow's Tomb:
You'll encounter a group of three Sith Apprentices guarding the entrance to the Academy. They'll attack your party unless you've left Naga Sadow's Tomb on peaceful terms with either Yuthura (and she's still with the Sith) or Uthar during the final test, but they're relatively harmless. If they end up attacking, be prepared to have the whole Sith Academy hostile toward you on your way back through it - a moderate challenge.
3 - Exit
Exit to
Shyrack Caves (#1). Guarding this entrance are a pack of five shyracks. They are not very tough and fall easily to force powers.
4 - Dak Vesser, Juhani's Old Friend
If you have Juhani in your party, they'll recognize each other and talk about unhappy farewells. Dak still holds resentment toward Juhani and will then run off to the Cantina at
Dreshdae (#11). Besides the relationship side story, you can gain a lot of useful info about the Tombs here from Dak. He'll tell you about each one and its prestige opportunity.
5 - Galon Lor, Sith Geek
Here's someone who knows the lore of the Tomb of Ajunta Pall, but does not dare to go inside. He'll tell you about the sword, and if you don't already have the quest, it will update in your journal. Either way, he's not very useful besides some info about the Tomb.
6 - Exit
Exit to
Tomb of Ajunta Pall (#1). Within is a prestige opportunity for Uthar concerning the Sword of Ajunta Pall.
7 - Lashowe & the Holocron
She'll be at this spot if you've agreed to "help" her on her quest to get the holocron, back at the
Sith Academy (#4) for prestige. See the link for details. When you arrive, she'll be chanting a mantra to summon the tuk'ata beasts, and shortly after they'll appear from the tomb entrance on your right. There are two tuk'ata and one tuk'ata Queen. After they're dead, you'll have a few options with Lashowe. You can let her go alone to Uthar, and lose any prestige you might have gained, but will get 500xp. Or, you can demand the holocron for
(DS Points) and the decent xp you get from killing Lashowe.
Your third option is generally the best for Light Side players. To avoid Dark Side points and still get the holocron, tell here "wait, we'll go together." She'll object, and you can then tell her "the plan has changed." Then continue to insist that you work together. She'll attack your party, and will use mediocre force powers. When she's dead, you'll get 1000xp and the holocron plus some average items if you search her remains. You may now take the holocron back to Uthar for prestige. You may lie about whether you did it alone, or tell Uthar the truth that you had help, and then that you killed her and he'll be more than satisfied... but not that much more.
8 - Exit
Exit to
Tomb of Tulak Hord (#1). Within will be a prestige opportunity for Uthar concerning the writings of Jorak Uln.
9 - Exit
Exit to
Tomb of Marko Ragnos (#1). Within is an opportunity for prestige with Uthar concerning the Rogue Assassin Droid.
10 - Exit
Exit to
Tomb of Naga Sadow (#1) and the Korriban Star Map. This door will be closed to you until you enter during your final test with Uthar, back at the
Sith Academy (#8). When you've earned enough prestige, Uthar will take you and Yuthura inside. You'll exit through this door when you're finished.


