|
|
 Did we miss anything on this map? Is there something we didn't discover? Let us know!
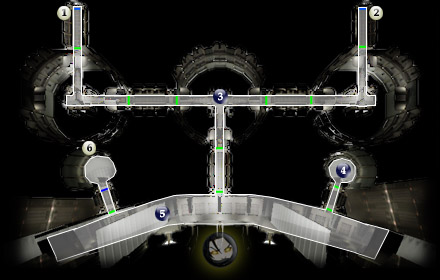
1 - Exit
Did we miss anything on this map? Is there something we didn't discover? Let us know!
1 - Exit
Exit to Deck 1 (#7). As soon as you step forward now, you'll encounter a cut-scene where Malak promises to unleash a literal horde of Dark Jedi, Troopers and Apprentice at you. And, from this point on, that is what you'll get. See #3 for complete details before heading down. Your goal is to make it to the elevator at #6 leading to the Command Center.
2 - Exit
Exit to Deck 1 (#8). As soon as you step forward now, you'll encounter a cut-scene where Malak promises to unleash a literal horde of Dark Jedi, Troopers and Apprentice at you. And, from this point on, that is what you'll get. See #3 for complete details before heading down. Your goal is to make it to the elevator at #6 leading to the Command Center.
3 - Fury of the Star Forge
This map marker is meant to literally represent the whole of the level. Out of all the encounters in the game barring the last, from now until the end of the Command Center can be the toughest challenge you'll have faced. There are several ways to get past it but I'll outline first what happens and then give you three variations on solutions.
At numerous areas after the first cut-scene near area #1 and #2, there are hidden trigger points all the way to the elevator at area #6. When you reach any one of these triggers, it will spawn several types of Sith Troopers, Dark Jedi and Apprentice to come at your party from ahead of you, and, importantly, behind you as well. If you go forward too fast, and try to battle all of them, you could be overwhelmed. Since this is the second hardest area in the game, here is the summary of your goals, and then the solutions.
Your first goal is to get to area #4 and deactivate the defense turrets at area #5. This is absolutely required to open the elevator door to the Command Center, unless you decide to do battle with them yourself. They must be destroyed for the elevator doors to open. Next, head to the Elevator at area #6. To do that, you'll need all of your party with you, which can be difficult on this level. Special note for all variations: if at any time you find yourself unable to target the computer terminal, the elevator door or any object other than an enemy, it means you're in combat. Simply hit the "B" button on Xbox or Disengage Combat button on the PC interface to exit combat and retarget the intended object. Here are the variations.:
Variation #1, a slightly risky but quick & easy solution:
This solution may not give you the complete satisfaction of variations 2 or 3, but it's quick and it almost always works (even in the PC version). Simply have your most powerful character, hopefully with Force Resistance or Immunity, and the Burst of Speed line activated, run as quickly as possible to area #4, activate the computer terminals in the room, deactivate the defense turrets, and again run to area #6 to the elevator. During this, you should completely disregard your other party members. In fact, most likely they'll end up dying and you'll be alone. Yet when you get to the elevator door you won't be able to go through without them. Fortunately, if they've died, they should soon find their way next to you. Just have patience, and enter through the elevator door when they show up. You'll have time for healing later.
Variation #2, a risky but longer solution:
This variation is the "power forward" approach. Do not take your time, and continuously and methodically push forward, attempting to take out any trooper or Jedi who's only in front of you. Select each party member and push them forward to the furthest enemy toward your goal. When you get to area #4, have one of your party exit from combat to use the computer terminal, shut off the defense turrets, and continue to push toward the elevator, not looking much behind you. After the elevator you'll have time to rest and heal before you open the first door in the Command Center.
Variation #3, a slightly risky but incredibly thorough approach:
You may not believe at first, but there's a limit to the troopers. Whenever you see an enemy, f you attempt to stay where you are, not push forward and fight all of them until they stop coming out, they eventually will. You can then rest, relax and press forward until you see an enemy again. This will take some time, but is perhaps the most sure way to get past the level. Again, you'll need to hit area #4 and the computer terminals first, deactivate the defense turrets at area #5, and then push to the elevator. One warning. It may seem like they'll never end if you stay in one spot. They will, but it takes a lot of willpower from you to believe it.
4 - Computer Terminals, Jedi Robes
This room is your first goal on Deck 2. Within are several computer terminals. Remove a party member from combat using the "B" button, and use the computer terminal to deactivate the defense turrets in area #5. This step is required to use the elevator at area #6.
Now that that's taken care of, you might have noticed the other options at the computer. For a lot of computer spikes, you can create a custom set of Jedi Robes. If you're a Light Side player, and you choose this option, you'll receive the incredibly powerful Star Forge Robes. However, only if you're very far toward the Dark Side will you get a different pair, Darth Revan's Robes. After you make the custom robes, you can find them in the replicator bin on the east side of the room. Remember to disengage from combat so you can target the bin. One word about the robes before you try. Only if you're high on the Light Side of the force, or high on the Dark Side can you actually equip either pair. The balanced or non-committal Jedi loses out here.
Now push forward using your own approach toward the elevator at area #6.
5 - Defense Turrets
To be able to use the elevator at area #6, these must be deactivated using a computer terminal in area #4. Don't proceed past them unless you've already done so.
6 - Elevator
Elevator to Command Center (#1). Again, only if you've first deactivated the turrets at area #5 using the computer terminals at area #4 can you use this.
|
|
|


