|
|
 Did we miss anything on this map? Is there something we didn't discover? Let us know!
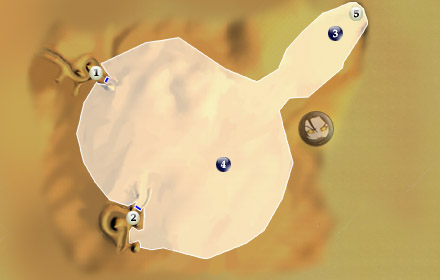
1 - Exit
Did we miss anything on this map? Is there something we didn't discover? Let us know!
1 - Exit
Exit to Dune Sea (#9).
2 - Exit
Exit to Sand People Territory (#2).
3 - Komad & Calo or Bandon
Here's Komad (you might have seen him in the Hunting Lodge earlier). He's got a proposition for you. There's a Krayt Dragon in the cave and he wants to lure him out onto a runway of mines. The only way to lure him is to bring the Bantha closer. To do that you'll need Bantha Fodder, which you probably have off your battles with Sand People Elite back in the Dune Sea. However, if you don't have any, you can pick some up back inside the Sand People Enclave near the entrance where the couple of Bantha are if you search the ground. Agree to help Komad, run to area #4 and touch a Bantha. They'll begin to follow and you'll have a difficult battle afterward. See #4 below for details.
After Luring the Bantha Back:
Talk to Komad again and signal that you're ready to begin. The beast will be lured out and fall dead from the mines, giving you half of the bounty, a Krayt Dragon Pearl. In the conversation that follows, it's possible to fight Komad for the other pearl. To do so, say "I want it all" and follow up. He'll attack you and on his remains will be another, as well as some average items. Of course, you'll get (DS Points) for the act, but that goes almost without saying by now. You're now free to explore the back of the cave and find the Star Map! Be sure to search every corpse within for some powerful and useful items. See #5 for details.
After Entering the Cave:
If this is your second Star Map of five (including Dantooine), you'll fight Calo Nord and four of his goons here when returning from the cave. You don't necessarily need to activate the Star Map, just enter the cave. This can be a difficult battle. If you're close enough, Calo will likely begin by tossing a grenade and throwing on an energy shield of his own. Don't use lightsabers against him until his energy shield is broken. Instead use vibroblade-type weapons. Before you do anything however, you'll have a minute to buff your party up with stims or force powers as you'll be far enough way that the battle won't start. Begin the actual battle by tossing a few grenades into the fray; concussion work well here as you'll have to cover some ground to get to them, and all his helpers will be firing their blasters. Since Calo is very difficult you can approach this in two ways but I found it easiest to dispose quickly of the enemies at his side quickly and one at a time before focusing on Calo. Have one of your party hang back and continue to throw grenades or attempt to incapacitate the others. Then focus all of your might on Calo. After the 650xp you get from killing Calo, his remains holds, among other things: a pair of Mandalorian Heavy Pistols, 2000+ credits and Calo Nord's Battle Armor.
After Entering the Cave:
If this is your fourth Star Map of five (including Dantooine), you'll fight Darth Bandon and two Dark Jedi here when returning from the cave. You don't necessarily need to activate the Star Map, just enter the cave. This battle's difficulty varies from easier to much harder than Calo Nord, but is normally not as difficult. Darth Bandon wields a double-bladed lightsaber and will attempt to paralyze you and your party continuously. By the time you fight him, you should have powerful force attacks, weapons and stims of your own. Force Breach or Immunity can help immensely, and so do the Stun, Fear, Shock and Push line of attacks, though he resists the Stun series often. For this battle, I would concentrate on the two Dark Jedi at his side first, as they can be incredibly annoying with their own force powers, if Bandon isn't destroyed quickly. Included on his remains will be: a Double-Bladed Lightsaber and Darth Bandon's Fiber Armor and 3000 credits.
4 - Bantha & Sand People Elite
After you've spoken with Komad at #3 above and have some Bantha Fodder, touch one of these Bantha and they'll begin to follow you back toward the cave. As soon as that happens, four difficult (if this is your first planet) Sand People Elite will show up and attack. They're pretty spread out, so a helpful grenade toss will only get one, maybe two of them in its blast. Use your energy shields if you have them. Concentrate on killing one at a time until they're all dead. Once again, touch one of the Bantha and you'll lure them all over to the cave. Now speak with Komad again.
5 - Krayt Dragon Cave & Tatooine Star Map
Search the remains of all bodies and items along the walls here for good items. On a chewed corpse near the entrance to the cave you'll get a Jedi Master Robe. Search further back for both an Opila and Violet lightsaber crystal. If you have Bastila's Mother's Quest to find the holocron - see Jedi Enclave (#2): Bastila's Mother Quest for details - find the tattered backpack on the ground near the Star Map, and look inside for the holocron journal. Now take it back to Helena at the Anchorhead Cantina (#4) for the resolution of the quest and 250xp.
The Tatooine Star Map:
All you need to do is touch it to update your journal and receive 2000xp. If this is your second or fourth of five Star Maps (including Dantooine), prepare for a battle as you exit the cave, with either Calo Nord or Darth Bandon. Calo appears after the second Star Map and Darth Bandon after the fourth. See #3 above for details.
|
|
|


