 Did we miss anything on this map? Is there something we didn't discover? Let us know!
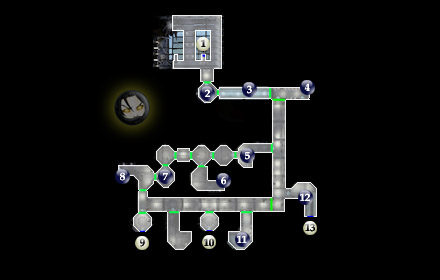
1 - Exit
Did we miss anything on this map? Is there something we didn't discover? Let us know!
1 - Exit
Exit to
East Central (#12) via the submersible. Your main goal here in Hrakert Station is to get both a sonic emitter (at area #6 or area #8... or both), and an environment suit so that you can venture out onto the sea floor. Sounds exciting. It is.
2 - Afraid Mercenary
When you open the door to this room, you'll meet a scared mercenary who warns you about the insane selkath within the station. You'll encounter many of these throughout, but they are no more difficult than any other standard enemy you've dealt with in the past.
3 - Calo Nord or Darth Bandon
After returning from your trip to the Hrakert Rift, if the Manaan Star Map was or would be your second of five (including Dantooine), or fourth of five (including Dantooine), you'll meet either Calo Nord or Darth Bandon at this area.
If this was/would be your second Star Map of five (including Dantooine):
You'll fight Calo Nord and four of his goons here on your return from the Rift. This can be a difficult battle. Calo will likely begin by tossing a grenade and throwing on an energy shield of his own. Don't use lightsabers against him until his energy shield is broken. Instead use vibroblade-type weapons. Before you do anything however, buff your party up with stims or force powers as time permits. Begin the actual battle by tossing a few grenades into the fray; concussion work well here, and all his helpers will be firing their blasters. Since Calo is very difficult you can approach this in two ways but I found it easiest to dispose quickly of the enemies at his side quickly and one at a time before focusing on Calo, as he can down life-support packs. Have one of your party hang back and continue to throw grenades or attempt to incapacitate the others. Then focus all of your might on Calo. After the 650xp (or 450xp depending on your character) you get from killing Calo, his remains will hold, among other things, at least two of the following dependent on how far your character has progressed in game: a pair of Mandalorian Heavy Pistols, 2000+ credits and Calo Nord's Battle Armor.
If this was/would be your fourth Star Map of five (including Dantooine):
You'll fight Darth Bandon and two Dark Jedi here on your return from the Rift. This battle's difficulty varies from easier to much harder than Calo Nord, but is normally not as difficult. Darth Bandon wields a double-bladed lightsaber and will attempt to paralyze you and your party continuously. By the time you fight him, you should have powerful force attacks, weapons and stims of your own. Force Breach or Immunity can help immensely, and so do the Stun, Fear, Shock and Push line of attacks, though he resists the Stun series often. For this battle, I would concentrate on the two Dark Jedi at his side first, as they can be incredibly annoying with their own force powers, if Bandon isn't destroyed quickly. Included on his remains will be: a Double-Bladed Lightsaber and Darth Bandon's Fiber Armor and 3000 credits.
4 - Security Computer
Like most computers, you can use its functions for xp or to view different areas of the Station.
5 - Jedi Remains & Faulty Patrol Droid
Other than a selkath encounter, search the remains on the ground to find a
Sigil Crystal and
Jedi Master Robe. There's also a potentially handy Faulty Patrol Droid on the south wall of this room that you can reprogram (for xp) to patrol the area to the east.
6 - Sonic Emitter
In a footlocker here on the wall, you'll find one of two sonic emitters in the station, needed to defeat the firaxa sharks on the sea floor.
7 - Environment Storage Area
Here's where you can pick up your Enviro Suit for outside exploration. The only other thing you'll need is the sonic emitter, which can be found both at area #6 and area #8. Also in this room, you'll find the "whimpering locker." You can talk to the person inside, but he won't come out no matter hard you try. If you tell him you'll slice him into pieces, you can then stick your lightsaber through the locker for
(DS Points). On a dead soldier on the ground, you can find an
Improved Energy Cell upgrade for ranged weapons.
8 - Sonic Emitter
In a footlocker here against the wall, you'll find one of two sonic emitters in the station, needed to defeat the firaxa sharks on the sea floor.
9 - Exit
Exit to
Sea Floor (#1) via the "Pressure Door" airlock. Activate the door with your Enviro Suit from area #7 and sonic emitter from either area #6 or #8 in your inventory, and you'll be leaving the rest of your party behind. This is a solo mission from here on out (even though the door text implies there might be other Enviro Suits), and an experience unlike the rest of the game.
10 - Exit
Exit to
Sea Floor (#2) via the "Pressure Door" airlock. Activate the door with both the Enviro Suit from area #7 and sonic emitter from either area #6 or #8 in your inventory, and you'll be leaving the rest of your party behind. This is a solo mission from here on out (even though the door text implies there might be other Enviro Suits), and an experience unlike the rest of the game.
11 - Insane Selkath Encounter
Though basically the same as the other insane selkath encounters in this area, one of them will leave behind an
Energy Projector upgrade item.
12 - Faulty Patrol Droid
Reprogram this droid to patrol the area if you wish, and you'll get xp and have a slightly easier time with the enemies in the area.
13 - Exit
Exit to
Hrakert Rift (#2). This is a one-way airlock similar to areas #9 and #10 that will remain locked until you visit the Hrakert Rift and enter through the other side.


