 Did we miss anything on this map? Is there something we didn't discover? Let us know!
1 - Elevator
Did we miss anything on this map? Is there something we didn't discover? Let us know!
1 - Elevator
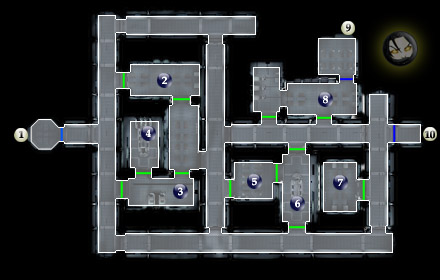
Elevator to Command Deck #1 (right here, though labeled "Bridge"),
Prison Block (#1), and
Hangar (#1). The corridors here will be filled with several Sith Troopers your first time through. On your way back from the Bridge area to this elevator later, they'll be filled with Dark Jedi and Sith Grenadiers, worth quite a bit of xp but dangerous all the same.
Your main goal on this level is to make it to the Bridge, through the area #9 exit. Before that happens, you'll need to invade the locked Armory at area #5 and pick up the Space Suits.
After Returning from the Bridge and Opening the Hangar Doors:
Use the elevator and select "Hangar" from the menu. That will be your next destination.
2 - Barracks & Datapad
In this room and the room below it, there are several Sith soldiers. They aren't the easy variety you saw in the Prison Block either, so be prepared. Check their remains, and on one body in this room you'll find a datapad, explaining that the space suits required to access the Bridge are in the Armory, area #5 - your first main objective on the level.
3 - Assault Droid & Droid Upgrades
Along with several droids you'll be battling here, check the Droid Upgrades container for several decent upgrades, and the footlocker for a
Superior Targeting Computer. You'll also notice a very large assault droid in the corner of the room, inactive. There is a way to activate it, but you'll need to do that via the computer at area #4.
4 - Computer Panel
Aside from the usual functions of a computer panel, that of cameras and uploading the area schematics, you'll be able to activate the Experimental Assault Droid in area #3. There's a warning when doing this, and for good reason. If you come into contact with the Assault Droid, you will have one tough battle on your hands; this is no ordinary droid. In fact, it's the toughest enemy in the game, barring the last. For a good challenge, see how your party does against it. Though it only gives you 350xp for its death and no parts, it is fun just for the challenge. Are you ready for its defense number? You'll have to be able to penetrate a defense of 39 to hit. That's right, probably at least 15 above your own number.
For preparation and during this optional battle, make good use of Force Valor (and upgrades if you have them), and anything that increases your attack number. Even then, you'll most likely see miss, miss, miss, miss, miss during most of the battle... yes, even with the Sword of Ajunta Pall should you happen to have it. The one obvious counter to the droid is the Stun Droid line of powers. However, unless you gave it to either Bastila or yourself, Jolee is back at the Ebon Hawk waiting for you and you'll have to make use with just your weapons.
5 - Armory & Space Suits
This is a locked room that you'll need to bash or use security to enter. Inside, you'll find a selection of useful items including the always handy
Thermal Detonators from the footlockers, and Space Suits (in one selectable lump) over in a corner. Once you have them, you'll be able to access the Bridge through area #9 and the subsequent airlock into deep vacuum. Beware of mines.
6 - Computer Panel
Another of two on the level that you can use to access various functions within the Command Deck. Of course, by now you'll probably not need it - but it's nice to know that it's here.
7 - Barracks
Aside from many troopers here, there really isn't much worth mentioning. There are some average items here as well.
8 - Dark Jedi Masters
Three of them. Be prepared, and act quick. They shouldn't be much trouble for you, but if you allow them to attack for too long, you might have trouble. Try and focus on one at a time, while at the same time attempting to take the others out of combat using another party member. They'll drop not a thing, but will grant you access to the exit to the Bridge at area #9.
I don't know how I almost missed this, but there's a decommissioned droid in the room. Now that all the enemies are dead, it shouldn't have any trouble helping you out in this level! Kidding aside, try coming back after the Bridge when slightly tougher enemies appear.
9 - Exit
Exit to
Bridge (#1). Before you enter, make sure you have the Space Suits from the Armory at area #5. They're not too tough to miss and you'll need 'em.


