 Did we miss anything in this section? Is there something we didn't discover?
Let us know!
Background
Did we miss anything in this section? Is there something we didn't discover?
Let us know!
Background
You'll receive this quest at the conclusion of the quest Prophet (the
vampire version or the
Dawnguard version).
Walkthrough
After learning that you'll need to track down the
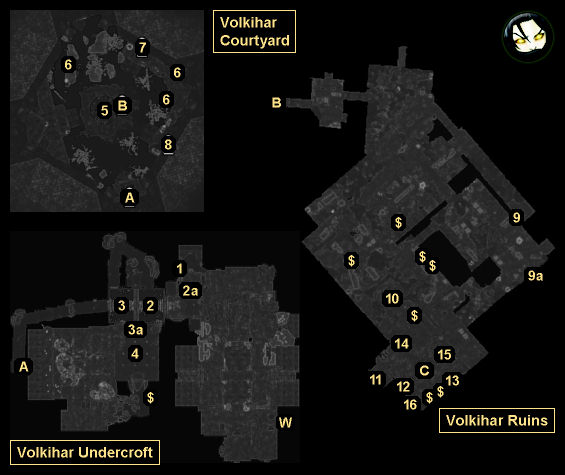
Elder Scroll (Blood) for the Moth Priest, the next time you talk to Serana, she'll tell you that her mother Valerica might have the scroll, or at least know where to search for it. The only problem is, Serana won't know where her mother is. She'll only have one clue -- that the location is someplace Harkon would never look. Eventually you'll decide that the clue refers to the garden in Volkihar Keep's inner courtyard.
To reach the Volkihar Courtyard, you'll need to travel to Volkihar Keep, but then instead of entering the keep, you should skirt around to the west to end up at the docks in back. While at the docks, you'll have to battle a few skeletons, but then you'll be able to enter the Volkihar Undercroft, which will lead you to the courtyard.
When you reach the Volkihar Courtyard, Serana will comment that something seems to be wrong with the moondial in the center (#5), and she'll speculate that it might be a clue from her mother. To fix the moondial, you'll need to collect the three moon crests from around the courtyard (#6) and then place them in the moondial. There isn't any way to place a crest incorrectly, so just collect all three and then activate the three blank spots in the moondial. Once the moondial has been repaired, a staircase will open up leading into the Volkihar Ruins (Exit B).
Inside the Volkihar Ruins, you'll have to battle skeletons and gargoyles, but eventually you'll wind your way up several levels to reach Valerica's study. Valerica won't be there, and so Serana will suggest that you look for
Valerica's Journal, which might have a clue indicating where she's gone. You'll find the journal (a little red book) in the alcove on the western side of the study (#11). It'll be in the middle of the shelves there.
When you take and read the journal, and then talk to Serana, you'll decide that Valerica must have gone to the Soul Cairn. To follow her there, you'll need to recreate the potion she detailed in her journal. That is, you'll need to find
Finely Ground Bone Meal (#12),
Purified Void Salts (#13), and
Soul Gem Shards (#14). Once you've collected the three ingredients, you'll need to place them in the Portal Vessel (#15). Serana will then add her blood to the mixture to create a portal to the Soul Cairn (Exit C).
If you joined the vampires, then you'll just need to walk through the portal to complete the quest. But if you joined the Dawnguard, then you'll have one extra step. Serana will tell you that the portal expects payment of a soul, so you'll either need to become a vampire lord (the same as if you had accepted Harkon's blood earlier), or you'll need to become partially soul trapped. If you choose the latter, then you'll gain the Weakened Soul active effect, which will reduce your Health, Magicka and Stamina by 45 points while you're in the Soul Cairn. This effect sounds bad, but it's not really a big deal, and you'll be able to remove it later.
1 - Book
On the table here you'll find the book
A Hypothetical Treachery, which will increase your Destruction skill by 1.
2 - Bridge
This part of the bridge (#2) will start out raised. To lower it so you can cross it, you'll need to pull the lever to the east (#2a).
3 - Bridge
This part of the bridge (#3) will start out raised. To lower it so you can cross it, you'll need to pull the lever above you and to the south (#3a).
4 - Giant Frostbite Spider (Upper Level)
5 - Moondial
6 - Moon Crests
7 - North Tower
Inside this tower you'll encounter three skeletons and a gargoyle, and you'll find three treasure chests (two along the northern wall, and one to the southwest that you'll need to use Whirlwind Sprint to reach).
8 - East Tower
Inside this tower you'll find some loose gems and gold coins (on a staircase), and you'll also find a treasure chest (buried in the rubble to the northwest).
9 - Gate / Lever / Gargoyle
To open the gate (#9), you'll need to pull the chain to the east (#9a), which will wake up the gargoyle right next to it.
10 - Fireplace
The fireplace conceals a secret passage. To open it, you'll need to turn the candlestick to the left.
11 - Valerica's Journal
12 - Finely Ground Bone Meal
13 - Purified Void Salts (Upper Level)
14 - Soul Gem Shards
15 - Portal Vessel
16 - Balcony
If you exit to the balcony, then you'll create a new node on the world map that will allow you to return right to Valerica's study (rather than having to climb up through the Undercroft, Courtyard, and Ruins again).
Exits:
- Doorway between the Undercroft and the Courtyard.
- Doorway between the Courtyard and the Ruins.
- Portal to the Soul Cairn.
- World exit.


