 Area Note
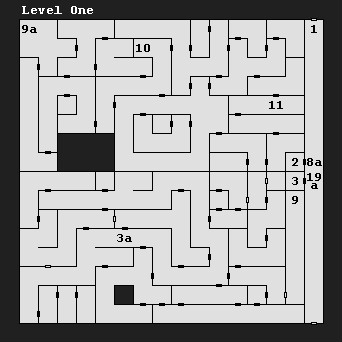
The pyramid is a confusing place, filled with teleporters and with no overhead map available. Your goal inside is to kill Yarash (#17) and to stop the pyramid from polluting the Stojanow River (#15).
The path to your objectives is as follows: #2 to #2a, #8 (throw rock) to #8b, #12 (throw rock) to #12b, and #13 (throw rock) to #13b. You can skip almost all of level one if you want to; if you do decide to explore there, you'll have many encounters with trios of high level creatures.
1 - Starting Point
2 - One-way Teleporter
When you first enter the pyramid, this teleporter will simply take you to #2a. Later (perhaps after you've used the teleporter at #8), the teleporter will take you to either #2a or #3a. You can choose your destination by throwing a rock into the teleporter. Each time you throw the rock, the destination will switch between the two possibilities.
3 - One-way Teleporter
The teleporter will take you to #3a.
4 - Lizards
The lizards will accuse you of being "servants of Yarash." If your speaker has a high enough charisma, then they won't attack; otherwise they will. The lizards won't drop anything interesting if you kill them.
5 - Alchemists Lab
If you "search" in the room you'll find a notebook: "Subject 213: Progressing well, scars healing. Unable to talk yet. Subject 214: Died when treated, failed again..."
6 - One-way Teleporter
The teleporter will take you to #4.
7 - Vat Room
If you "search" in the room, you'll be attacked by three mutant lizardmen.
8 - One-way Teleporter
This teleporter can take you to #8a or #8b, and it works like the teleporter at #2.
9 - One-way Teleporter
The teleporter will take you to #9a.
10 - One-way Teleporter
The teleporter will take you to #10a.
11 - Corpse
If you "look" at the corpse, you'll find the journal of Tyrmor (
journal entry 26).
12 - One-way Teleporter
This teleporter can take you to #12a or #12b, and it works like the teleporter at #2.
13 - One-way Teleporter
This teleporter can take you to #13a or #13b, and it works like the teleporter at #2.
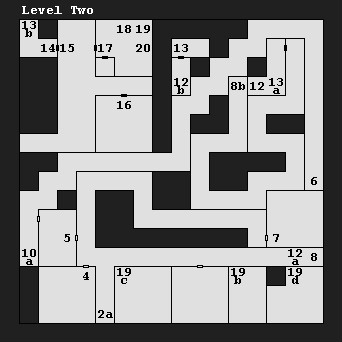
14 - Door
The door requires a password, but, helpfully, it provides a hint in the form of six dwarvish runes. The password is "Noknok."
15 - Equipment
Destroying the equipment here is necessary for completing the City Council's quest.
16 - Lizard Slaves
If you free "parlay" with the lizard slaves, you'll automatically free them, and they'll tell you a code word for use with other lizardmen: "savior." (This is explained in
journal entry 35). You can use the code word in the Ruined Castle in the Wilderness.
17 - Yarash
You'll face Yarash and some mutant lizardmen here. The "fireball" spell makes this a pretty easy battle. Once everybody is dead, you'll find
bracers of AC 4, two
potions of healing, a
wand of paralyzation, and a
potion of speed.
18 - Dial
The dial controls where the teleporter to the west (#19) takes you: #19a (blue), #19b (copper), #19c (silver), and #19d (gold).
19 - Teleporter
The teleporter will take you to #19a-#19d (see #18). #19a is a one-way teleporter that you can use to quickly get out of the pyramid. #19b-d are two-way teleporters that you can use to get to treasure rooms. If you search in the treasure rooms, then you'll find lots of treasure:
#19b: a
magic user scroll, a
broad sword +1, and a
long sword +1
#19c: a
voulge +2, a
bastard sword +1, and
splint mail +1
#19d: a
long sword +2, a
magic user scroll, and a
ring of fire resistance
20 - Yarash's Desk
If you "look" here, you'll find a mess of papers (
journal entries 33, 49, 27, 56, and 40).


