|
|
 Did we miss anything on this map? Is there something we didn't discover? Let us know!
At last, when you enter this room, you have until near the end of the first bridge to prepare yourself for battle. Of course, with the inevitable introductions, you're probably best waiting until combat begins to utilize any of your stimulants or other force powers.
Did we miss anything on this map? Is there something we didn't discover? Let us know!
At last, when you enter this room, you have until near the end of the first bridge to prepare yourself for battle. Of course, with the inevitable introductions, you're probably best waiting until combat begins to utilize any of your stimulants or other force powers.
This battle, though fairly challenging, should be over quickly compared to that with Malak in the first KotOR.
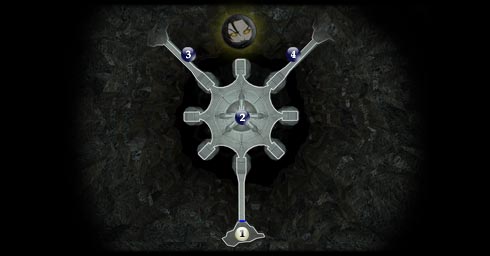
1 - Exit
Exit to Trayus Academy (#10).
2 - Darth Traya
When battle begins, quickly use your best stimulants and throw on the Verpine Prototype Shield the Sith were fond of dropping or leaving in containers. Use your best buffing power and Force Resistance/Immunity if you have it, and equip yourself with items that make you immune to fear/stun/horror, etc. Then consider yourself prepared.
There are two battles with Traya.
a) Round 1:
The first is only against her and you should have no problem with the above advice. Master Critical Strike or Flurry can help considerably as well. If your health begins to get low, use a life support pack or escape up the bridge either at #3 or #4 and you should be safe enough to recuperate.
After the first time Traya is drained of health - according to my data, she has roughly 1000-1100 vitality - you will enter into conversation. Regardless of whether you attempt to save her or kill her, you will enter into round two.
b) Round 2:
It's you vs. three floating lightsabers and Traya. One of the best force powers to have here is Force Wave if available. If the floating lightsabers are stunned or in stasis, you can concentrate on Traya, who is a little less powerful than before. Once their stun or stasis wears off, fire off another power and repeat. Of course, as a consular-type, this is perhaps the easiest route to victory.
As a guardian or sentinel-type character, you may simply want to take out the floating lightsabers one at a time. In this case, run away so that you're only facing one or two at a time rather than all four opponents. Whittle one down to zero vitality and your battle becomes much easier. You can still use the bridge at #3 or #4 to temporarily escape and recover before heading back.
The constant is that when Traya has fallen, so too will any remaining floating lightsabers.
c) Epilogue:
After the battle, if you remain composed, you will have a final chance to learn the fate of the planets you've touched and of the party members who've traveled with you. Depending on the side you ultimately chose, you will learn of a different set of events. Congratulations on beating the sequel! Here's to a third installment on the Xbox 360!
|
|
|


