|
|
 Did we miss anything on this map? Is there something we didn't discover? Let us know!
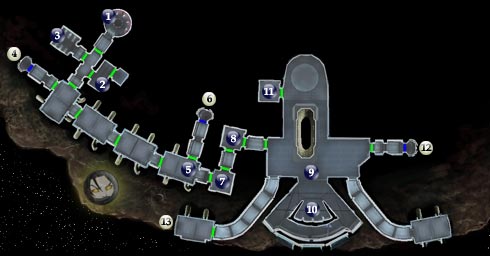
Your main goal on the Administration Level is to first open the prison at #11, and ultimately open the Emergency Hatch Door at #5. A quick word of advice. The entire mining facility (and in fact, much of the game) is droid heavy. If you're playing a Light Side character, I'd highly recommend the Stun Droid line of force powers first.
1 - Medical Bay
Did we miss anything on this map? Is there something we didn't discover? Let us know!
Your main goal on the Administration Level is to first open the prison at #11, and ultimately open the Emergency Hatch Door at #5. A quick word of advice. The entire mining facility (and in fact, much of the game) is droid heavy. If you're playing a Light Side character, I'd highly recommend the Stun Droid line of force powers first.
1 - Medical Bay
If you played the prologue, it's nice to finally get control of the character you made. After a cut scene, you awaken in a sparse Medical Bay of the Administration Level on the Peragus Mining Facility with only clothing and naught else. You can return to the Kolto Tank at any time to heal yourself, however since your wounds gradually regenerate anyway, it's likely best waiting it out rather than running back here.
2 - Med Lab & Lab Station
Head here to use the Lab Station, open the Morgue across the hall and storage room from the nearby console, and search the containers for some equipment. If you have a high enough Treat Injury you can learn a little about your Kolto Tank experience using the logs on the console.
3 - Morgue & Kreia, Party Member
After you've been to #2 and opened the Morgue door, head inside and search the body in the back for a plasma torch. The plasma torch is your key item to bash open difficult-to-open locked doors, so remember that. Any time you come across a door you can bash, equip your torch and watch the door quickly open. That goes for the door just south of this room, your first opportunity.
As soon as you grab the torch, Kreia wakes up and you'll have a cut-scene with her. At this point you can begin gaining Dark Side Points (DS Points) or Light Side Points (LS Points).
The bonus is that while you can receive a change in your own alignment right now, you still are unable to influence your party members (until you reach the Harbinger and get a short tutorial on the matter). This means that you can act as cruel or nice as you want, and not have it influence their alignment yet. Why is this good? Because if you wish to play the Dark Side and want quick (DS Points), you don't yet risk losing their influence by being cruel to them personally. It's best gaining (DS Points) later in the game by trusting your allies, but being cruel to everyone else. Thus, though it is a bit slower for yourself since you're not being cruel to everyone (in most cases), you direct your party's alignment much faster toward the Dark Side (if that is what you want).
4 - Exit
Exit to Dormitories (#10). The door is locked until you pass through it on the other side.
a) After entering here from the dormitories:
Kreia will be waiting on the other side of the door in the main corridor. Continue with all three party members to #9a.
5 - Security Room
Use the console here and check the logs to learn about the hostile droids on the level and a way of shutting them all down.
6 - Exit
Exit to Mining Tunnels (#1). The emergency hatch at #5, the only way to this exit, is one of your main objectives, and will remain locked until T3-M4 comes to the rescue.
7 - Security Room
Use the console here and check the logs to learn about the hostile droids on the level and a way of shutting them all down. These particular logs are required later in the Fuel Depot if you aren't putting any points into your Persuade skill.
8 - Droid Attack
Before entering this room, Kreia helps you regain your force sensitivity, a bonus of 40 force points, which helps alert you to the three droids in the room. When you level up your character, if you're playing light side, I would definitely recommend the Stun Droid series as you progress. It helps tremendously in Peragus, especially for the physically "weaker" consular. Snatch the stealth field generator in the room and equip it on your character (providing you have the Stealth skill) if you want to avoid the several droids in the next large room at #9. You can shut them all down using the console in the large room at #10.
9 - Droids Squared
Several mining droids inhabit this large area, and if you opted for using the stealth generator, you can shut them all down using the console at #10. They're easy, so whichever way you prefer won't likely alter the outcome.
a) After returning from the dormitories:
You've been through the dormitories and have both Kreia and Atton with you. Here is where you'll encounter the lone assassination droid that's been stalking you, HK-50. When combat begins he'll have 4 droid mines floating nearby, so focus on them first and then concentrate on HK. He's fairly easy so you probably won't have too much trouble, but use your vibroblade up close and have another character or two stay back and fire (and/or use the force, especially stun droid if you have it). When the battle's over, search the remains for a Droid Self-Sustaining Unit, an Advanced Mining Laser and the important HK Vocabulator, which will be one of the four parts necessary to restore the HK droid on the Ebon Hawk once you reach it.
Continue now through the exit at #13.
10 - Console
Use the console to shut down the droids on the level if you haven't already destroyed them all, and likewise open the prison door at #11, which is where you should go now if you're here for the first time.
a) After finding Atton:
Use the comm on the console to get in touch with T3-M4, and after the session, you'll once again (if you played the prologue) get to navigate the droid around to help out. Proceed to Hangar Bay (#1).
11 - Atton, Party Member
After using the console at #10 to open the prison door, find this room and you'll be introduced to Atton. It's another good spot to gain (LS Points) or (DS Points), depending on your choices. Remember, there's no influence yet, so if you're a Dark Sider, you can be cruel here without any influence loss later. Next use the console at #10. See #10a above.
12 - Exit
Exit to Fuel Depot (#9). You can access this exit from the other side, from within the Fuel Depot.
13 - Exit
Exit to the Harbinger Command Deck (#1). This exit will be unavailable until you defeat HK-50, at which point, you'll want to come here and use it.
|
|
|


