 Did we miss anything on this map? Is there something we didn't discover? Let us know!
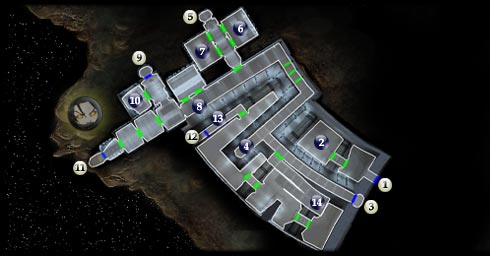
Ultimately, you'll enter the Fuel Depot four times and explore different areas. The first two times, as T3-M4, they'll be short trips through the #1 and #3 entrance/exits, and later as your main character, only moderately longer. The first time with your PC (player character), you'll enter at #5 and then again at #12 for your final trip through. With T3, your goal is explained in the first four map numbers.
1 - Exit
Did we miss anything on this map? Is there something we didn't discover? Let us know!
Ultimately, you'll enter the Fuel Depot four times and explore different areas. The first two times, as T3-M4, they'll be short trips through the #1 and #3 entrance/exits, and later as your main character, only moderately longer. The first time with your PC (player character), you'll enter at #5 and then again at #12 for your final trip through. With T3, your goal is explained in the first four map numbers.
1 - Exit
Exit to
Hangar Bay (#3). The only time you'll come through this door is with T3-M4 on his first trip. Continue to #2.
2 - Parts
Search the broken droid and corpse (which I'll give the label "containers" often in the walkthrough) thoroughly for the parts you need to repair the console back in the Hangar Bay, and then make your way to
Hangar Bay (#4).
3 - Exit
Exit to
Hangar Bay (#6). The first time here, you'll be T3-M4. Continue down the corridor and take a left to #4.
Later, with your main party, after you take down the force field on the left wall of the corridor, you'll take this exit back to the Hangar Bay and your final push for the Ebon Hawk.
4 - Console
Using T3-M4, open the Emergency Hatch at
Administration Level (#5) for your main character. Then watch a small cut-scene... and continue to the link above with your main character to enter the Mining Tunnels.
5 - Exit
Exit to
Mining Tunnels (#9). When you enter here, you'll need to solve a puzzle to proceed, involving a curious droid in the room on your left. Go there now.
6 - Arrogant HK Droid
Talk to the droid for an amusing if also irritating conversation, and ask it about the body on the floor. You'll learn that it can mimic voices. Hmm. Continue to #7 and search the containers in the room for a sonic imprint sensor. Bring it back to the HK droid and again ask about the body on the floor. If you have a high enough Persuade skill, eventually you'll get him to speak the code you need into the sensor. Otherwise, you'll need to put together the code from the holologs of two consoles (see #10) as well as the miner's dying screams in order to access the airlock at #11, which is your current destination.
7 - Workbench & Sonic Imprint Sensor
Search the containers for a sonic imprint sensor you can use on the HK Droid at #6 to record its playback of the miner's screams, or easier, to get it to play back the airlock code in the miner's own voice. Also, you can use the workbench here to upgrade, create or breakdown items.
8 - Droid Ambush
As you pass this locked door, two Mark II droids bust out of the room and attack. They're tougher than what you've faced up to this point, with potentially lethal ranged attacks. Get up close.
9 - Exit
Exit to
Administration Level (#12). There is no need to use this exit unless you both could not get HK to play back the codes and did not listen to the holologs at the
Administration Level (#7) security terminal. I'd recommend trying to put together the code first at #10, and if that fails, then go back to the link above and listen to the logs.
10 - Console
Play back the code you recorded from HK at #6, or put together the correct code from the holologs on the terminal as well as the one from the
Administration Level (#7) terminal and the miner's dying screams from the HK droid at #6. Unlock the airlock seal and proceed to #11. Watch out for the floating mines on your way there, and make sure to shoot them from a distance.
11 - Exit
Exit to
Asteroid Exterior (#1). Once you have access from the console at #10, grab a space suit from the nearby locker and take this exit. You'll automatically don your space suit.
12 - Exit
Exit to
Engine Deck (#6). You've just stepped off the Harbinger and are now here for the last time, on your way to the Hangar Bay. Continue to #13.
13 - T3-M4 & Stash
Check the stash container for the Hangar 25 Control Conduit and rouse T3-M4 nearby to reclaim the expert droid. In the next short section, you'll do battle with numerous spider droids and mines. Clear them all out before proceeding to the console at #14.
14 - Console
Use the console here to shut down the field at the top of the ramp. Then proceed out the exit at #3 to
Hangar Bay (#6).


