|
|
 Did we miss anything on this map? Is there something we didn't discover? Let us know!
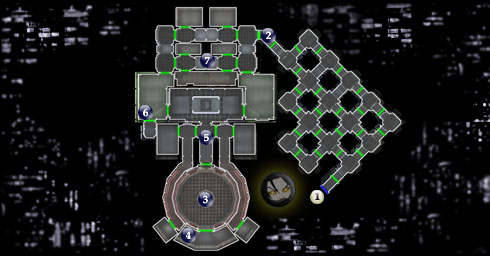
As your main character, your main goal will first be to get to #2 through the darkened maze (your map fails to work for this part). It's very simple if you know where you're going. Hang the first left, then proceed straight all the way to the end, avoiding, disabling or recovering the mines on your path, open the door to your right, and keep to the left until you find the last door. At this point, you will take control of either Hanharr or Mira in a battle against the other, at #3.
Did we miss anything on this map? Is there something we didn't discover? Let us know!
As your main character, your main goal will first be to get to #2 through the darkened maze (your map fails to work for this part). It's very simple if you know where you're going. Hang the first left, then proceed straight all the way to the end, avoiding, disabling or recovering the mines on your path, open the door to your right, and keep to the left until you find the last door. At this point, you will take control of either Hanharr or Mira in a battle against the other, at #3.
After the battle, your goal will be to open the door for your main character, which can be done at #6 after first finding the key at #4. Once that's done, use your main character to walk down to #3 and that will be the end. Be very cautious of the Ubese Bounty Hunters, especially as Mira, as they can be very tough to defeat. Hanharr or your main character should have little to no problem.
1 - Exit
Exit to Jekk Jekk Tarr (#6).
2 - Sealed Door
When your main character reaches this door, the scene will shift to either Mira or Hanharr at #3, depending on whom you met at the Docks earlier. After Mira or Hanharr open up the door for you at #6, you'll be free to explore the area and eventually head back down to #3 again for a showdown with Visquis. See #3a for details.
3 - Mira vs. Hanharr, then Kath Hounds
Whichever character you take control of, level them up if need be. As Mira, if you didn't level her up at Jekk Jekk Tarr, give her the best ranged feats such as Master Rapid Shot and Close Combat. As Hanharr, concentrate purely on Melee feats such as Master Toughness, Two-Weapon Fighting, Master Flurry, etc.
Hanharr is by far the toughest, most robust tank character you can have in the game. Without using Force Powers, a fully leveled Hanharr would be likely to be a very tough match for even your fully leveled Jedi Weapon Master/Sith Marauder, if not come out on top. Fortunately, as Mira against him, the AI is not as smart or clever, and you can both outrun and outrange him to death.
As Mira, after equipping the very best ranged weapons you have and activating your melee shield, just keep your distance, running in a circle and stop every 6 or so seconds to fire off a short flurry. You will eventually wear Hanharr down and defeat him. As Hanharr, the battle is almost over before it begins. Mira is no match for your weapon skills and she will go down quickly, especially if you use your Wookiee Rage ability.
When it's over, you'll be faced with another challenge. Visquis will release several Kath Hounds into the arena. As Mira, toss a grenade at them, then run and fire. As Hanharr, plow them down using Rage.
After defeating the dogs, head to #4 to retrieve the keycard you need for the locked door.
a) As your main character:
When you make it to the door leading to the arena, a cut scene will play out with Visquis and then Goto. Essentially, your character is captured by Goto and taken to his Yacht. Cue T3-M4 at Docks (#14). See the link for details.
4 - Old Beast Tender Corpse
Grab the keycard off this corpse to unlock the door to the north of the arena.
5 - Ubese Bounty Hunters
As Mira, approach every Ubese Bounty Hunter with care. They are extremely powerful melee fighters and can kill you quickly if they get too close. Run away as much as you can from them, stopping to fire off a blaster flurry every 6 or so seconds, until they are dead. It will take longer, but you are likely no match for them, even with a shield. However, activate a melee shield regardless. Do not explore the area and instead proceed straight to #6, so you won't be dealing with as many bounty hunters. You can take them down with your main character after he/she enters.
As Hanharr, even the bounty hunters pose no threat, especially after turning on your Wookiee Rage. Nevertheless, I'd recommend heading to #6 without exploring much, and leaving that to your main character.
6 - Emergency Tunnel Control
Use this console to "access all available escape routes" and you will again take control of your main character at #2. Explore all rooms with your main character before proceeding to #3a.
7 - Workbench & Ventilation Control Console
Use the console to cause chaos with the bounty hunters in the various rooms, download a map of the area, and open all doors. Use the workbench here as well if you need to.
|
|
|


