|
|
 Did we miss anything on this map? Is there something we didn't discover? Let us know!
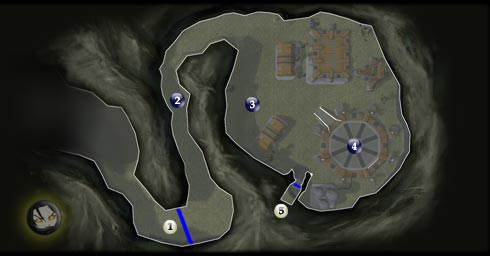
Your main goal is to make it to #4 and use the console, then decide to head into the Underground Base at #5. There are several battles before that can happen, however, beginning with the one at #2.
1 - Exit
Did we miss anything on this map? Is there something we didn't discover? Let us know!
Your main goal is to make it to #4 and use the console, then decide to head into the Underground Base at #5. There are several battles before that can happen, however, beginning with the one at #2.
1 - Exit
Exit to Restoration Zone (#10).
2 - Twi'lek Mercenary Droidmaster & War Bots
Before you reach this point, you'll see many mines lined up in rows. The easiest approach is to take Bao-Dur into Solo mode, and put him in Stealth mode to disarm the mines, if he has any skill in Stealth. Alternatively, take your best character in Solo mode, and run through the mines, then bring your others up for support. It's easiest I found if you first take out the two War Bots, then concentrate solely on the twi'lek.
3 - Mercenary Attack
All around this area you'll find several groups of mercenaries, all hostile. The first is here at #3 but you'll find them also between this and the raised platform at #4. Try and keep your party together by focusing on the same enemy, so that you stay grouped and are around one another for healing. It can be a long battle if you fight them all at once, or separated if you managed to stay together and prevent yourself from straying. Try to kill all of them on the ground before heading up the ramp to the platform at #4.
4 - Platform, Turrets & Console
Defeat the two turrets at the top of the ramp, then your enemies on the platform. Afterward, use the console to scratch out any alternative plans you may have, and decide that it's best to enter the Underground base at #5.
5 - Exit
Exit to Underground Base (#1). Watch out for the mines guarding the entrance.
|
|
|


