 Did we miss anything on this map? Is there something we didn't discover? Let us know!
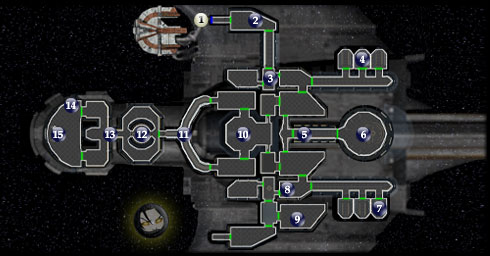
This yacht can at first appear very confusing. I'll make it simple, however. Each security function of the ship (turrets, containment cells, power distribution, etc.) is controlled by normal looking "command consoles" located in various places throughout the ship. Each one of these security functions is at first "restricted" and the only way to gain control of them is to gain its corresponding access code. Why would you want to gain control of them? How does overloading the turret system at #5 so that a difficult battle is made much easier sound? How about shutting down the deadly mine fields at #13?
Did we miss anything on this map? Is there something we didn't discover? Let us know!
This yacht can at first appear very confusing. I'll make it simple, however. Each security function of the ship (turrets, containment cells, power distribution, etc.) is controlled by normal looking "command consoles" located in various places throughout the ship. Each one of these security functions is at first "restricted" and the only way to gain control of them is to gain its corresponding access code. Why would you want to gain control of them? How does overloading the turret system at #5 so that a difficult battle is made much easier sound? How about shutting down the deadly mine fields at #13?
There's only one other thing you need to know. In order to perform any "actions" on these security functions of the ship, you need the proper program, such as the "shut down" program, "overload" program and a "reset" program. How do you get the access codes and programs? By defeating various enemies and downloading them from various terminals. Then you simply find a command console (not a security terminal), upload the programs you've found, unlock the restricted security function (using its access code), and then Run the program of your choice.
Your main objective here is to first find your main character at #6, acquire the "power distribution" access code, along with the "shut down" program, and head to #15 where you can "shut down" the power distribution, and escape the ship. Simple right? It actually is.
1 - Exit
Exit to
The Ebon Hawk (#1). You won't be able to reboard the 'Hawk until after you shut down Goto's power distribution system.
2 - Console & Utility Droid
Using a character with the computer skill, slice into the console and download the "overload" program. If you fail to do this, in order to get the optional "overload" program, you will need to defeat Goto Guard Droids, witness their final transmission binary code, which has three bits labeled something like: ZERO ONE ONE (which is 3). You must then keep a
current count, meaning the total of the final transmissions you've seen, and enter it into this console in order to get the "overload" program. If you ask me, it's too much trouble and you are better off simply fighting your way past the turrets at #5, which is one of two places you'd want to use the program. Here is a list of binary numbers, in case you need to do it the hard way:
zero zero zero = 0
zero zero one = 1
zero one zero = 2
zero one one = 3
one zero zero = 4
one zero one = 5
one one zero = 6
one one one = 7
Also check the Utility Droid and receive the "shut down" program.
3 - Goto Starboard Commander & Command Console
Execute your own shut down program on this defense droid, and then check its remains for the access code to the Containment Cells. It's likely you'll also have to defeat a few curious Goto Guard Droids here as well.
Now use the command console, upload the programs you currently have (shut down and possibly overload), unlock the restricted system: containment cells (using the access code you just got), access system control for containment cells, and run the program shut down. Now you have access to #4 and #7. Proceed to #4, taking out any droid resistance along the way.
4 - Damaged Droid
After shutting down the containment cell shields, scavenge this droid to acquire the Turret Defense access code. Head back to the command console you were recently at, at #3, and unlock the Turret Defense system. Now select system control for Turret Defense and run both overload and shut down (or at least shut down). The turrets at #5 will then turn on one another and the droids in the room will be destroyed, making this difficult battle virtually harmless.
5 - Droids & Turrets
If you didn't run any programs on the turret defense (see above), then you'll be facing a tough battle. Activate your energy shields and your force power Energy Resistance if you have it, and use your most potent mass-affecting force powers on the droids and turrets. When you open the door to #6, you'll be reunited with your main character, finally.
6 - Main Character & Console
After you find your main character, access the console here to acquire the crucial Power Distribution access code. This code is required in order to escape the ship. Map points #7, 8 and 9 are completely optional. All you need to do now is head straight toward #15, however I'd recommend exploring anyway for experience.
7 - Damage Droid
Scavenge this droid to acquire the Reset Program.
8 - Lab Station
Aside from the hostile droids here, you can access the possibly handy Lab Station.
9 - Workbench
Another useful utility, the workbench.
10 - Defense Turrets & Twin Suns
On your way to the bridge at #15, you'll encounter several turrets around the perimeter of the room. Concentrate on one at a time to defeat them quickly. On the way back from the bridge, you'll have your second and final encounter with the Twin Suns (who apparently didn't die). They are actually much easier this time around, and when they've fallen, search the remains for a pair of Twi'lek Spinning Blades.
11 - Deadly Mines & Goto Central Commander
The easiest way past these deadly mines is simply running over them (preferably in solo) and healing, however you can also enter Stealth mode and disable or recover them too. Just past the mines are a few droids you'll have to fight including the Goto Central Commander. Search its remains for the Minefield access code, which can come in handy just ahead at #12.
12 - Command Console
Use this command console once you acquired the Minefield access codes at #11. Unlock the restricted system: Minefield, and then under system control for Minefield, run either the overload or shut down program. The overload keeps the mines active but will destroy most of the droids who rush at you at #13... very handy. The shut down program will deactivate all the deadly mines at #13 plus more at the entrance to the bridge. You'll still have to battle the multiple droids at #13 however.
13 - Deadly Mines & Droids
Just past the rows of deadly mines are the droids, waiting to get at you. In Stealth mode you can disable or recover them before having at the droids, or use the console at #12 to take down the mines, or shoot the droids from afar using one of your characters in Solo mode. The possibilities are many. When the area is clear, head to the right, pass up the mines and open the door to the bridge area.
14 - Container
Surprisingly, you'll find among some other good items the Droid Controller access code, not that it will do any good now.
15 - Primary Command Console
Use this central command console to run the shut down program on the power distribution system. Remember, the access code for the system was at #6.
After this is accomplished, you will meet heavy resistance on your way back to #1 and the Ebon Hawk including Duros Bounty Hunters and the Twin Suns at #10. Continue fighting your way to #1 and the next time you regain control over your character, you will be face to face with Zez-Kai Ell at
Docks (#11a). See the link for details.


