 Did we miss anything in this section? Is there something we didn't discover?
Let us know!
Walkthrough
Did we miss anything in this section? Is there something we didn't discover?
Let us know!
Walkthrough
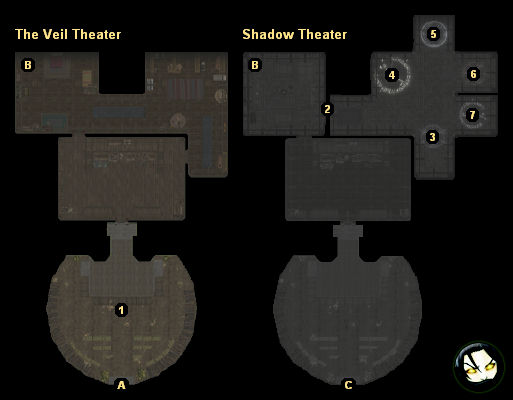
1 - Magda
Madga will tell you some things about Lienna, including how she spent time with a "red lady" with a shaved head, and she'll give you a key that you can use to unlock a couple of doors inside the Shadow Theater (#2 and Exit C). Magda will also act as a shopkeeper. She'll only carry a couple of items of interest, like
Finch's Finest Hat and a
Nymph Cloak +6.
2 - Locked Door
3 - Golem
You'll encounter a golem here called the "Keeper of Doors." It will start out dormant, but if you click on it then you'll be given a couple of options for bringing it back to life. If you channel your spirit into the golem, then you'll lose 5 spirit energy, and the golem will only function for your current conversation. Since you'll need to talk to the golem a few times, this isn't a great option.
The other way to bring the golem back to life is to reach into its body and pull out a
Blackened Spirit Core. This act will also give you the Mold Spirit feat, and if you use the feat to combine the spirit core with a
Brilliant Spirit Essence (using the
Enchanter's Satchel), you'll create a
Shining Spirit Core, which, when placed back into the golem, will animate it forever (or at least as long as the campaign lasts). You'll also receive 1000 experience points for doing this.
Note: You should have picked up a
Brilliant Spirit Essence from the
Middle Barrow. If you no longer have it, then don't worry. You'll pick up more spirit essences during the course of the campaign, and it doesn't really matter when in Act Two you get the golem working.
Either way, with the golem awake, you'll be able to order it to open the four doors in the room (#4-7).
Finally, behind the golem you'll find a book and a pair of chests. You can pick up a
Grey Robe of the Archmagi and the quarterstaff
Remembrance from the chests.
4 - First Door
When the golem (#3) opens this door, a trio of gargoyles will pop out. These are the gargoyles who carried you away from the Vale of Merdelain at the end of the original campaign, and they'll tell you a little bit about how you got from there to Okku's Barrow, and what happened to some of your companions. They'll also inform you that the nine hags of the Slumbering Coven are involved in some way, and you'll receive 2500 experience points for talking to them
The conversation with the gargoyles can end in a few ways. You might attack them, they might attack you, you might let them leave in peace, or you might send them into the Third Door (#6), provided that you've learned where it leads. Each choice will reward you with a small amount of experience points, but you'll get the most (750-1000) from using diplomacy (good) or bluff (evil).
5 - Second Door
When the golem (#3) opens this door, a Defective Imaskari Golem will step through and attack you. It will drop
Shocking Golem Arms when it dies. You can use the golem arms in a quest later in the act.
6 - Third Door
When the golem (#3) opens this door, a Lesser Primal Fire Elemental will appear and attack you. It'll drop a
Brilliant Fire Essence when it dies.
7 - Fourth Door
This is the only door here that you'll be able to step through -- but only once you've learned a proper destination. For now, you won't be able to do anything with it. Later, you'll be able to use this door to travel to the Red Wizard Academy.
Exits:
- Exit to
Mulsantir.
- Shadow portal.
- Door to
Shadow Mulsantir. The key from Magda (#1) will open this door, too,
which is convenient, because this route to
Shadow Mulsantir won't force you to wait until night falls.


