 Did we miss anything in this section? Is there something we didn't discover?
Let us know!
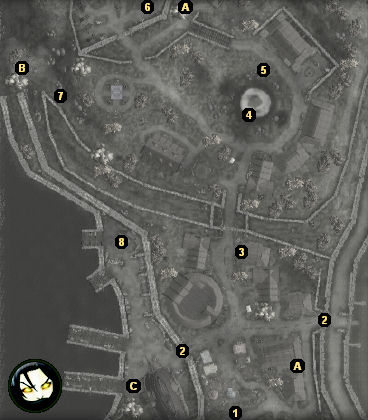
Walkthrough
1 - Dirt Mount
Did we miss anything in this section? Is there something we didn't discover?
Let us know!
Walkthrough
1 - Dirt Mount
Inside this dirt mound you'll find
Death's Handmaiden.
2 - Locked Gates
These gates can't be opened. To get to the harbor part of Shadow Mulsantir, you'll need to go through the shadow portal in the Sloop.
3 - Heilari's House
You'll find a few things of interest inside the house: some books and scrolls, a corpse, a phylactery, and a pair of death knights. If you read the books, then you'll discover that Heilari learned how to turn himself into a lich, but that the ritual apparently didn't go very well. If you then click on Heilari's corpse, you'll be given three options.
If you crush Heilari's head, then you'll become more chaotic, and the death knights will attack you. If you complete the ritual, then you'll become much more evil, you'll earn 250 experience points, and when you talk to Heilari, he and the death knights will attack you. If you release Heilari's soul from the phylactery, then you'll become more good and lawful, you'll earn 250 experience points, and you'll find a
Talisman of Pure Good. If you're just looking for experience points, then the middle option is the best.
You might also notice a small locked chest in the house. If you can get it open, you'll find some spell scrolls and a
Rakshasa Staff inside.
Note: It's safe to rest in Heilari's house.
4 - Death God's Vault
Outside the vault, you'll face a pair of nightwalkers. Each one will drop a
Brilliant Earth Essence when it dies. Inside the vault, you'll quickly run into Kaelyn the Dove, and she'll agree to join your party.
Note: There is much more to the
Death God's Vault than your encounter with Kaelyn, and while you can explore some of it in Act One, you'll just have to come back in Act Two to see the rest. For that reason, we've placed the vault in the Act Two section of the walkthrough, and you'll have to reference it there if you plan to start exploring it now.
Another note: If you have trouble getting your rogue character to disarm the trap on the front door of the vault (because s/he runs up to it and then stops and does nothing), here's a trick. Order the character to disarm the door twice (so there are two entries in the command queue), and then cancel the first order (by left clicking on it).
A third note: Magic Circle against Alignment is an extremely noisy (and therefore annoying) spell. You might want to immediately take it out of Kaelyn's spellbook.
5 - Unmarked Graves
You'll find two unmarked graves here. If you loot them, you'll find a bunch of equipment, including a
Shield of Darksteel Tower, a
Black Robe of the Archmagi, and a
Lichskull.
6 - Dirt Mound
Inside this dirt mound you'll discover a pair of
Dragon Slippers.
7 - Shadow Umber Hulks
You'll encounter half a dozen shadow umber hulks here. They won't drop anything more exciting than some volatile essences, but behind them you'll find a shadow portal (Exit B) that will lead you to an isolated part of
Mulsantir where you can pick up a
Periapt of the Lost Witch.
8 - Shadowmaster Camp
No matter what you say to the shadowmasters, they'll attack you -- although you can get an extra 200 experience points if you successfully bluff them first. Some shadowmasters will spring up out of the shadows when the battle starts, so you'll be fighting half a dozen enemies in total, but if you have a full party then it shouldn't be a very tough fight. When you loot the corpses, you'll find some gold, a
Brown Dragon Shield, and a letter incriminating Shelvedar Nuum (located inside the Sloop) as a shadowmaster spy.
Exits:
- Shadow portal to
Mulsantir.
- Shadow portal to
Mulsantir. This portal leads to an isolated part of
Mulsantir where you can pick up a
Periapt of the Lost Witch.
- Shadow portal to the Sloop.


