 Did we miss anything in this section? Is there something we didn't discover?
Let us know!
Walkthrough
1 - Fireplace
Did we miss anything in this section? Is there something we didn't discover?
Let us know!
Walkthrough
1 - Fireplace
Inside the fireplace you'll find a singed piece of paper reading "Seal the door." So apparently Nefris had some warning about what was going to happen.
2 - Lab Journal
Inside the journal, under "replication," you'll find a key. The key won't open the door in this room (#3), but it will unlock some doors in the
Academy Instructors' Quarters.
3 - Locked Door
This door has a special lock. If you read the inscription, then you'll see a poem about "four wayward souls," and if you examine the lock, then you'll see "four hemispherical sockets." Clearly then, you'll need four particular souls to open the door. Here's where you can find them:
- Fragmented Soul. You'll get this soul for completing the mephit experiment in the
Academy Classrooms.
- Incomplete Soul. You'll get this soul for completing the strange apparatus puzzle in the
Academy Instructors' Quarters.
- Marked Soul. For this soul you'll have to bargain with the pit fiends in the
Academy Instructors' Quarters. They'll ask you for a single soul in return, but that soul will have to be rich, poor, selfless and self-centered. When you ask Master Poruset (in the
Academy Classrooms) about such a soul, he'll tell you that he can construct one by combining two souls together, but that you'll need to provide him with the souls. To help you out, Poruset will give you a Work Order, which will allow you to check out two souls from the soul depository (also in the
Academy Classrooms).
The two correct souls are in Soul Housing No. 91 and Soul Housing No. 127. When you take these souls to Poruset and put them in his forge, he'll combine the souls together to form a Fused Soul. If you've used the correct souls, then Poruset will comment, "This seems right to me." Poruset will also give you two Promissory Notes, which you can give to the caretaker to forgive your debt to the soul depository.
When you take the Fused Soul to the pit fiends, they detect that it isn't a real soul, and they won't be happy about it, but they'll still give you the Marked Soul in exchange, and you'll also receive 2000 experience points.
- Surrogate Soul. You'll get this soul from Bebtu in the
Academy Instructors' Quarters.
When you place the four souls into the lock, the door will click open, but then Araman and several Red Wizards will ambush you. Araman will talk to you a bit and reveal (just in case you hadn't figured it out yet) that the hunger you feel inside of you is what is left of his brother Akachi. Then Araman will leave, and the Red Wizards will attack. If you have Safiya with you, or if you're skilled in diplomacy or intimidation, then you can convince Master Djafi to switch sides, but this won't make a lot of difference in the battle. You'll receive 1500 experience points for defeating the wizards.
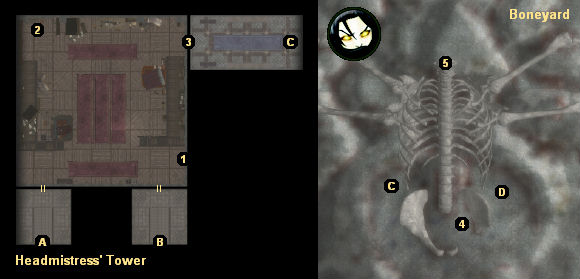
4 - Sardonis
In this spot you'll meet a group of dragon knights led by a man named Sardonis. No matter what you say to Sardonis, he'll wave you through to speak with Myrkul (#5). If you devour Myrkul's spirit, then the knights will attack you, and you'll find a
Deea Pouch on Sardonis' corpse.
5 - Myrkul
You'll have a long conversation with Myrkul here. He'll comment on some of your companions (especially Kaelyn), but then he'll move on to you. You'll learn that your soul is in the Wall of the Faithless, and that to get it back (and end your curse), you'll need to go through the Betrayer's Gate in the
Death God's Vault and assault the City of Judgment. To open the gate, you'll need to pick up your old friend the
Silver Sword of Gith, which you'll find in the
Founder's Sanctum. To help you out, Myrkul will open a portal to the Sanctum (Exit D).
Before leaving, you might want to use Eternal Rest or Devour Spirit on Myrkul. That will net you
Myrkul's Essence, which unfortunately can't be used in the campaign without resorting to the console (the item you'd need to combine it with can't be gained without loading it onto one of your characters). But ending Myrkul's existence will also restore your spirit energy, which might be a very good thing depending on how long it took you to solve the puzzles in the Academy.
Note: If you allow One of Many to devour Myrkul's spirit, then Myrkul will become the One, and if you talk to it after dismissing your other companions, then it will attack you. After defeating Myrkul, the Child will take back over, but if you want to you can use this as an excuse to devour One of Many's spirit to claim
One of Many's Essence.
Exits:
- Stairs down to the
Academy Instructors' Quarters.
- Stairs down to the
Academy Classrooms.
- Portal between the Headmistress' Tower and the Boneyard.
- Portal to the
Founder's Sanctum. Going through this portal will cause Act Three to start up.


