 Did we miss anything in this section? Is there something we didn't discover?
Let us know!
Area Note
Did we miss anything in this section? Is there something we didn't discover?
Let us know!
Area Note
If you begin the campaign with a new character, then you'll start out in a small lobby. The lobby is a safe place where you can advance your character. The campaign will give you 165,000 experience points, which is enough to bring your character to an unadjusted level of 18. The campaign will also give you some basic +3 equipment, but you won't receive it until you've left the lobby and started playing the campaign. The exit door from the lobby is located in the southeastern corner.
Walkthrough
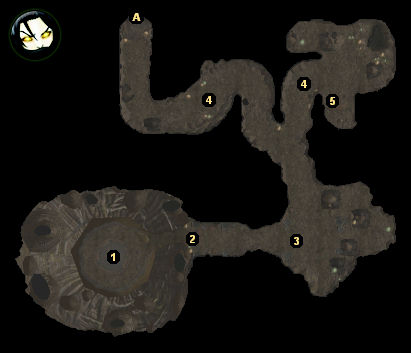
1 - Starting Point
This is where you'll start out in the campaign. You'll quickly discover that the silver shard near your heart has been removed, and that you now have "a presence, a hunger" inside of you instead. Then Safiya, a Red Wizard of Thay, will show up, and she'll join your party.
If you touch one of the runestone pillars here, then you'll have a vision of a boy, a woman, and a wall, and you'll earn 250 experience points. The vision will make more sense later. You might also notice a skeleton nearby. It'll make more sense later, too.
Before advancing into the barrow, you should check your inventory and your spellbook. You won't have any weapons or gold on you, your cloak will need to be equipped, and you might not have any spells memorized. It's safe to rest where you start out.
Note: You might also want to check Safiya's spellbook. She has the Persistent Spell feat, which means that you can change one of her level 9 spells to persistent Haste, which will last 24 hours when cast.
2 - Kaji Conversation
At this point Saifiya will tell you about her familiar Kaji. Kaji is useful if you're not a rogue because he can disarm traps and unlock doors.
3 - Weapon Conversation
When you reach this spot in the barrow, the ground will shake and Safiya will worry that you're about to be attacked. She'll then offer you one of the weapons in her inventory (a
Composite Shortbow +3, a
Light Crossbow +3, or a
Short Sword +3), and she'll suggest that you enchant it.
To enchant the weapon, open up Safiya's inventory and place the weapon of your choice along with a
Brilliant Water Essence into the
Enchanter's Satchel. Then have Safiya cast Ice Storm on the satchel. You should end up with a weapon with a 1d6 cold damage bonus.
4 - Barrow Guardians
You'll face a couple of barrow guardians in these spots. They'll drop one or more volatile essences when you kill them. You can't do anything with volatile essences, other than combine them to form brilliant and pristine essences. To combine essences, you'll need to use the "combine" power of the
Shaper's Alembic, which you'll find in Safiya's inventory.
5 - Scroll Pile
Inside this scroll pile you'll discover a
Dagger +3, the book
The City of Judgment, and a spell scroll. Picking up the
book will trigger the quest "The Betrayer's Crusade."
If you pre-ordered Mask of the Betrayer, then this scroll pile is also where you will find your pre-order bonus,
Mystra's Blessing. Three of these blessings were created in all, but the other two,
Chauntea's Blessing and
Mielikki's Blessing, were not placed in the campaign.
If you didn't pre-order the game, then you can still acquire the blessings via the console. Just press the "~" key and type the following lines:
debugmode 1
giveitem nx1_blessing_chauntea 1
giveitem nx1_blessing_mielikki 1
giveitem nx1_blessing_mystra 1
debugmode 0
Your currently selected character should receive the blessings.
Exits:
- Stairs to the
Middle Barrow.


