 Did we miss anything in this section? Is there something we didn't discover?
Let us know!
Area Note
Did we miss anything in this section? Is there something we didn't discover?
Let us know!
Area Note
This is where you'll end up when you travel to the Sunken City on the world map.
In some versions of the game, it's possible to die on your way to Lakeshore. That's because on your first visit you have to arrive during the afternoon, and if you arrive "too late" then the game will force you to wait until hour 15, and all of that waiting plus the travel time can kill high-craving characters. If this happens to you, then you'll need to make sure that you leave for Lakeshore in the late morning (if you leave from
Mulsantir Gate, then noon is a good departure time).
Also, unverified by us, if you used the
Imaskari Rod to open the blocked passage in the
Middle Barrow, then you might meet the lich Maric here (on the Nightshore dock), and he'll become a follower for a while during the Sunken City part of the campaign.
Walkthrough
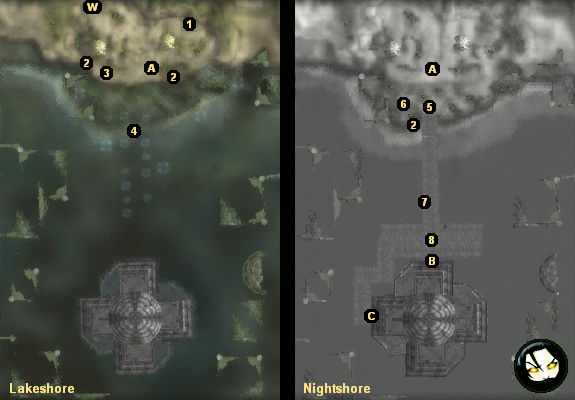
Your goal in this section of the campaign is to make it into the structure in the center of the lake. You won't be able to do it during the daytime, but at night a shadow portal will appear (Exit A), which will take you to Nightshore, and from there you can simply walk to the structure. However, to actually get inside, you'll either have to make a deal with Fentomy (#5), or you'll need to convince the petitioners waiting outside (#8) to leave, and then the door guards will let you in.
1 - Beetle Mound
If you click on the beetle mound, then six tenacious fire beetles will attack you. Inside the mound you'll find
Boots of the Sun Soul +4 and some other odds and ends.
2 - Beached Corpses
You won't find anything of interest on these three corpses, but next to the two in Lakeshore, animal spirits or water elementals will spring up and attack you, no matter what kind of character you're playing.
3 - Fentomy (First Visit)
Fentomy will tell you that he fishes here even though there aren't any fish, and eventually you'll figure out that a lot of bodies can be pulled from the lake, and that such "fishing" is lucrative. Before he leaves, you might learn that Fentomy is a dao (genie), and that he isn't really here for the fishing, but regardless, he'll warn you not to stay here at night.
Also at this spot you'll find a chest and a journal belonging to the previous fisherman. You'll only pick up some gems and gold from the chest, but the journal will help explain why the shore is dangerous at night.
4 - Lake
There isn't any way to reach the floating corpses or the sea monsters in the lake.
5 - Fentomy (Second Visit)
When you meet up with Fentomy again at this spot, he'll tell you that he needs a "heavy lifter" for his gem business, and he'll ask you to battle an earth elemental in the
Skein, so that he can claim it when it returns to the Elemental Plane. If you agree, then he'll give you a key to the side door of the building to the south (Exit C).
Later, when you return to Fentomy (now back at Lakeshore) after visiting the
Skein, if you completed his quest, then he'll give you 5000 experience points and 100,000 gold pieces. If you didn't complete his quest, then he'll be mad at you, and if you can't pass a diplomacy check, then he'll summon two elder earth elementals and attack you. This isn't so bad, though, because he'll drop around 10,000 gold pieces plus a
Durthan Cloak when he dies.
6 - Coffin
When you approach the coffin, Count Crowroost's servant will approach you, and he'll predict dire consequences for you should you disturb the count or attempt to open the "impenetrable" coffin. If you talk to the servant a second time, then you might get one or more options for carrying the coffin through the nearby portal (Exit A). If you do, and if you open the coffin during the daytime, then you'll earn you 2000 experience points for destroying the vampire (plus get to see him run screaming to the world exit). If you open the coffin at night or in the Shadow Plane, then you'll earn 1000 experience points for disturbing the vampire, and you'll also get about 300 experience points plus a
Shadowmaster Kukri when you kill him.
7 - Omaga
Omaga is a merchant. He'll be dismayed that you would venture outside your home with such weak equipment, and he'll attempt to sell you some of his own. But despite the build-up, Omaga won't have a lot to offer other than
Imaskari Bracers of Immortality and a
Shield of the Magi.
Note: If you kill the Slumbering Coven inside
Coveya Kurg'annis, then Omaga will attack you when you return here, and you'll be able to pick up the
Shield of the Magi for free.
8 - Petitioners
When you reach the door to
Coveya Kurg'annis (Exit B), you'll find two guards named Turlok and Mulv blocking the way. If you talk to them, then you'll learn that they're not letting anybody inside, simply because there are too many people waiting for admittance, and if one group were to go in, then the others would become angry, and who'd want to deal with that? But if you can cut the number of petitioners in half, then they'll let you in.
There are four sets of petitioners:
- Telthor Group. If you have Okku with you, then he can scare off the telthors. Otherwise you'll have to use the Provoke Spirit feat to kill them.
- Genasi Group. You'll need to be skilled in diplomacy or intimidation to get the genasi prince to leave. If you don't make fun of the prince's circumstances, then 45 diplomacy is enough to get the job done. We've never beat the intimidate check. If you have One of Many with you, then you can also use him to scare the prince away.
- Uthraki Group. If you didn't devour Okku's spirit, then Gruuf the uthraki, like every uthraki out there, will decide that you've been wasting your gift, and he'll challenge you to a fight. Regardless of how you answer, he'll move next to the side door (Exit C), where two of his friends will join him, and then the next time you talk to him, he'll attack you. When he dies he'll drop
Mysterious Meat, but you'll never be able to use it.
If you devoured Okku's spirit, then Gruuf will tell you that he brought the
Mysterious Meat for his brethren inside, but that the guards won't let him deliver it. If you offer to deliver the meat yourself, then he'll be skeptical about your ability to get past the guards, and you'll either have to steal the meat from him or return to him once you've gained passage. If you have One of Many in your party, then he'll be able to steal the meat for you.
- Illithid Group. If you can convince Gud-bugh-ka the illithid that some githyanki are on their way here (this requires some skill in bluff, diplomacy and lore, but not much), then he'll give you the
Likely Amulet, and he'll flee the area.
After removing at least two of the four petitioner groups, when you talk to Turlok again, he'll open the locked doorway behind him (Exit B), which will allow you to pass through the shadow portal there to arrive in
Coveya Kurg'annis. If you only removed two of the four groups, then Turlok will charge you 50,000 gold pieces to get in. If you removed more groups than that, then Turlok won't charge you. If you have Gann in your party, then you won't have to pay anything regardless.
Exits:
- Shadow portal between Lakeshore and Nightshore. It will only appear at night. You'll receive 2000 experience points the first time you go through it.
- Door / shadow portal to
Coyeva Kurg'annis. You'll need to convince some petitioners to leave (see #8) to use this exit.
- Door / shadow portal to the
Skein. Fentomy (#5) will give you the key to this door.
- World exit.


