 Did we miss anything in this section? Is there something we didn't discover?
Let us know!
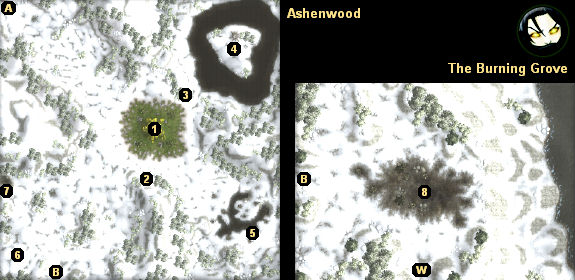
Walkthrough
1 - Glowing Ash Tree
Did we miss anything in this section? Is there something we didn't discover?
Let us know!
Walkthrough
1 - Glowing Ash Tree
A lot of things will eventually happen at this tree, but you'll find the walkthrough for these events in the
Lake of Tears Garrison section rather than here.
2 - Remains of the Hunting Party
This is where you'll find the remains of the hunting party that you might have heard about while at the
Lake of Tears Garrison. If you loot one of the corpses here, then you'll find a
Reverberating Crossbow of Pain and the book
Ceremonies of the Hunt, which describes how to make an offering to Malar, the god of the hunt. You won't be able to do anything with the second corpse yet.
Somewhere near the remains, you should encounter a hunting dog (the dog wanders around, but it'll probably be to the east). If you click on the dog, then it will run away from you. To gain its trust, you'll need to go back to the remains, where you'll discover that you can now tear off a piece of the
Huntmaster's Garb from the second corpse.
With fabric in hand, when you approach the dog, you'll be able to calm it, and if you have Gann or Okku in your party, then you'll learn from it that the forest somehow killed the hunting party, and you'll earn 1000 experience points.
3 - Berserker Spirit
The berserker spirit will tell you about the nearby island sanctuary (#4): how it was once guarded by a dryad spirit before a previous spirit-eater devoured it, and how recently a group of frost giants claimed it as their own. To restore the sanctuary, you'll have to drive off the frost giants (covered in #4), and you'll have to find a new spirit to guard it. If you're at all diplomatic, you can convince the berserker spirit to sacrifice himself to become the new guardian, but this isn't really necessary. Any spirit essence will work, and you should have several of them by now. To create the new guardian, you'll just need to place a spirit essence into the sacred pool on the island.
Other sources of essences include Grigarii (#6), whose spirit will appear on the island if you rescue his fellow berserker Yurkov, and the Shape of Fire (#8). For the Shape of Fire, you'll have to devour his spirit to claim the
Shape of Fire Essence, and then use that unique essence on the island. However, nothing about the quest will really change for using different essences. If you use a regular spirit essence, then a blue forcefield will appear around the island. If you use the
Shape of Fire Essence, then the island will catch on fire. Nobody will comment on the difference.
Restoring the sanctuary will earn you 1500 experience points. It's one of the tasks that you'll need to complete before you can meet the Wood Man.
4 - Island Sanctuary
If you talk to the frost giant jarl on the island, he'll tell you how new jarls are selected. Obviously then, you'll need to challenge him so you can become the jarl yourself. To do this, you'll basically have to play "king of the hill" and beat off all of the frost giants who approach you. This shouldn't be too hard, and since the frost giants will always come to the same place, you can drop some fog spells or area-affect spells in the center of the island and be guaranteed to hit them.
After the contest, the frost giant jarl will talk to you again, and you'll be able to give him some orders. If you demand tribute, then he'll give you
Thicketfavors (a nice enough set of gloves for Gann). Anything else you say will cause the frost giants to leave the island. For your reward, you'll receive 3000 experience points and the Honorary Jarl feat.
If you somehow fail the contest, then afterwards you can challenge the frost giants to a regular fight. But for this case you'll only receive about 2000 experience points, and you won't receive any feats or equipment, so it's not exactly the optimal solution.
You might also notice a sacred pool on the island. If you look inside of it, you'll find
Pure Sanctuary Water, which can be used to remove the blight from the forest (see #5). You'll also need to place an essence into the pool to restore the island as a sanctuary for spirits (see #3).
5 - Gnarlthorn
You'll find a treant named Gnarlthorn lying on the ground here, surrounded by blighted trees. When you talk to him, he'll tell you that the blight was caused by a previous encounter with a spirit-eater, and that to remove it, you'll need to make a "strong petition" to the god Chauntea.
Here's what you'll need for the petition:
Blighted Leaves, which Gnarlthorn will give you,
Bark Cinders, which you can find in the Burning Grove (#8), and
Pure Sanctuary Water, which you can find on the island sanctuary to the north (#4).
Once you've gathered the ingredients, simply use the leaves and cinders on the water (by right clicking on them, selecting the "use" option, and then targeting the water), and you'll end up with an
Anointing Solution. This is the solution for Chauntea. If you're feeling more evil, then you can instead create a solution for Malar by replacing the water with
Legendary Blood (from #7).
To petition a god, you'll need to go to
Immil Vale. There you'll find a red tree. Once there, you'll need to anoint yourself (by right clicking on the
Anointing Solution, selecting the "use" option, and targeting yourself), and then you'll need to click on the trunk of the tree. If you've done everything correctly, then you'll either receive a
Toxic Plantbane of the Beastlord (from Malar) or a
Blessed Salve of the Earthmother (from Chauntea). You'll also receive 1500 experience points.
To complete the quest, you'll need to return to Gnarlthorn and talk to him. If you have Chauntea's salve, then Gnarlthorn will ask you to place it in the pond to heal the other trees, but this is a little bit inaccurate. What you'll really need to do is use the salve on one of the nearby blighted trees. That will heal all of the trees in the area, but it will also cause some blightspawned treants to attack you. There isn't any way to convince Gnarlthorn to use the salve as well. He'll decide that he has cheated death for long enough.
If you have Malar's salve, then everything will go about the same, except that after dealing with the blightspawned treants, you'll be able to talk to Gnarlthorn again and tell him what you did. This will cause him to attack you, but, so far as we can tell, there isn't any way to acquire
Gnarlthorn's Essence. If you want to create the item using the console, the code is "nx1_cft_ess_gnarlthorn."
For ending the blight (one way or the other), you'll receive 1500 experience points. This is one of the tasks that you'll need to complete before you can meet the Wood Man.
6 - Ferala and the Berserkers
You'll encounter a woman named Ferala here, next to two severely wounded berserkers named Yurkov and Grigarii. When you approach them, you'll hear Ferala call the berserkers her "prey," and Yurkov will ask you to help. That will give you three options: to help the berserkers, to help Ferala, or to attack them all.
Note: You should let the conversation here start up automatically. If you talk to Ferala or Yurkov before the conversation triggers, then the encounter won't proceed as intended.
If you help Ferala, then you'll become more evil, and, after killing Yurkov, Ferala will turn into a werewolf and attack you. Once you've done enough damage to her, a dialogue will pop up giving you even more options for how to proceed. If you skin Ferala, then you'll lose even more alignment, but "something" will be pleased, and you'll earn a
Pristine Earth Essence. If you let Ferala go, then you'll regain some good points, but she'll just turn around and attack you again, and so this option is about the same as finishing her off, and you'll get about 100 experience points for her death. Regardless of how you kill Ferala, you'll find the armor
Grasp of Earth on her corpse.
If you help Yurkov, then you'll become more good, but Ferala plus a couple of summoned beasts of Malar will attack you. After the battle, no matter what you say, the berserker Grigarii will die, and Yurkov will leave to return to the garrison. If you ask for a reward, then Yurkov will give you 150 gold pieces. You'll also "meet" both berserkers again. Grigarii's spirit will appear at the sanctuary island to the north (#4), and you'll be able to convince him to become the guardian of the island. Yurkov, meanwhile, will wander over to the glowing ash tree (#1), and you'll discover his corpse there when the
Ashenwood part of the campaign comes to an end. On Yurkov's corpse you'll find the dwarven waraxe
Fatecarver.
If you attack the berserkers and Ferala, then you'll become more evil, but you'll only find some gold on the remains of Yurkov and Ferala, and you won't be able to do anything with Grigarii.
7 - Predator Den
You'll find a variety of regular, dire, and paragon creatures inside the den. Only the paragon creatures will drop essences, but you'll also find
Relli's Belt of Mischief on the corpse of a fell troll.
At the back of the den you'll encounter a paragon beast of Malar. You'll get about 2000 experience points for killing it, and on its corpse you'll find
Legendary Blood. You can use the blood to create a petition to Malar. Just follow the same steps as the petition to Chauntea (see #5), but use the blood instead of the water.
Note: The paragon beast of Malar has a terrific regeneration rate. If your party isn't particularly good at melee attacks, then you'll really need to hammer it with spells to kill it.
8 - Shape of Fire
At this spot you'll meet a strange creature called the Shape of Fire. It'll tend to repeat itself and to speak obliquely, but you should get the idea from it that it is mad at the Wood Man, and that it is burning the grove to weaken him. The Shape of Fire will also mention an "icy hag" that it once battled, and that the hag can be found in
Immil Vale.
You'll have a couple of options for how to deal with the Shape of Fire: you can help it burn down the grove, or you can put out the fires. After you've completed your conversation with the creature, the trunks of all of the trees in the grove will become clickable. To put out the fires, you'll need to hit the burning trees with cold damage. To spread the fires, you'll need to hit the non-burning trees with fire damage. The easiest way to damage the trees is to click on them, which will cause your selected character to begin hacking away. Fire or cold damage bonuses on weapons will get the job done, but if you have both on the same weapon, then they'll cancel each other out. You can also use spells to damage the trees, but this doesn't work as well.
The hag in
Immil Vale is somewhat optional to the quest. If you visit her and help her out, then she'll give you a
Jar of Condensed Orglash Essences. You can use the jar to enhance a weapon with cold damage, making it easier to put out the fires, and the jar will also give you an extra option at the end of the quest. But if you can do fire or cold damage without it, then it isn't really needed.
If you decide to help the Shape of Fire by burning down the remaining trees, then pretty much nothing will happen, and the Wood Man won't make an appearance. This will depress the Shape of Fire, and when you talk to it again, it will ask you to end its existence. If you have the jar from the witch, then you can use that to snuff out its life force, or you can just devour its spirit, which will gain you a
Shape of Fire Essence.
Note: You can use the
Shape of Fire Essence to make the Shape of Fire the guardian of the island sanctuary (#4). Doing this will set the island on fire, but nothing else will change (the berserker spirit next to the island will even say "thank you" afterwards), and so it's sort of a waste to use a unique essence in this way.
If you decide to put out the fires, then the Shape of Fire will attack you, but once you've done enough damage to it, it will surrender. Then you'll be given the exact same options as if you had lit the grove on fire, and the results will be the same.
Defeating the Shape of Fire (regardless of how you do it) will net you 3000 experience points. It's one of the tasks that you'll need to complete before you can meet the Wood Man.
Besides the Shape of Fire, there are two other things of interest at this spot. From a burned-out tree husk you can pick up
Bark Cinders, which you'll need for the petition to Chauntea (see #5), and from a regular tree you can grab a
Long Charred Branch, which you can mold with the
Wood Man's Essence to create the
Staff of Ashenwood.
Exits:
- Path to the
Lake of Tears Garrison.
- Path between the Burning Grove and the Ashenwood.
- World exit.


