 Did we miss anything in this section? Is there something we didn't discover?
Let us know!
Walkthrough
Did we miss anything in this section? Is there something we didn't discover?
Let us know!
Walkthrough
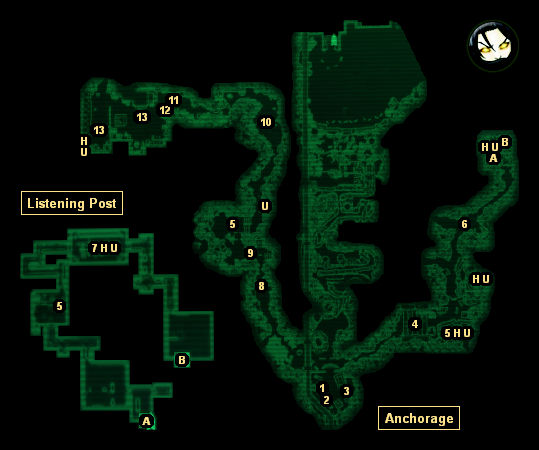
When you talk to General Chase in the command tent (#1), he'll give you your objectives for the quest. He'll tell you about three targets: a chimera depot (to the west), a listening post (to the east), and a pulse field (in the middle). For this quest you'll need to deal with the first two targets. You'll need to destroy the two fuel tanks (#13) at the chimera depot (#11), and you'll need to clear the enemy soldiers out of the listening post (Exit A).
After talking to Chase, you should next talk to Lieutenant Morgan. He'll give you more information on your objectives, and he'll also give you two
Explosive Charges (for blowing up the fuel tanks) and five
Recruitment Markers (for filling out your strike team).
Next you should log into both computer terminals in the command tent. At the requisition terminal you'll be able to select your weapons for the quest. If you make a speech check while talking to the quartermaster (#3), then he'll give you a
Gauss Rifle, but otherwise you won't find any other weapons while working through the quest, and so you should choose carefully here.
At Patterson's terminal, you'll be able to choose some soldiers for your strike team. You can add up to three soldiers, but you'll be limited by the five
Recruitment Markers that Lieutenant Morgan gave you. We usually pick two snipers and a grenadier, but it doesn't really matter. Sergeant Montgomery will be on your team no matter what, and he and you alone should be able to complete all of the remaining objectives without any trouble.
Finally, you should visit the quartermaster (#3) in the base camp. He'll give you the weapons you selected from the requisition terminal. If you can beat a speech check with him, then he'll also give you a
Gauss Rifle.
Note: It's possible to get all of the weapons instead of just one weapon package, provided that you don't mind cheating a little. The trick is, if you receive one package but then change your mind and switch to a different package, the quartermaster will only take weapons from your inventory. So if you drop your weapons before making the switch, then you'll be able to keep both packages, and you can repeat this process until you have all four packages.
When you're ready to head out, you should talk to Sergeant Montgomery, who will be in the center of the base camp along with the soldiers you selected for your strike team. You can send him and the team to the mining town (#4) or to the ice camp (#8), where they'll wait for you to arrive, or you can ignore them completely and head out on your own.
Listening Post
This is a fairly straightforward search-and-destroy mission. You'll need to fight your way to the listening post (Exit A), and then kill everybody inside. You'll face a lot of stealthed soldiers during this mission, and you'll spend a lot of time in cramped quarters, and so you'll be better off with a short-range weapon like an
Assault Rifle or a
Combat Shotgun rather than a
Sniper Rifle.
To complete the mission, you'll need to not only clear out the listening post, but also go through the back door (Exit B) and kill a couple of guys outside, too. Once you've killed enough soldiers, Sergeant Montgomery will let you know that you've completed the objective, and you'll be teleported back to the command tent (#1).
Chimera Depot
The chimera depot mission will go about the same as the listening post mission, except that instead of squaring off against a bunch of stealthed snipers, you'll have to battle spider drones (#10) and chimera tanks (#13). The drones shouldn't pose any trouble at all (Sergeant Montgomery will probably kill them before you even get a shot off), but the tanks can be trouble.
Chimera tanks have a good armor rating plus a lot of hit points. If you've saved up the
Frag Gernades from the ammunition dispensers (U), then this is a good place to use them. If you have the
Gauss Rifle from the quartermaster (#3), then you could try using it here, too. Otherwise, just hit the tanks with what you can, and let Sergeant Montgomery lead the charge, since he can't be killed, and since he can't run out of ammunition.
You'll find two fuel tanks (#13) in the depot. Blowing them up works just like blowing up the artillery guns in the
previous quest. That is, you'll need to activate the fuel tanks and then get the heck out of the way before they blow up. Once you've taken out the two fuel tanks, you'll be teleported back to the command tent (#1).
Back at Base Camp
After completing each objective, Sergeant Montgomery will return to his position in the center of the base camp. After the first objective, when you talk to Montgomery, you'll be able to request replacements for any of the soldiers in your strike team who died in the mission. After the second objective, talking to Montgomery will only cause him to start following you again.
| |
 |
The Anchorage
War Memorial |
|
After completing the first objective, you'll find a photographer in the camp, and he'll take a picture of three soldiers. You might recognize the scene, because it'll end up being immortalized at the
Anchorage War Memorial (see insert).
After completing the second objective, when you're teleported back to the camp, you'll automatically complete the quest and earn 100 experience points.
H - Health Dispenser
U - Ammunition Dispenser
1- Command Tent
Inside the tent you'll meet General Chase and Lieutenant Morgan, and you'll find two doses of
Psycho and a holotape labeled "I'm Okay."
2 - Medical Tent
You'll meet Dr. Adami inside this tent. She'll give you five doses of
Psycho when you talk to her. You can also use a health dispenser here.
3 - Quartermaster's Tent
You'll meet the quartermaster just outside of the tent. Inside you'll find a health dispenser, an ammunition dispenser, and more.
4 - Abandoned Mining Town
5 - Intel Case
6 - Stealthed Snipers
You'll encounter a handful of stealthed snipers waiting to ambush you here. However, they won't coordinate their attacks, and so you should be able to kill them one at a time.
7 - More Stealthed Snipers
A few more stealthed snipers will try to ambush you here. They'll all attack at the same time, but you can stand right next to the health (H) and ammunition (U) dispensers and load up as necessary.
8 - Ice Camp
9 - Tent
Inside this tent you'll find a health dispenser, an ammunition dispenser, and a Chinese terminal. The terminal will give you some warning about the spider drones that you'll encounter to the north (#10).
10 - Spider Drones
You'll face a lot of spider drones in this part of the map. Spider drones will blow up if they get to you, but they have so few hit points that they'll probably never get there. You should attack them with lightweight, quick-firing weapons.
11 - Chimera Depot
12 - Compartment
Inside this compartment you'll find a health dispenser, an ammunition dispenser, and an intel case.
13 - Fuel Tanks
Exits:
- Front door to the listening post.
- Back door to the listening post.


