 Did we miss anything in this section? Is there something we didn't discover?
Let us know!
Walkthrough
Did we miss anything in this section? Is there something we didn't discover?
Let us know!
Walkthrough
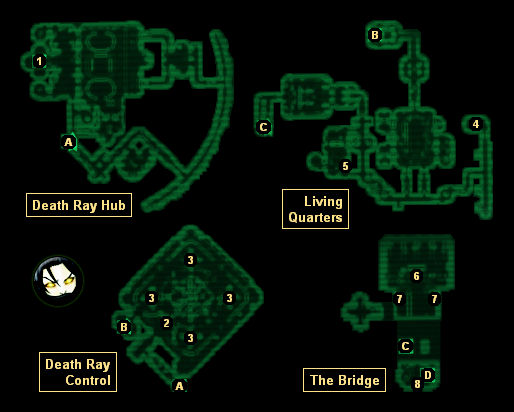
When you go through the teleporter to arrive in the Death Ray Hub (#1), the teleporter will malfunction, and you won't be able to use it to return to the Observation Deck. Instead (as you probably had planned anyway), you'll have to continue forward, and fight through the Death Ray Hub to arrive in Death Ray Control.
Inside Death Ray Control, you'll find a control panel (#2) and four power generators (#3). There are four buttons on the control panel. From left to right they raise the cores of the power generators, fire the death ray, aim the death ray towards Earth, and aim the death ray away from Earth. If you're bored, you can shoot the Earth as many times as you'd like, and nothing will come of it.
To disable the death ray, you'll need to destroy the four generators in the room (#3). To accomplish this, you'll need to press the leftmost button on the control panel (#2). Each time you do this, one of the generator cores will raise up, and then you'll just need to activate the three coolant switches surrounding it to cause it to overheat and explode.
After you've destroyed two of the generators, a handful of aliens will ambush you. After destroying all four generators, the forcefield blocking the exit (Exit B) will disappear, and you'll then be able to fight your way through the Living Quarters to finally reach the Bridge.
When you enter the bridge, you'll be attacked by several aliens, including the alien captain. The captain isn't especially tougher than the other aliens, and you might not even notice that you're fighting him -- until the quest updates to let you know that he's dead. When the captain dies, he'll drop the
Captain's Sidearm, an alien weapon that does about half the damage of the
MPLX Novasurge.
Note: The captain's corpse (and its contents) will disappear soon after the battle, so if you're interested in the
Captain's Sidearm, you should grab it right away.
After the battle, the surviving abductees will converge on the Bridge, but you won't be done yet. A second mothership will arrive, and it will attack you. To defend yourself, you'll need to use the panels at the front of the Bridge (#6). The three buttons grouped together on the left control the ship's power distribution, with the leftmost button sending all power to the shields, the rightmost button sending all power to the death ray, and the middle button giving an even distribution. The control all by itself on the right fires the death way.
The best strategy for the ship battle is to repeat the following sequence:
- Switch all power to your shields.
- Wait for the other ship to fire.
- Switch all power to your death ray.
- Fire your death ray.
After you've done enough damage to the other ship, some aliens will ambush you on the bridge, and they'll knock out your power. To restore power, you'll just need to activate the four generator controls on the sides of the Bridge (#7). Aliens will continue to attack you from time to time, but Kago (if he's still alive) will show up to help you out. Conveniently, the enemy ship won't attack you until you've restored power.
When you finally destroy the other ship, the quest will come to an end, and you'll receive 600 experience points. The aliens will stop attacking you, and you'll be able to use the teleporter in the captain's quarters (Exit D) to return to the wasteland. In the wasteland, you'll find a homing beacon where the crashed UFO was, and it will allow you to return to the ship and use it as a base of sorts. Somah will disappear, so you won't be able to visit her for repairs, but Elliott and Sally will occasionally scrounge up alien gear for you.
1 - Starting Point
2 - Death Ray Controls
3 - Power Generators
4 - Toshiro Kago
Assuming that Kago survived the first part of the DLC, then you'll find him in this room, surrounded by dead aliens.
5 - Alien Captive Recorded Log 23
6 - Bridge Controls
7 - Generator Controls
8 - Control
This control is the alien equivalent of a workbench, and you'll be able to use it just like a workbench.
Exits:
- Hatch between the Death Ray Hub and Death Ray Control.
- Teleporter between Death Ray Control and the Living Quarters.
- Teleporter between the Living Quarters and the Bridge.
- Teleporter to the D.C. wasteland.


