 Did we miss anything in this section? Is there something we didn't discover?
Let us know!
Walkthrough
Did we miss anything in this section? Is there something we didn't discover?
Let us know!
Walkthrough
After installing the DLC, you should shortly receive notice of an "ominous" signal. It will point you towards the crashed UFO in the suburbs north of D.C. (near the Greener Pastures Disposal Site). When you get there, you'll be beamed aboard the mothership. The aliens will take your possessions and experiment on you for a bit, and then they'll drop you into a cell with Somah (#1).
Somah will convince you that you should try to escape. Her plan will involve staging a fight so that you can lure the guards into your cell. You won't need to do anything during the ensuing battle, and Somah's punches won't hurt you very much. Eventually, some guards will come in, and you should be able to beat them down easily, even if you don't have any points in unarmed combat.
As you explore the ship, you'll first encounter Sally (#6), who will act as your guide. If you can't hear what she's saying when she's behind the ship's walls, don't worry about it. There's usually only one direction that you can go, and you can't exactly get lost. Later you'll meet some other abductees (#10), and they'll help you as well.
You'll also find several useful objects:
-
Alien Biogel. The biogel will heal you for 10-30 hitpoints, but it will also cause a random side effect, sometimes good and sometimes bad. Eventually you'll meet up with Elliott Tercorien (#10), and he'll offer to convert
Alien Biogel into
Adapted Biogel, which will heal you for 110-150 hitpoints, but still cause side effects.
- Alien Captive Recorded Logs. There are 25 of these logs scattered throughout the mothership (including at #3, #4 and #10). If you find all of them, then you'll receive the Alien Archivist achievement.
You can recognize the terminals with the logs because they'll have holograms of concentric circles floating next to them.
-
Alien Epoxy. These items will show up in the "aid" part of your inventory, but they won't heal you. Instead, they'll repair whatever weapon you're wielding. That means you don't need to use alien weapons, which don't seem to work very well against the aliens. We had much better luck using conventional energy weapons like the
Metal Blaster and the
Gatling Laser.
- Healing Archways. Walking through these archways will heal you to 75% of your maximum health. If you're already healthier than that, then they won't do anything. To make the archways more effective, you'll need a science skill of 75. Then you'll be able to modify them so that they'll heal you fully three times before malfunctioning. Modifying the archways will also net you 50 experience points.
-
Large Alien Crystals and
Small Alien Crystals. These objects don't appear to serve any purpose, but they have value and they're weightless, so you can hang onto them and then sell them when you get back to the D.C. wasteland.
When you and Sally finally make it to the Engineering Core, you'll discover that the teleporter to the Observation Deck (Exit C) is unavailable. But then Sally will come up with an alternate plan. She'll lead you to the cryo chamber (#10), where she'll point out a "spaceman" with a
Spacesuit, and she'll then tell you that you'll need the suit so you can reach the Observation Deck via a spacewalk. Completing this conversation with Sally will also complete the quest, which will earn you 300 experience points.
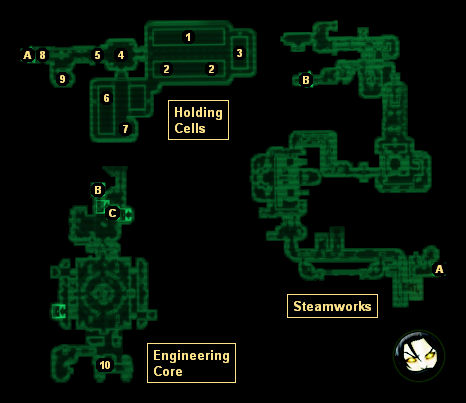
1 - Your Cell
This is where you'll start out in the mothership.
2 - Other Cells
You'll find a dead Enclave officer and a live Rivet City security guard in these two cells. You can "borrow" their clothes if you want, but this isn't really necessary since you'll be getting your equipment back shortly (#9).
3 - Control Room
If you activate the three terminals in this room, then you'll receive Alien Captive Recorded Logs 14, 15 and 22.
4 - Control Room
You'll find Alien Captive Recorded Logs 1, 3 and 12 in here. Somah will also stop following you here, so you'll be on your own for a while.
5 - Sealed Door
You won't be able to go through this door until you've rescued Sally (#6).
6 - Sally's Cell
To open up Sally's cell, you'll need to blow up the nearby generator (#7).
7 - Power Generator
To blow up the generator, you'll first need to activate the control panel, and then while the core is up, activate the three core coolant switches.
8 - Sealed Door
The control panel for this door can be found in the nearby storage room (#9).
9 - Storage Room
Inside one of the containers here, you'll find all of your gear. You'll also find the control panel for the sealed door to the north (#8).
10 - Cryo Room
You'll meet some more abductees in this room. You'll also find Alien Captive Recorded Logs 5, 6, 7 and 8.
Exits:
- Hatch between the Holding Cells and the Steamworks.
- Hatch between the Steamworks and the Engineering Core.
- Teleporter to the Observation Deck. You won't be able to use this teleporter until the next quest.


