 Did we miss anything in this section? Is there something we didn't discover?
Let us know!
Walkthrough
Did we miss anything in this section? Is there something we didn't discover?
Let us know!
Walkthrough
You'll begin the quest in the cryo room of the Engineering Core (#1). The first thing that you should do in this room is activate the stasis controls, which will release a few abductees from their cryo pods. You can also pick up some Alien Captive Recorded Logs in the room.
Colonel Hartigan (aka the "spaceman") won't survive the unthawing, but you'll be able to grab a
Spacesuit from his corpse. The other abductees, plus Sally and Somah, will then be available to help you out:
- Elliott Tercorien. He can join you as a companion for the Cryo Lab (Exit A). If he survives the trip, then he'll gain the ability to create
Cryo Grenades and
Cryo Mines for you, but only during this quest. Elliott will also convert
Alien Biogel into
Adapted Biogel, and he'll maintain this ability for as long as he survives. If Elliott dies then he'll drop
Winterized Medic Armor and an
Assault Rifle.
- Paulson. He can join you as a companion for the Hangar (Exit C). If Paulson dies then he'll drop
Paulson's Revolver,
Paulson's Outfit, and a
Sheriff's Hat.
- Toshiro Kago. He'll only speak to you in Japanese, which you won't be able to understand, and so you won't be able to recruit him as a companion. If you go into the Maintenance Level (#2), you'll find Kago's
Samurai's Sword there, and then when you talk to him next, you'll be able to give it to him (but nothing will really happen if you do, and he'll get it on his own if you don't). Eventually, Kago will disappear from the Engineering Core, and you won't see him again until you reach the Living Quarters.
If Kago dies then he'll drop
Samurai Armor and a
Samurai Helmet, plus perhaps his sword.
- Sally. If you have the Child at Heart perk, then Sally will let you into a storage room on the northern side of the Engineering Core (#6). You'll find three containers inside. Sally will also assist you in the Maintenance Level (#2).
- Somah. She can join you as a companion for the Robot Assembly area (Exit B). She'll also repair your equipment, but charge you caps for it. Remember that
Alien Epoxy will take care of your weapons, but you'll probably need Somah for your armor.
If Somah dies then she'll drop a
Combat Shotgun and a
Merc Veteran Outfit.
When you talk to Sally after freeing the other abductees, she'll fill you in on the rest of her plan. She'll tell you that you'll need to make a spacewalk to reach the Observation Deck, but that to have any chance of surviving the trek, you'll need to destroy three power generators (#10, #16 and #24) to clear away the aliens in your way. You can tackle the generators in any order.
Note: There are three companions, one for each of the three power generator areas. The companions will only follow you into their designated power generator area, plus two of the optional areas (#3 and #4). If you try to take a companion into a different power generator area, then he/she will stop following you and return to the Engineering Core. You can also send companions back to the Engineering Core by talking to them. Companions can get killed, but they add elements to their respective areas, and so they're worth trying out.
Robot Assembly
If you have Somah with you, then she'll immediately head over to a teleporter (#7) and begin tinkering with it -- and get herself teleported to another part of the area, leaving you behind. You can meet up with her again at another teleporter (#8), or past the assembly line (#9).
Whether Somah is with you or not, the first thing you'll need to do is head over to the northern part of the assembly line (#9), and overload the electronics access panel there. That will cause the assembly line to blow up, creating a path to the northern part of the area.
Past the assembly line, you'll get attacked by several aliens and drones. One of the aliens will drop a
Drone Control Device, which you'll be able to use to take control of the drones housed in the big spherical pods scattered throughout the mothership (essentially giving you an extra companion). Guardian drones are more useful than support drones, so be sure to look at the drone in the pod before activating it.
Note: If you're quick, you can sometimes activate multiple drones at once, but otherwise you'll only be allowed to have one at a time.
You'll find the power generator in the back of the area (#10). To blow it up, just follow the same steps as with the generator from the Holding Cells: activate the main control, and then while the core is raised, activate the three coolant switches surrounding it. When the power generator blows up, a nearby teleporter (#11) will become available, giving you an easy route back to the entrance (Exit B).
Hangar
Inside the Hangar, you won't find much to kill or loot until you attempt to open the door (#15) leading to the generator (#16). Then alarms will sound, and aliens and drones will start streaming out of the teleporters in the area (#13), intent on eliminating you.
The easiest way to deal with the aliens and drones is to use the pylon control panel (#14). The five buttons on the panel will overcharge the pylons surrounding the spaceship (#12), causing area-effect and toss-back damage to anything nearby. With judicious use of the buttons, you'll be able to kill most of the enemies as they try to approach you, and then mop up whatever stragglers actually make it to you at the control panel.
At the end of the battle, the door to the generator (#16) will open, and you'll just need to follow the usual steps to destroy it. That is, you'll need to activate the control panel on the generator, and then while the core is raised, activate the three coolant switches surrounding it. After a few moments, the generator will blow up, and you'll be able to return to the Engineering Core.
Cryo Lab / Cryo Storage
If you have Elliott with you for these areas, then you'll encounter a few differences, mostly in finding some of Elliott's former squad mates in the cryo pods and operating tables rather than random wastelanders. Also, if Elliott makes it to the exit of the Cryo Lab (Exit F), then he'll find some cryogenic compounds there, and if he survives to make it back to the Engineering Core, then he'll be able to supply you with
Cryo Grenades and
Cryo Mines.
Otherwise, you'll just need to fight your way to the power generator in Cryo Storage (#24) and destroy it. To destroy the generator, you'll just need to activate the switch on it, and then while the core is raised, activate the three coolant switches surrounding it. After a few moments, the generator will overheat and explode.
Spacewalk
After destroying the three generators (#10, #16 and #24), and after talking to Sally again, you should head to the Decompression Chamber (Exit D). In the first room you'll find a switch, and provided that you're wearing the
Spacesuit from Colonel Hartigan's corpse (#1), activating the switch will open the door to the west, allowing you to continue. If you're not wearing the suit, then your head will explode and you'll die.
In the rest of the Decompression Chamber, you'll find some dead aliens and containers to loot, but they'll just have standard alien gear in them. In the final room you'll also find the hatch leading to the spacewalk.
During the spacewalk, you'll find yourself on the hull of the ship. To progress, you'll need to locate three exposed panels (jutting up from the hull) and activate them. This will cause the traction beam in the center of the hull to activate, and then when you stand in it, you'll be transported to the Observation Deck. When you arrive in the Observation Deck, the quest will come to an end, and you'll earn 300 experience points.
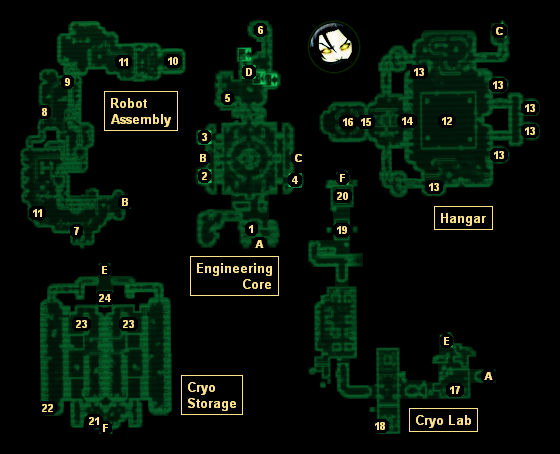
1 - Cryo Room
Besides being able to free Paulson, Elliott Tercorien, and Toshiro Kago here, you'll also find a
Spacesuit and Alien Captive Recorded Logs 5, 6, 7 and 8.
2 - Teleporter to the Maintenance Level / Waste Disposal
You'll meet Sally in the Maintenance Level, but then you'll get dumped into a big pile of waste (crippling one of your legs) and you'll have to escape (via the Waste Disposal area) on your own. You'll encounter several aliens and drones in the process, but you'll find lots of alien gear plus some useful items, including Alien Captive Recorded Log 19 (in the ambush room by the door), some first aid boxes (mostly in the storage room by the exit), and Toshiro Kago's
Samurai's Sword (also in the storage room).
None of the companions will join you for this area, and then once you've escaped, the teleporter to it will stop working.
3 - Hatch to the Engine Room
You'll encounter aliens and drones in the Engine Room, and they'll drop standard alien items. Near the entrance in a storage room, you'll also find a unique
Shock Baton called the
Electro-Suppressor.
You won't be able to return to the Engine Room after completing the DLC.
4 - Hatch to the Cargo Hold / Research Lab
In the Cargo Hold, you'll find a whole slew of miscellaneous wasteland items, including clothes, meds, weapons, and ammunition. On a counter in the southwestern part of the hold (near a shelf filled with ammunition boxes), you'll also find Reid Underwood's terminal. If you hack into it, then you'll gain access to Underwood's safe, which is located just to the east of the waste zapper in the southeastern part of the hold. Inside the safe you'll find a unique
Plasma Pistol called the
MPLX Novasurge.
In the Research Lab you'll find Alien Captive Recorded Log 13 (in the western chamber) and Alien Captive Recorded Log 21 (in the central chamber). You'll also find a bunch of mechanical merry-go-round horses, but your guess is as good as ours what the aliens were planning to do with them.
You won't be able to return to these two areas after completing the DLC.
5 - Bed
A makeshift bed will appear here (under the staircase) once you've exited and then returned to the Engineering Core.
6 - Sally's Storage Room
If you have the Child at Heart perk, then Sally will open up this room for you, and inside you'll find three containers.
7 - Unpowered Teleporter
8 - Teleporter
You can use this teleporter to travel up or down between the floor level and the catwalk level of the Robot Assembly area.
9 - Electronics Access Panel
10 - Power Generator
11 - Teleporter
This teleporter will take you between the front and back of the Robot Assembly area. You'll only be able to use it after blowing up the generator (#10).
12 - Spaceship / Pylons
13 - Reinforcement Teleporters
14 - Pylon Control Panel
15 - Sealed Door
16 - Power Generator
17 - Release Mechanism / Storage Room
If you activate the release mechanism (on the upper level) then you'll open a storage room (on the lower level). Inside the storage room you'll find three containers, a healing archway, Alien Captive Recorded Log 4, and more.
18 - Alien Captive Recorded Log 2
19 - Autopsy Room
You'll witness some aliens dissecting humans in this room. If you have Elliott with you, then he'll recognize the humans as former squad mates of his, and he'll hit a switch that will freeze the aliens. If you don't have Elliott with you, then the humans will just be random wastelanders, and you'll need to hit the switch yourself to gain admittance to the room.
Also in the autopsy room you'll find Alien Captive Recorded Logs 11 and 17.
20 - Cryo Pods
You'll find a pair of cryo pods in this room. If Elliott is with you then he'll recognize the people inside as Sergeant Daniels and Private Beckett. You'll then have to make a decision about what to do with them. It won't make any difference what you decide, but if you revive the soldiers properly then they'll follow you for a few minutes and help you in the initial battles in Cryo Storage. If Elliott isn't with you, then the pods will be empty.
Also in this room, if Elliott is with you then he'll find some cryogenic compounds by the exit hatch (Exit F), and if he survives to make it back to the Engineering Core, then he'll be able to provide you with
Cryo Grenades and
Cryo Mines.
21 - Alien Captive Recorded Log 25
22 - Alien Captive Recorded Log 16
23 - Switches
At both of these switches, if you activate them, then you'll release a pair of super-mutants from cryo pods on the level beneath you.
24 - Power Generator
Exits:
- Hatch between the Engineering Core and the Cryo Lab.
- Hatch between the Engineering Core and the Robot Assembly area.
- Hatch between the Engineering Core and the Hangar.
- Hatch to the Decompression Chamber.
- Teleporter between the Cryo Lab and Cryo Storage. You'll need to flip the switch next to the teleporter in Cryo Storage to get it to work.
- Hatch between the Cryo Lab and Cryo Storage.


