 Did we miss anything in this section? Is there something we didn't discover?
Let us know!
Walkthrough
Did we miss anything in this section? Is there something we didn't discover?
Let us know!
Walkthrough
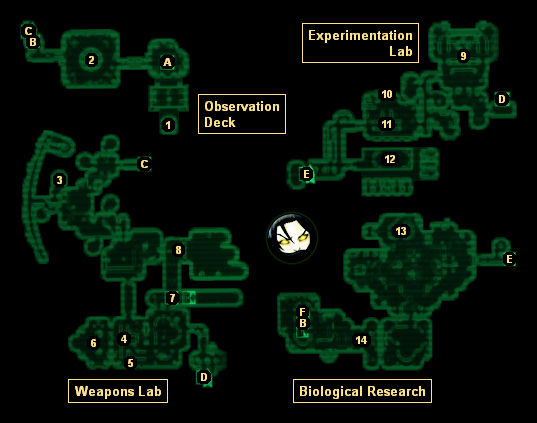
You'll start out in an airlock attached to the Observation Deck (#1). To continue on, you'll need to activate the switch the room, which will open up the door to the north. Once the door has opened, you'll be able to remove your
Spacesuit and put back on your regular armor.
In the next room, you'll find a teleporter to the Engineering Core (Exit A). When you activate the control next to it, you'll restore power to it, and all of the surviving abductees (minus Kago) will step through it. Sally will then crawl through a maintenance duct and open the door to the west. All of the abductees will now hang out in the Observation Deck rather than the Engineering Core.
In the viewing room (#2), you'll witness a holographic image of an alien yelling at you, and then the aliens will fire a warning shot from their Death Ray near the Earth. This will cause your objective to update, and you'll be tasked with disabling the Death Ray.
To reach the Death Ray, you'll have to do a bunch of fighting -- against aliens, drones, and experimental creatures called abominations -- and you'll have to make your way through the Weapons Lab, the Experimentation Lab, and Biological Research.
In the back of Biological Research, you'll find a teleporter to the Observation Deck (Exit B), and when you power it up (by activating the control next to it), the surviving abductees will use it to catch up to you, and then they'll begin loitering next to it. You'll also find a teleporter to the Death Ray Hub (Exit F), and when you go through it you'll move on to
the second half of this quest.
1 - Starting Point
2 - Viewing Room
3 - Storage Room
Inside this storage room you'll find lots of standard alien gear, plus a guardian drone, a
Buttercup Toy, several
Alien Power Cells, and a unique
Alien Atomizer called the
Atomic Pulverizer.
4 - Alien Captive Recorded Log 24
5 - Supply Counters
You'll find a bunch of useful items on these counters, including ammunition, weapons, and armor.
6 - Lab
You'll discover two experimental weapons drones inside this lab. They'll be in the same sort of spherical docking bays as other drones, but you won't be able to control them using the
Drone Control Device. All you'll be able to do is activate the switches outside of the lab, which will release the drones so they can attack brahmin, and then kill the drones so you can claim their
unique Drone Cannons, which have the same stats but behave a little differently than the regular
Drone Cannons.
7 - Target Range
If you activate the control here, then a brahmin will appear at the far end of the range, and you'll be able to shoot it for practice. You can use the nearby teleporters to actually move into the range and loot the brahmins if you want to. You'll also find a unique
Alien Disintegrator called the
Destabilizer on a shelf next to the range.
8 - Target Range
When you activate the control here, several raiders, radscorpions and deathclaws will appear in the target range and start fighting each other. Once enough of the creatures have died (whether you actually shoot at them or not), you'll gain the Xenotech Expert perk, which will give you a bonus when using alien weapons.
You can activate the control as many times as you'd like, but you'll only get the perk once. There isn't any way to enter the target range to loot the corpses.
9 - Alien Captive Recorded Log 20
10 - Alien Captive Recorded Log 10
11 - Power Generator
You'll need to destroy this generator to remove the forcefield blocking the doorway to the west. Destroying the generator will also disrupt power to the abomination lab (#12), which will free a pair of abominations and cause the alien scientists to flee or get killed.
12 - Abomination Lab
You'll find Alien Captive Recorded Log 9 in this lab.
13 - Alien Captive Record Log 18
14 - Shelves (Lower Level)
You'll find some
Alien Power Cells in the shelves here.
Exits:
- Teleporter to the Engineering Core. You'll need to activate the control next to the teleporter to turn it on.
- Teleporter between the Observation Deck and Biological Research. You'll need to activate a control in Biological Research to make the teleporter functional.
- Hatch between the Observation Deck and Weapons Research.
- Hatch between Weapons Research and the Experimentation Lab.
- Hatch between the Experimentation Lab and Biological Research.
- Teleporter to the Death Ray Hub.


