 Did we miss anything in this section? Is there something we didn't discover?
Let us know!
Background
Did we miss anything in this section? Is there something we didn't discover?
Let us know!
Background
You'll receive this quest at the conclusion of Chapter 4, when you visit with Dorion in the Temple of Hesinde in Praios Square.
Walkthrough
Inside the temple, the Oracle of the Dragon Quest will give you your second task -- but once again he'll speak in riddles, and so you'll only learn that it has to do with a "bloody red" mountain and "ancient knowledge." However, when you talk to Dorion afterwards, he'll clarify the words, and he'll direct you to a ruined fortress in the Blood Mountains, where you should search for the
Book of the Serpent.
When you arrive in the Blood Mountains (located on the world map south of Ferdok), you'll discover that the fortress ruins are being protected by a magic barrier, preventing you from getting inside. You won't be able to bypass the shield on your own. You'll need some help, and you'll have two choices -- the Sisters of Satuaria or the Inquisition.
Note: Unlike the similar decision from Chapter 3, when you had to choose a trading company, for this case you'll only pick your side when you complete a quest for that side, rather than when you accept a quest. That means you can wander around first and talk to everybody, and then make a decision.
Siding with the Witches
If you want to side with the witches, then you should start off by talking to Yasmin, who you'll meet near the entrance to the area. She'll ask you to steal some
Altar Wine from the Inquisition camp to the east. The wine will be guarded by the camp's quartermaster, but you'll have three ways of getting past him: you can bribe him with 3 ducats, you can seduce him, or you can open the gate to the chicken coop (located on the western side of the camp), which will cause him to leave his post and chase down the chickens.
You'll receive 5 experience points if you use a social skill while dealing with the quartermaster, you'll receive 20 experience points when you grab the Altar Wine from the quartermaster's chest, and you'll receive 20 experience points more plus 10 ducats when you bring the wine to Yasmin. Yasmin will also reward you with
Yasmin's Owl Skull, which you'll need in the quest
The Witches of the Dark Forest.
The
Altar Wine will make Yasmin happy, but she's just one of the Sisters of Satuaria, and you'll still need to complete tasks for the other three witches to gain the support of the coven. This is covered in the quest entry for
The Witches of the Dark Forest. Yasmin will also warn you that the Praiots are planning to fell the witch trees in the forest, and she'll ask you to protect them. This is covered in the quest entry for
The Witch Trees.
With her part of the quest complete, Yasmin will take her pigs and depart, but then right afterwards Praios Devotee Warina will show up and announce that she saw everything. She and two Rays of Light will then attack you. You'll receive 10 experience points for killing Warina, and you'll find 5 ducats and a
Ravensbeak on her corpse.
After the battle with Warina, the Inquisition camp to the east will turn hostile towards you, and the wandering Rays of Light will start attacking you on sight. You might be able to kill the two guards at the entrance to the Inquisition camp, but if you try and fight your way to Grand Inquisitor da Vanya, you'll get overwhelmed and defeated.
At the conclusion of the quest
The Witches of the Dark Forest, the magic barrier surrounding the fortress ruins will disappear, and you'll be able to go inside. When you approach Yasmin on your way there, she and the other witches will thank you for helping them out, and they'll each give you a gift depending on how you completed their tasks. This is summarized below:
- Yasmin. She'll give you a wild boar companion if you used trickery, and some unknown reward
(Olginroot Brew?) otherwise.
- Alvina. She'll give you Greyfoot (a wolf) as a companion if you used cunning, and 15
Hunting Arrows if you used intimidation.
- Morla. She'll give you an
Amulet of Constitution if you used diplomacy, and a
Large Magic Potion and a
Large Healing Potion if you used violence.
- Saphira. She'll give you a nature spirit companion if you sneaked into the camp, and a
Courage Elixir if you used violence.
For the companion rewards, the companion will only stay with you until you reach the fortress entrance, and then it will disappear.
Siding with the Inquisition
For this case you should venture to the main Inquisition camp and talk to Praios Devotee Warina. She'll ask you to end the "foul life" of the witch Yasmin, who you should have already met near the entrance to the area. Yasmin's pigs will turn into wild boars when you attack her, but otherwise the battle shouldn't be too difficult. When Yasmin dies, you'll automatically pick up
Yasmin's Owl Skull, and you'll receive 35 experience points.
When you deliver the skull to Warina, you'll receive 20 experience points, and Warina will tell you to meet with Grand Inquisitor da Vanya. Da Vanya will speculate that the barrier around the fortress is being maintained by the remaining witches, and that by killing them you'd be able to get inside. Details about killing the witches can be found in the quest entry for
The Praiots in the Dark Forest.
Note: When you leave the camp, Warina will stop you, and if you talk to her thoroughly, then she'll give you the quest
The Destruction of the Witch Trees.
After completing the quest
The Praiots in the Dark Forest, the barrier surrounding the fortress ruins will disappear, and you'll be able to go inside. If you stop by the main Inquisition camp on your way there, then you'll find Berndrik in charge, and he'll provide you with three Rays of Light to escort you to the entrance.
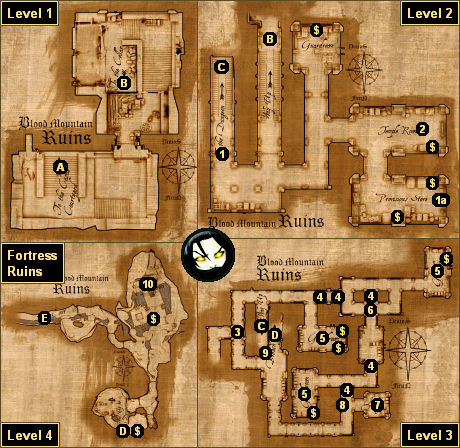
Inside the Ruined Fortress
When you enter the ruins (via Exit A), you'll trigger the quest "Like a Shadow," which will challenge you to move through the ruins undetected. This will involve some sneaking (by your entire party) and trap disarming, so if you can't do those two things, then don't even worry about it; just fight all of the cultists that you run into. But if you can complete the quest, then you'll fight fewer battles as you make your way through the ruins, and you'll face fewer enemies at the end (#10). You'll also earn 30 experience points.
Note: If you sneak your way through the ruins, then you can always return to the upper levels after completing "Like a Shadow," and kill all of the cultists you skipped earlier.
At the bottom of the ruins you'll run into your old friend Kastan Gamblack (#10). When you arrive, you'll witness a lizard creature named Noldrokon berating Gamblack for not killing you in Ferdok, and then teleporting away. Gamblack will then turn to you, but no matter what you say to him, the encounter will turn hostile.
The first thing you should do when the fighting starts is run away. That's because the dragon cultists with Gamblack will chase you, but Gamblack won't, and so you'll be able to split up the battle into two parts. This is more important if you fought your way to Gamblack (rather than sneaking), because then you'll face seven cultists instead of just three.
Gamblack is tough, and he'll take a while to kill, but with four against one you should eventually wear him down. When Gamblack dies you'll earn 65 experience points, and you'll find the sword
Snip and more on his corpse. Then when you click on the nearby cultist's desk, you'll pick up the
Book of the Serpent, and you'll earn 100 more experience points.
Note: Picking up the
Book of the Serpent will lock the Blood Mountains, and so when you leave the area you won't be able to return.
To complete the quest, you'll just need to deliver the
Book of the Serpent to Dorion at the Temple of Hesinde in Praios Square in Ferdok. When you do, you'll receive 300 experience points -- plus your next task from the Oracle.
1 - Locked Gate
To open the locked gate (#1), you'll need to activate the rope winch (#1a) to the east. To reach the rope winch, you'll either need to sneak past or fight the cultists in the temple (#2). If you choose to be stealthy, then your entire party will need to be able to sneak (the winch is too far away for one character to make it alone), but 10 points in the Sneak talent should be enough.
2 - Temple
One of the cultist's here will drop
Jost's Key, which you'll need to free Jost (#7).
3 - Debris
You won't be able to pass through the debris here.
4 - Traps
If you set off any of these traps, then you'll alert the guards to your presence and you'll fail the quest "Like a Shadow."
5 - Barracks Rooms
The doors to these rooms will start out closed, which will prevent the sleeping guards inside from noticing you. But if you set off a trap or attack someone, then the doors will open and the guards will come streaming out looking for you.
6 - Patrolling Guard
The guard here will patrol in a clockwise direction. You're probably supposed to sneak behind him and follow him in his route, and hope that he doesn't detect you. But oddly, if you wait in the hallway to the west and fight him there, then he won't raise the alarm, and you'll be able to kill him without any repercussions.
7 - Jost's Cell
Inside this cell you'll meet Jost, who will ask you to free him. If you agree to make the attempt, then you'll trigger the quest "The Prisoner." You'll find the key to Jost's cell on a dragon cultist in the temple (#2). If you've been sneaking through the ruins, then you'll be able to steal the key from the cultist. Otherwise you'll have to kill him to get it.
When you free Jost, you'll receive 20 experience points, and Jost will become available as a companion. You'll also find a treasure chest in Jost's cell, and if you can open it (using the
Robber's Key from Humbert in the Blood Mountains) then inside you'll find a
Ring of Phex plus lots of crafting supplies.
8 - Locked Chest
You'll need to pick the lock on this chest or use the
Robber's Key (from Humbert in the Blood Mountains) to get the chest open. Inside you'll find a
Horasian Fighting Staff, a
Healing Potion, and more.
9 - Guard
You'll encounter a guard here, but he won't be able to set off any alarms, and so you won't face any penalty for killing him.
10 - Kastan Gamblack / Book of the Serpent
You'll need to kill Gamblack and claim the book to complete the chapter.
Exits:
- Exit to the Blood Mountains.
- Stairs between levels 1 and 2.
- Stairs between levels 2 and 3.
- Stairs between levels 3 and 4.
- Exit to the Blood Mountains.


