 Did we miss anything in this section? Is there something we didn't discover?
Let us know!
Overview
Did we miss anything in this section? Is there something we didn't discover?
Let us know!
Overview
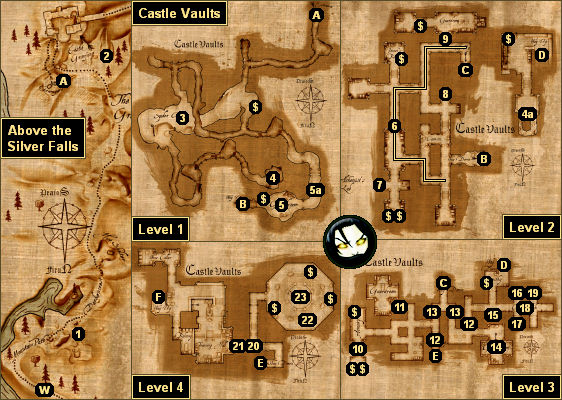
This chapter will task you with completing another trial for the Oracle of the Dragon Quest. You'll need to travel to Grimtooth Castle and acquire the
Dragon's Eye. You'll find Grimtooth Castle in a region named Above the Silver Falls, located south of Ferdok. However, when you get there, you'll find the area under attack by orcs and ogres, and so you'll need to sneak into the castle via the Castle Vaults (Exit A).
The main quest for the chapter is
The Dragon's Eye, but you'll also find a few side quests in Ferdok and along the path leading to the castle.
1 - Humbold
At this spot a soldier named Humbold (who you might remember from Avestrue) will come running up to you. He'll tell you that he's being chased by "an entire horde of orcs," and he'll trigger two quests -- "The Messenger," which will require you to save Humbold by defeating the orcs, and "Captured," which will require you to free Humbold's friend Gondwin, who was taken prisoner by the orcs to the north (#2).
Several orcs and an ogre will then attack you. The ogre is big and tough but slow, so try to kill the orcs quickly so you can concentrate on the ogre alone. You'll receive 10 experience points when you kill the ogre, and you'll receive 50 experience points for completing the battle. Humbold won't stick around to thank you.
2 - Orc Camp
This is the camp where Gondwin is being held. You'll face an ogre, an orc captain and more in the camp, but if you can defeat them, then you'll earn 100 experience points, and you'll free Gondwin. Gondwin will then tell you that he knows a secret way into the castle (Exit A), and he'll lead you there.
Note: Before rushing off to follow Gondwin, go ahead and loot the camp first. Gondwin will wait for you a short ways ahead.
3 - Spider Nest
You'll get attacked by eight small emerald spiders here. Nothing will happen if you destroy the spider eggs (here and elsewhere).
4 - Cave
When you stand in this cave (#4), you'll eavesdrop on a pair of orcs. They'll discuss the
Dragon's Eye, but they won't know anything more about it than you do, other than that Bloodfang, the orc leader, is looking for it. The orcs will show up on your mini-map, but you won't be able to attack them. That's because they're actually standing above you in the smithy (#4a).
You'll also find four skeletons in the cave, but they won't contain anything of value.
5 - Orcs and Ogre
You'll encounter two orc warriors and an ogre here (#5). The orcs will taunt the ogre so much that the ogre will start pounding on the ground with his club, and he'll cause the unstable walls to the east (#5a) to collapse, blocking your retreat from the Castle Vaults. You'll have to kill the orcs and ogre to progress to Level 2.
6 - Orc Patrol
If you're trying to sneak through the castle, then you'll need to avoid this patrol. The patrol will follow the route marked by the gold lines on the map.
7 - Fake Wall
Behind this fake wall you'll find a locked chest containing 7 ducats and more, plus a laboratory and lots of Alchemy ingredients.
8 - Fake Wall
Behind this fake wall you'll find a locked chest containing 7 ducats and some potions.
9 - Ironbound Wooden Door
The door to this guard room will remain closed unless the orcs on Level 2 discover your presence. We've never seen the doors to this guard room and the other guard room (#11) both open. Ideally you'd force this door to open (by first sneaking through the level to meet a quest objective, and then returning) because you'll find more to loot in this guard room than the other one.
10 - Not-So-Fake Wall
Every time we've played the game, this fake wall has already been open, revealing the way into a secret armory. If you loot all of the containers and orcs in the armory, then you'll find a bunch of good stuff, including a
Byakka, a
Ravensbeak, a
Warunkian Hammer,
Gloves of Chain Mail,
Chain Mail Leggings, and more.
11 - Ironbound Wooden Door
The door to this guard room will remain closed unless the orcs on Level 3 discover your presence. We've never seen the doors to this guard room and the other guard room (#9) both open.
12 - Locked Gates
You'll need to position the levers in the guard room (#14) correctly to open these gates.
13 - Levers
These levers will open the gate in between them. But sometimes the gate will start out open, and the levers won't do anything.
14 - Guard Room
If you loot the three locked chests in the guard room, then you'll find about 200 ducats inside. In the back of the room you should also notice three levers. If you move the two outer levers to "up" and the middle lever to "down" (to match the shields on the wall above them), then you'll open a pair of locked gates (#12).
15 - Lever Alcove
The levers here will open and close the cells to the east. Move the levers up to open the cells and down to close the cells.
16 - Orc Captain
When the orc captain dies, he'll drop the
Key to Cell Wing, the
Key to Torture Chamber, and
Instructions for Orcish Composite Bow. You'll need the
Key to Cell Wing to open the gate to the east (#18), but the
Key to Torture Chamber doesn't unlock anything.
17 - Skeleton
You'll find a
Note on the skeleton.
18 - Locked Gate
You'll need the
Key to Cell Wing (#16) to open this gate.
19 - Robbers
You'll meet a pair of robbers here, but they'll prefer to stay locked in their cell where they're safe from the orcs. So far as we can tell, there isn't any way to open the cell door or do anything with the robbers.
20 - Torch Brackets
You'll find four torch brackets here that you can click on. To open the gates to the north, you'll need to extinguish all of the torches, but if you click them in the wrong order, then you'll get hit by a fireball and have to start over. You won't have to worry about the northwestern torch (it'll start out extinguished). For the others, you'll need to click on them in this order: northeastern bracket, southwestern bracket, and then southeastern bracket.
21 - Ironbound Wooden Door
This door will remain closed until you solve the statue puzzle (#23).
22 - Treasure Chest
Inside the trapped and locked chest here you'll find a
Robe of Astral Power,
Okharim's Ring of Cleverness, and a
Magician's Rapier.
23 - Statue Puzzle / Dragon's Eye
At this spot you'll find four statues surrounding a pedestal. If you click on the statues then you'll rotate them. Your goal is to rotate the statues so that they're all directing a beam of light onto the pedestal.
To complete the puzzle, just notice that clicking on the eastern statue will rotate all of the statues, clicking on the northern statue will rotate three of the statues, clicking on the western statue will rotate two of the statues, and clicking on the southern statue will rotate only itself. That means you should start with the eastern statue, position it correctly, and then continue on in a counterclockwise fashion, positioning the statues as you go. Each new statue will only rotate itself and the statues you haven't positioned yet, and so at the end all of the statues will be in the correct position.
When all four statues are pointing a beam of light at the pedestal, the
Dragon's Eye will appear, and a door to the west (#21) will open, allowing you to escape from the vaults (via Exit F). When you pick up the
Dragon's Eye, you'll receive 300 experience points.
Exits:
- Entrance to the Castle Vaults. You'll receive 100 experience points for entering the vaults.
- Stairs between levels 1 and 2 of the vaults.
- Stairs between levels 2 and 3 of the vaults.
- Stairs between the upper and lower levels of the smithy.
- Stairs between levels 3 and 4 of the vaults.
- Exit from the Castle Vaults (to the Castle Inner Ward). When you exit the vaults, you won't be able to return.
- World exit.


