 Did we miss anything in this section? Is there something we didn't discover?
Let us know!
Background
Did we miss anything in this section? Is there something we didn't discover?
Let us know!
Background
You'll trigger this quest when you pick a trading company during the quest
Investigations at the Harbor. Your choice will lead to a series of tasks, which will span the next few chapters. This page is for the Stoerrebrandt line of quests. The Neisbeck line can be found
here.
Walkthrough
Running Errands (Chapter 3)
Foreman Dykemiller (#1) will ask you fetch an order sheet from the innkeeper at the Silver Pitcher tavern in Praios Square. You won't encounter any difficulties during this task. You'll just need to visit the Silver Pitcher, pick up the
Ferdok Brewery Order from the innkeeper, and then return to Dykemiller. All told, you'll receive 25 experience points and 5 thalers for your efforts.
Hops and Malt (Chapter 5)
For this task, Dykemiller (#1) will ask you to pick up an order from the docks (#2), deliver it to the Ferdok Brewery (#4), and then return with the payment. Nothing unexpected will happen at the docks. The Stoerrebrandt Dock Worker will simply show you the
Secret Ingredient (on the nearby cart) that you're supposed to deliver, and you'll earn 10 experience points.
But when you approach the brewery, you'll be attacked by three Dark Eyes (#3). After dispatching them, when you talk to the brewery owner (#4), he'll accept the delivery and give you the
Brewery Payment, and you'll also receive 10 experience points. Then when you return to Dykemiller, you'll receive 10 more experience points plus 10 ducats.
Problem with the Beer (Chapter 5)
Dykemiller (#1) will ask you to report the Dark Eye attack to Head Guardsman Tashman at the toll house (#5). Tashman won't be too concerned with your "trivial matters," but eventually (via Fast Talk or Haggle) he'll announce that he might know who was behind the ambush, and he'll set off in pursuit.
Tashman will lead you to a drunkard and a scallywag (#6). It'll be clear from their dialogue that the pair wasn't involved in the attack, and that Tashman is just trying to tie up some loose ends, but you won't be able to do anything about it, and after the two are dead, Tashman will decide that the case is now closed.
When you report these events to Dykemiller (#1), you'll receive 10 experience points and 12 ducats.
An Exclusive Deal (Chapter 5)
For this task you'll need to escort a Stoerrebrandt negotiator from Dykemiller's position (#1) to the Ferdok Brewery (#4), make sure that he stays safe during the negotiations, and then bring him back. The negotiator will lead the way. Just talk to him to get him started.
You'll receive 10 experience points when you reach the brewery, but then without surprise some Dark Eye thugs will attack you. The negotiator and the brewery owner will retreat into the brewery, leaving you on your own, but you shouldn't have any trouble with the battle, which will net you 10 more experience points.
After you've completed the fighting, the negotiator will exit the brewery and let you know that he's ready to go back. Nothing untoward will happen on the return trip, and when you report in to Dykemiller (#1), you'll receive 10 experience points and 20 ducats.
Neisbeck Worker (Chapter 6)
When you approach Laran Dykemiller (#1), a Neisbeck worker will stop you and attempt to recruit you to the Neisbecks. He'll start off by offering you 20 ducats, but with enough prowess in Haggle, you'll be able to increase that offer to 100 ducats. If you accept the worker's offer, then you'll switch to the Neisbeck version of For a Handful of Ducats, starting with their Chapter 6 quests.
The New General (Chapter 6)
When you talk to Dykemiller (#1), he'll tell you that Master Stoerrebrandt's son Reginald just arrived in the city, and that you'll need to escort him through the harbor to make sure that he arrives in the Stoerrebrandt warehouse (#7) safe and sound.
When you meet Reginald at the docks (#8), you'll earn 10 experience points, but Reginald won't want to experience any "touching family reunions" just yet. Instead, he'll want to do some investigating. First he'll talk to Merchant Cupinez (#9) and then he'll enter the Fleet Footed Ferret (#10) and talk to Tarosh Strawbeadle. Between the two he'll learn that the Neisbecks are working with the Dark Eyes in Wagoner's Home, and that they're expecting an important visitor today.
Pick Pocketing Note: Reginald will drop 10 ducats.
| |
|
| Wagoner's Home |
Reginald will then run to a gate leading to Wagoner's Home (#11), but a Dark Eye named Radulf Kramer will stand in your way. Kramer won't seem to realize that he's outnumbered, and he'll pick a fight will you. Once you've killed him, Reginald will find the key to the gate on his body, but before going through the gate he'll recommend that you leave your companions behind so that the two of you can sneak through Wagoner's Home and figure out what's going on. When you talk to Reginald after dismissing your companions, you'll receive 10 experience points.
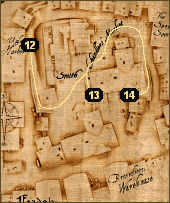
It'll be foggy in Wagoner's Home, and so you won't need much prowess in Sneak to avoid the Dark Eyes, but you will need to sneak. Then just as long as you follow the path shown in the insert to the right (starting at #12 and ending at #14), avoiding the Dark Eyes when necessary, you'll reach your vantage point undetected, and you'll learn that the Dark Eyes, Head Guardsman Tashman and a mysterious magician are all working for the Neisbecks. Completing this step in the quest will earn you 20 experience points.
Note: If you're spotted by the Dark Eyes, then you'll have to fight them, and you'll probably get overwhelmed and killed. So be patient and sneak through the area.
To exit Wagoner's Home, you'll just need to reverse the path you used to spy on the Neisbecks (that is, starting at #14 you'll need to travel back to #12). When you reach the exit gate, you'll automatically return to Dykemiller (#1), and he'll reward you with 20 experience points and 25 ducats. Reginald will also give you the
Key to the gate to Wagoner's Home (#11), just in case you had a hankering to go through it again.
Testing Times (Chapter 6)
The next time you talk to Dykemiller (#1), he'll move the carts out of the way. Then in front of the warehouse (#7), you'll meet Reginald again, and he'll tell you that the Dark Eyes have stepped up their attacks on Stoerrebrandt workers, and he'll ask you to patrol the area and keep the workers safe.
You'll have to battle the Dark Eyes in three places: near the Fleet Footed Ferret (#10), near the bridge (#15), and along the docks (#3). At each spot you'll face three Dark Eyes, and you'll receive 20 experience points for defeating them. You won't be able to keep the Stoerrebrandt workers alive. After the third battle you'll get ambushed by six Dark Eyes, and taking them down will net you 20 additional experience points.
Then when you return to Reginald, he'll reward you with 20 experience points and 30 ducats.
The Way of Things (Chapter 7)
When you talk to Laran Dykemiller (#1), he'll direct you to Emmeran Stoerrebrandt, who is residing inside the Stoerrebrandt Warehouse (#7). When you talk to Emmeran, he'll inform you that his son Reginald was assassinated by House Neisbeck and Head Guardsman Tashman, and he'll ask you to track down Tashman, so that you can use him as a witness against the Neisbecks.
Emmeran will suspect that Tashman is going to try and leave the city by boat, but he won't know for sure, and so he'll send you to the informer Merchant Cupinez (#9). Cupinez will tell you about a woman named Arnelia Ennko, who "finds people quiet spots between the sacks and crates of cargo ships." You'll gain 25 experience points for learning about Ennko.
Ennko can be found in Wagoner's Home, near Fishwife Strunkler's stall. When you approach Ennko (now called Smuggler Dana), you'll catch the tail end of a conference between her, Tashman and two Dark Eyes. Tashman will then flee, but the Dark Eyes will attack you. After the battle, and after a bit of prompting, Ennko will admit that she booked passage for Tashman on board the ship
Horasia, which is about to set sail from the harbor. For learning about the ship, you'll gain 25 experience points.
You'll finally catch up with Tashman at the docks (#8). When you accuse him of murder, he'll bring up Ardo, but then he'll backtrack and claim that he only made the killing look like one of the other murders, to hide the fact that the Neisbecks were responsible. Learning that bit of information will net you 50 experience points.
At that moment Yandric of Andergast will show up. He'll chastise Tashman for being "a little too talkative," but then he'll start talking himself, and he'll admit to not only killing Ardo, but of enjoying the murder immensely. Yandric will then cast a fire spell at you. The spell will kill Tashman and sink the
Horasia, but it will only set your party on fire.
Note: When Tashman dies, you'll automatically pick up
Ardo's Key. This key will unlock the study on the upper floor of Ardo's residence in Praios Square, and inside you'll find
Ardo's Ancestral Sword and 80 ducats.
Yandric is tough. He'll probably start out by casting a couple of Ignifaxus Burst of Flames, which might knock one of your party members right out of the battle, and he'll have Fastness of Body up, which will make him difficult to hit. But if you use potions or spells to withstand his early barrage, then you should be able to win a battle of attrition against him.
Once you've done enough damage to Yandric, he'll dive into the water and escape, but you'll gain 25 experience points. Then when you return to Emmeran (#7), he'll reward you with 80 ducats and 25 more experience points. Reporting back to Emmeran will also trigger the quest
Revenge for Ardo, which will bring a couple of plot lines to a conclusion.
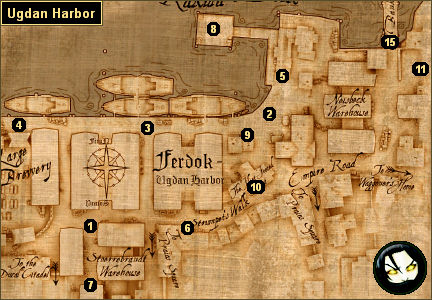
1 - Laran Dykemiller
2 - Stoerrebrandt Dock Worker
3 - Dark Eye Ambush
4 - Brewery Owner
5 - Toll House
6 - Suspects
7 - Stoerrebrandt Warehouse
8 - Docks
9 - Merchant Cupinez
10 - Fleet Footed Ferret
11 - Locked Gate to Wagoner's Home
12 - Wagoner's Home: Starting Point
13 - Wagoner's Home: First Stop
14 - Wagoner's Home: Destination
15 - Bridge


