 Did we miss anything in this section? Is there something we didn't discover?
Let us know!
Background
Did we miss anything in this section? Is there something we didn't discover?
Let us know!
Background
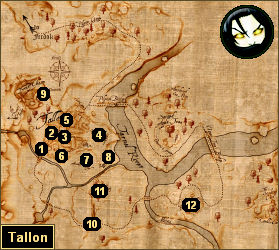
You'll receive this quest from the Tallon Captain at the west gate of Tallon (#1). You'll have to accept this quest to go through the gate.
Walkthrough
The captain will tell you that goblins are coming right up to the town walls, and he'll chafe a bit that he and his men have been ordered to stay inside. But then he'll take a close look at you and recruit you to help drive the goblins away.
Outside of the gate, you'll encounter several goblins, including a goblin shaman. The shaman is the most dangerous enemy in the group, so take him down first. After a minute or so of fighting, half a dozen more goblins, including another shaman, will charge at you. Like before, you should target the shaman first and then mop up the rest.
After the battle, the Tallon Captain will offer you some money as a reward for your assistance. If you accept the money, then you'll gain 30 experience points and 20 ducats. If you refuse the money, then you'll gain 45 experience points.
Since you fared so well against the goblins at the gate, the Tallon Captain will have a second task for you. He'll speculate that the goblins must have a camp somewhere between Tallon and Rattle Farm (#12), and he'll ask you to look for it.
If you follow the path out of Tallon, then you'll eventually come to a bridge where you'll meet Ancoron (#10). He'll tell you that his family was killed by goblins, and that all he seeks now is revenge. He'll then tell you that the goblin camp is located in the dry riverbed to the north (#11), but he'll caution you that just your small party, even with him included, won't be enough to take it on. You'll need an entire army. For learning about the camp, you'll earn 20 experience points.
When you return with this news to the Tallon Captain (#1), you'll earn 20 more experience points, but the captain will inform you that the town council has forbidden the guards from leaving the city. That means you'll somehow need to change the mind of the council before the attack can proceed. There are three council members -- Mayor Dipwidge (#2), Merchant Oakrich (#3), and the Abbot of Tallon (#4) -- and you'll need to complete a task for each of them to convince them that the attack is a good idea.
Persuading the Mayor
You'll find Mayor Dipwidge at the tavern in Tallon (#2). He'll tell you that a nobleman had some figurines stolen from him by a leprechaun, and he'll ask you to retrieve them. This conversation will net you 10 experience points.
You'll find the leprechaun in the field southeast of the city (#7). The leprechaun will claim that it was only "borrowing" the figurines, and it'll offer to give them back to you -- provided that you convince the woodcutters in the camp to the east (#8) to play a game. The woodcutters will be wary of the leprechaun, but with judicious use of Fast Talk, Seduce, or 10-15 ducats, you'll be able to persuade them to play, and you'll earn 10-15 experience points for your trouble.
When you return to the leprechaun, it will start the game. It will turn the three woodcutters into chickens, and it will challenge you to turn them into cats. Each time you touch one of the woodcutters, he'll change shape using the sequence chicken, cat, dog, pig and deer, and the other two woodcutters will revert back to their previous shape. To turn all of the woodcutters into cats at the same time, you'll need to touch one of the woodcutters four times, then another one twice, and then the last one once.
When you complete the puzzle, you'll earn 50 experience points, and the leprechaun will give you the figurines (although you won't actually receive anything in your inventory). Then the leprechaun will mention that it has a passion for alchemy, and it will become a trainer for many talents, including Ignisphaero Fireball and Calm Body Calm Spirit. You'll also be able to talk to the leprechaun about Auralia's alchemy recipe. See the quest entry for
The Recipe for the Potion of Power for more information.
Finally, when you return to Mayor Dipwidge, he'll give his blessing for the attack, and you'll also receive 10 experience points.
Persuading the Merchant
You'll find Merchant Oakrich in the Tallon marketplace (#3). He'll tell you that his son Ulfing has been "having trysts with a common maidservant" named Niame, but that he hasn't seen him in some time, and he's worried. He'll then ask you to look for Ulfing, and he'll suggest that you interrogate Mother Sweeting (#5), Niame's mother. For meeting with Oakrich, you'll gain 10 experience points.
When you speak with Mother Sweeting, she'll inform you that the lovebirds have been rendezvousing at the Oakrich crypt in the cemetery (#6), much to her disapproval, and that they're probably there now. Learning this information will net you 10 experience points.
Inside the crypt, you'll encounter a bunch of skeletons and traps, and you'll also find a few diary fragments (in sarcophagi) that will reveal some interesting tidbits about Oakrich's ancestor Xindan, including that he once had a disciple named Meredin, and that he was obsessed with a special ring.
You'll also eventually find Niame (in the central chamber). When you talk to her, she'll tell you that she and Ulfing got separated when the undead started spawning, and she'll ask you to rescue him. But before you can do anything, some skeletons will appear in the crypt, and you'll have to defend Niame. After the battle you'll receive 30 experience points, and Niame will give you a
Crypt Key, which will allow you to reach Ulfing in the back of the crypt.
When you get to Ulfing, you'll find him in the clutches of Xindan, in the form of an undead necromancer. Xindan will talk to you, and this will give you two options for the encounter -- to convince Xindan to return to death, or to attack him.
If you want to talk your way through the encounter, then you'll need to select the following lines of dialogue:
- I read your journal.
- No meaning? You found a home here after all.
- I know about the matter regarding Hesperia.
- So, was doom averted by her death then?
- I read about your ring.
- No, I don't want it. Just look what it did to you.
- You're talking about your wife's death, aren't you?
- I defile her memory?! You did not attend to her when she was still among the living!
- You still want to bring back Dhana from the dead, do you?
- There is another way yet to be united with Dhana again.
- No, I already said what I had to say.
- If you adhere to your plan, you will doom yourself and Dhana for all time.
If you want to fight your way through the encounter, then you should buff up your party and stock up on potions first. Xindan is a tough opponent -- he'll knock you over and deal extra spell damage when he hits you -- and he'll have a few of the bigger and nastier skeletons helping him out. You should definitely take down the skeletons first, but mostly you'll just need to keep your party upright so that you can eventually wear down Xindan.
Regardless of how you choose to deal with the encounter, Xindan will fall over dead at the end of it, and you'll receive 50 experience points. You'll also find an
Old Letter and the staff
Soulsplitter on Xindan's corpse, but you won't find any trace of Xindan's ring.
Ulfing will then ask you if you're ready to go, and when you say yes, you'll teleport out of the crypt and find yourself next to Merchant Oakrich. Oakrich will thank you for your help, and he'll promise to support the planned attack on the goblin camp. You'll also receive 10 experience points.
Persuading the High Deont
You'll find the Abbot of Tallon inside the Temple of Peraine (#4). The abbot will tell you that a well in the town has been poisoned by goblins, but that he can't cleanse it yet because he's missing an ingredient. He'll then ask you to fetch this ingredient for him. Talking to the abbot will earn you 10 experience points.
You'll find the ingredient,
Mandrake, outside of Tallon to the west (#9). You'll have to battle some goblins to get to it, and then after picking it up, you'll probably get ambushed by harpies. Neither battle should be particularly tough. You'll gain 30 experience points for grabbing the
Mandrake.
Then when you return to the abbot, he'll agree to support the guards' attack on the goblin camp, and you'll receive 10 experience points.
Attacking the Goblins
After gaining the support of the town council, when you return to the Tallon Captain (#1), you'll gain 10 experience points, and you'll lead the town guards to Ancoron's position (#10). Then after a bit of dialogue, the battle will start.
You'll find the goblin camp in the dry riverbed to the north (#11). The guards will rush off ahead of you to attack it, and they'll help you out in the fighting while they last. The battle will proceed in four parts. In the first three parts you'll have to battle regular groups of goblins, much like you've seen elsewhere around Tallon, but in the last part you'll have to rescue Ancoron from three ogres, including an ogre chief.
The battle with the ogres won't start until you get there, so feel free to buff up your party first. Ogres are tough, especially in groups, and so you'll need to be careful in the battle. If you have trouble, then you can always lure the ogres back towards the Tallon guards, and they'll help you out.
After the battle, you'll gain 50 experience points (in addition to the 100 or so experience points from killing the goblins and ogres), and Ancoron will become available as a companion. If you loot the chests in the camp, then you'll also find some useful crafting items, plus 48 ducats. Mayor Dipwidge (#2) won't give you a reward if you return to him.
1 - West Gate
2 - Tavern
3 - Marketplace
4 - Temple of Peraine
5 - Mother Sweeting's Stall
6 - Cemetery
7 - Leprechaun
8 - Woodcutters' Camp
9 - Mandrake
10 - Ancoron
11 - Goblin Camp
12 - Rattle Farm


