 Did we miss anything in this section? Is there something we didn't discover?
Let us know!
Background
Did we miss anything in this section? Is there something we didn't discover?
Let us know!
Background
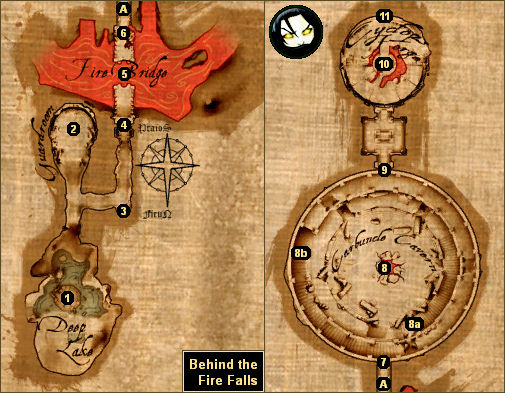
You'll trigger this quest when you go through the portal in Aldessia's Chambers in Murolosh, and arrive in the area called Behind the Fire Falls.
Walkthrough
Your goal in this quest is to track down the Adamantine Heart (#8). To reach it, you'll have to fight a variety of creatures, including fire spirits and grolm ghosts, and you'll have to solve some puzzles.
First off, you'll need to figure out how to open a door (#4). The switch for the door is located in the guardroom (#2), but you won't be able to reach it. To activate the switch, you'll need to topple the pillar next to it (by clicking on its base) so that it falls into the switch. When that happens, you'll earn 100 experience points.
Next up, you'll need to "repair" the fire bridge (#5). To do this, notice the two illuminated stone cavities to the left and right of the bridge. Inside of each you'll find a certain number of
Cooled Fire Hearts. To make the bridge functional again, you'll just need to insert an equal number of regular
Fire Hearts. Conveniently, fire spirits will regularly spawn by the bridge, and they'll drop
Fire Hearts. When you cross the bridge, you'll gain 100 experience points.
Beyond the bridge you'll be stopped by a fire curtain (#6). To make it disappear, you'll need to examine the illuminated stone cavities on the northern side of the bridge (#5), then note the number of
Cooled Fire Hearts inside of each one, and then once again insert an equal number of regular
Fire Hearts. When you've done this correctly, the curtain will part, and you'll gain 100 experience points.
Note: Fire spirits will continue to spawn by the bridge whether you need
Fire Hearts or not, so exit the area as quickly as possible.
Past the fire curtain you'll come to a passage filled with symbols (Exit A). The "eye" symbols are trapped. If you detect the traps and hover your mouse over them, then you'll see a message claiming that the traps can be disarmed by an "expert," but so far as we've seen, the traps can't be disarmed at all. That means you'll need to take your characters one by one and lead them around the traps. If you make it to the northern door (#7) unscathed, then you'll gain 200 experience points, and two stone cavities will appear beside the southern door (#6). Inside the cavities you'll find a
Ring of Life, a
Ring of Astral Accumulation, and some crafting items.
Finally, you'll come to the carbuncle cavern (#8), which is the resting place for the Adamantine Heart. What you'll need to do in the cavern is climb to the top (using the staircases at #8a and #8b). You'll get attacked by grolm ghosts and a grolm king as you progress. The king will disappear after a single hit, but to make the ghosts stop spawning, you'll need to destroy a nearby grolm crystal.
Note: Grolm ghosts will constantly cast Lightning Find You on your party. To protect yourself from this spell, have your characters quaff
Elixirs of Cleverness.
Another Note: Inside the grolm crystals you'll find
Crystal Shards. The crystals will use up the shards when they spawn grolm ghosts, and so you might find between one and five shards per crystal. If you manage to collect 20 shards while you're in the cavern, then when you return to Murolosh, Merchant Watmoss will give you 50 ducats for them. This transaction will also trigger and complete the quest "Ducats and Crystal Shards," which will earn you 50 experience points. If you don't find 20 shards, then you'll only be able to sell them for about 5 thalers each.
Five times while you're winding your way to the top of the cavern, you'll come across a grolm console. The consoles control "floating stones," which fit into the gaps in the walkways, and so you'll need to move them into place to continue your ascent. However, all five of the consoles are trapped, and one of them is simply broken. When you reach the broken console, you'll need to backtrack a ways and then use the outer rim staircase (#8b) to reach the top.
If you examine the consoles, then you'll see that they each contain four panels of symbols. One of the panels will move the floating stones, and the others will trigger poison traps, but it's random which panel is the "right" one. If you make it past all of the consoles without triggering any traps, then on the bottom level of the cavern on the eastern side you'll detect a stone cavity containing a
Ring of Endurance and some crafting items. Opening the cavity will also trigger and complete the quest "The Legendary Treasure of the Grolms," which will net you 50 experience points.
When you reach the top of the cavern, the grolm king will finally decide to fight you in earnest. He'll summon grolm ghosts to help him out, and he'll cast Ignisphaero Fireballs to damage you, but the fireballs will damage the ghosts as well as your party, and so the battle shouldn't be too tough.
When you kill the king, you'll receive 145 experience points, and the barrier preventing you from reaching the Adamantine Heart will disappear. However, the shield around the heart will remain, and when you try to reach through it, you'll be knocked down. At the same time, the door to the north (#9) will open, allowing you to venture into the Cyclops Forge (#10).
Note: Defeating the king will also cause a glowing treasure chest to appear on the northern side of the cavern (on the bottom level). Inside the chest you'll find an
Amulet of Constitution and some crafting items.
At the forge you'll meet the cyclops Pal'Na'Thar. You'll recognize his voice as the Oracle of the Dragon Quest, and you'll learn that the Adamantine Heart is really the carbuncle of the immortal dragon Umbracor. Pal'Na'Thar will then explain that he set up the Dragon Quest to find his successor, and that you're now supposed to take his place at the forge and watch over the heart for the next few centuries.
Eventually you'll convince Pal'Na'Thar that you're not cut out to be a guardian, and that maybe you can wake up Umbracor with the help of Rakorium. Pal'Na'That will then agree to give you the heart and allow you to leave the forge. This will earn you 100 experience points. However, when Pal'Na'Thar removes the shield from around the heart, Malgorra will swoop in and steal it, and you'll be left with nothing to show for all of your hard work.
Pal'Na'Thar will be depressed for a minute, but then he'll perk up and create a weapon for you. Only your main character will be able to equip
this weapon, so choose wisely. Pal'Na'Thar will then open the way to a portal (#11), and when you go through it you'll complete the quest
The Caves below Murolosh, and you'll earn 50 experience points.
To complete this quest, you'll need to travel to Drakensang Mountain and retrieve the Adamantine Heart from Malgorra. This is covered in the quest entry for
Drakensang Mountain. When the heart is yours, you'll gain 100 experience points, and the quest will come to an end.
1 - Portal
This is where you'll start out in the Fire Falls. As with the portal in the Deeps of Gruldur, the portal here will disappear when you arrive, and you won't be able to return to Murolosh right away.
2 - Guardroom
Inside this room you'll find a cyclops skeleton. If you pick up the
Cyclops Skull from the skeleton, and later give it to Pal'Na'Thar (#10), then you'll receive 15 experience points.
3 - Lava Curtain
When you open the stone cavities by the fire bridge to the north (#5), the lava curtain here will disappear, and you'll discover a chest behind it. You'll find potions and more inside the chest.
4 - Door
To open this door you'll need to click on the pillar in the guardroom (#2).
5 - Fire Bridge
You'll need to insert
Fire Hearts into the nearby stone niches to extend the bridge.
6 - Fire Curtain
You'll need to insert
Fire Hearts into the nearby stone niches to open the curtain.
7 - Door
This door will open when you get close to it, but then close behind you when you go through, locking you into the Carbuncle Cavern (#8).
8 - Carbuncle Cavern / Grolm King / Adamantine Heart
The cavern is the resting place of the Adamantine Heart (#8). To reach it, you'll need to climb two staircases (#8a and #8b) and battle some grolms, including the grolm king.
9 - Door
This door won't open until you've defeated the grolm king (#8).
10 - Cyclops Forge
This is where you'll meet the cyclops Pal'Na'Thar.
11 - Passage to Portal
The passage will only open after you've selected a weapon from Pal'Na'Thar (#10).
Exits:
- Trapped passage.


