 Did we miss anything in this section? Is there something we didn't discover?
Let us know!
Overview
Did we miss anything in this section? Is there something we didn't discover?
Let us know!
Overview
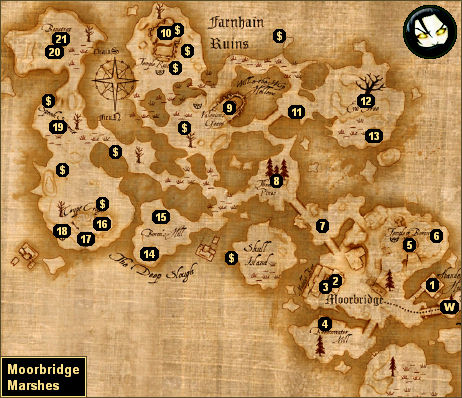
This chapter will take place mostly in the Moorbridge Marshes, which are located south of Ferdok. You'll have to exit Ferdok to the world map to reach them, and you might also need to scroll the world map to make the marshes visible as a destination (to scroll the map, just left click on it and drag your mouse).
Note: You'll only find one new quest in Ferdok --
The Boltan Card Trick, which you'll receive automatically when you leave the Temple of Hesinde at the start of the chapter.
When you arrive in Moorbridge, you'll find the villagers planning to execute the "undead monster" Bredo Bento (who you might remember from Avestrue) because he was wandering in the marshes rather than sticking to the roads. No matter what you say, Bento will be saved, and you'll receive 55-60 experience points.
After the confrontation, Bento will come up to you and thank you for saving him. He'll also let you know that the local Boron "deont" is missing, which is contributing to why the villagers are acting so radically. Bento will then give you a
Crypt Key and a
Blood Leech in a Jar, and he'll head over to an abandoned house (#1). You'll be able to use the
Crypt Key to unlock one of the crypts in the marshes (#18).
Note: As far as we can tell, "deont" isn't really a word, but "deontology" is defined as the branch of philosophy concerned with ethics and moral obligation.
As you progress through the chapter, you'll need to track down Rakorium for the Dragon Quest
(
The Addled Mind in Moorbridge), and you'll need to look for the missing deont that Bento told you about
(
The Boron Deont of Moorbridge). You'll also receive some side quests, including a treasure hunt
(
An Old Treasure Map) and the tracking down of a thief
(
The Boltan Card Trick).
1 - Abandoned House
You'll meet Bredo Bento here. He'll sell you a few items, and he'll also offer to buy your
Parcel of Candied Kosh Bunting Tongues for 5 ducats, if you still have it.
Pick Pocketing Note: Bento will drop 1 ducat and more.
2 - The Muddy Boot
You'll meet a few people of interest inside the tavern:
- Innkeeper Pebblebeer. He'll give you the quest "The Wolf Rats of Moorbridge," which will require you to go behind the tavern and kill a handful of wolf rats there. After completing the task, Pebblebeer will offer to pay you 4 thalers for your work. If you accept the money, then you'll also gain 10 experience points. If you don't accept the money, then you'll gain 25 experience points.
You'll also be able to buy a round of drinks from Pebblebeer. This purchase won't affect any quests, but if you spend 6 ducats on drinks and also refuse Pebblebeer's reward for the wolf rat quest, then you'll receive 15 extra experience points. "Your heart is truly in the right place."
- Nylla the Herbalist. She'll sell you some Alchemy items, including an
Herb Sickle and the
Recipe for Salve of Healing.
- Wigur and Krobber. If you encourage Wigur to talk about himself, then he'll let slip that Krobber has a "treasure." This will lead to the quest
An Old Treasure Map.
- Rogue (aka Bellisa Greenmont aka Thalya di Ravendoza). She'll readily admit to having robbed Innkeeper Soapstone in Ferdok. See the quest entry for
The Boltan Card Trick for more information.
3 - Blacksmith Leadfinger
Leadfinger's motto is "peat spades to swords." If you give him a
Shovel then he'll reward you with a
Broadsword. Leadfinger will also sell you some Blacksmith and Bowyer items.
4 - Old Mill
The Old Mill is involved in the quest
The Boltan Card Trick. You won't be able to enter it.
5 - Temple of Boron
When you first arrive at the temple, you'll find Militiaman Hamwin loitering out front, but he won't say much to you. Later, during the quest
The Boron Deont of Moorbridge, Morlinde will show up at the temple as well. She'll give you the quest
The Cleansing of the Crypts, she'll sell you some Alchemy items, and she'll train you in Animal Lore, Plant Lore, Survival, and Treat Poisons.
6 - Krobber's Cave
This is the cave where you'll find Krobber's
Treasure Map. See the quest entry for
An Old Treasure Map for more information. You'll also find a chest here.
7 - Sentry Post
When you first enter the marshes, you'll meet Militiaman Torfler at this post. Later, after defeating the necromancer at the temple ruins (#10), Bailiff Sheffler and four of his militiamen (including Torfler) will attempt to ambush you here. Depending on what else you've done in the marshes (such as rescuing Morlinde from the crypt at #11), you might be able to avoid the fight.
If Sheffler leaves peaceably, then nothing much will come of the encounter. But if the ambush proceeds as planned, then you'll receive 10 experience points for killing Sheffler, and you'll find 3 ducats and more on his corpse. If the militiamen join in the fight with Sheffler, then they'll flee when he dies.
8 - Undead Rufus
You'll encounter Undead Rufus and an undead mule here. When Rufus dies he'll drop
Rakorium's Recipe Book, which you'll need for the quest
The Addled Mind in Moorbridge. You'll also receive 30 experience points for completing the battle.
9 - Valonian's Grave
This is where you'll find Rakorium. He's involved in the quest
The Addled Mind in Moorbridge, and he'll also give you the quest
A Magician's Worries.
10 - Temple Ruins
You'll encounter a necromancer here. Killing him will prevent the undead from rising in the marshes. You'll also find a
Crypt Key, a
Magician's Staff, and a
Volcanic Glass Dagger on his corpse.
Note: You might notice a treasure chest in the fissure in the ruins. There isn't any way to get to it.
11 - Locked Crypt
You'll need the
Crypt Key from the necromancer (#11) to open this crypt. Inside you'll find Deont Morlinde.
12 - Evil Tree
When you approach the tree, you'll notice the elf Gwendala caught in its roots, and you'll trigger the quest "An Elf in Distress." When you talk to Gwendala, she'll plead for you to help her, and she'll tell you that you'll need to weaken the tree to make it let her go. After your conversation with Gwendala, the tree and its associated dragon plants will attack.
There are two ways to go in the battle. The dragon plants will periodically produce fireflies, so if you destroy them, then you'll have an easier time. But the tree itself is tough, and killing it will end the fight, so you might want to concentrate on it instead. Since the tree can't move, we'd recommend taking out the dragon plants first, then resting to full health, and then taking on the tree.
When the tree dies, you'll gain 70 experience points, but Gwendala won't be released from its roots. Gwendala will then tell you the story about why she's there, and she'll give you a
Soul Instrument (a +2 charisma amulet) so that you can enter the tree and placate her ancestor.
Inside the tree you'll encounter an elf spirit. You'll have three ways of dealing with it. You can hand over the
Soul Instrument, you can persuade the spirit to leave, or you can attack it. You'll get roughly the same amount of experience points for each option (30 or 40 points), but if you use persuasion or violence then you'll get to keep the
Soul Instrument, which is a useful item.
Note: Inside the tree, on the eastern side (just north of the entrance), you'll also find a skeleton. If you loot it then you'll gain an
Elven Robe,
Silvan Elf Shoes, an
Elven Bow, and
Silvan Elf Gloves.
Finally, when you exit the tree and return to Gwendala, you'll complete the quest, which will net you 10 more experience points. Gwendala will then become available to join your party.
13 - Mandrake
You'll find
Mandrake growing here. No prowess with Plant Lore is required to pick it. You'll need the
Mandrake for the quest
A Magician's Worries.
14 - Locked Crypt
This crypt is involved in the quest
The Boltan Card Trick.
15 - Crypt
Inside this crypt you'll meet the graverobbers Flint and Trastein (aka Treestone). They'll demand money from you, and you'll have three ways of dealing with them. You can attack them, you can pay them, or you can persuade them to leave you alone. If the graverobbers survive, then you'll also be able to bribe them or persuade them to stop robbing crypts. Regardless, you should end up with some
Grave Jewelry, which will trigger the quest "The Burial Jewelry."
To complete the quest, you'll just need to unload the jewelry. If you give it to Morlinde (#5), then you'll receive 15 experience points. If you sell it to Innkeeper Pebblebeer (#2), then you'll receive 6-12 ducats and 5 experience points.
16 - Harpy Nest
You'll have to fight three harpies here, but in their tree you'll find
Harpy Egg Yolk, which you'll need for the quest
A Magician's Worries. You'll get 30 experience points for picking up the yolk.
Note: The harpies will re-spawn from time to time.
17 - Locked Crypt
You'll need to pick open this crypt. Inside you'll find a sarcophagus containing a ducat and a
Shovel. You won't be able to dig up anything with the
Shovel, but if you take it to Blacksmith Leadfinger (#2), then he'll trade you a
Broadsword for it.
18 - Locked Crypt
The
Crypt Key from Bredo Benton (#1) will unlock this crypt. Inside you'll find skeletons and sarcophagi.
19 - Crypt
You'll find a rock goblin hiding in a barrel in this crypt. When you kill it, you'll receive
Rock Goblin Teeth and 35 experience points. You'll need the teeth for the quest
A Magician's Worries.
20 - Crypt
You'll find skeletons and sarcophagi inside.
21 - Locked Crypt
There isn't a key for this crypt; you'll have to pick the lock to get the door open. Inside the crypt you'll find a sarcophagus that you won't be able to interact with. It will only open after you've cleansed the crypt. See the quest entry for
The Cleansing of the Crypts for how to do this. Inside the sarcophagus you'll find two locked chests containing about 5 ducats in total.
Exits:
- World exit.


