 Did we miss anything in this location? Is there something we didn't discover?
Let us know!
Objectives
Did we miss anything in this location? Is there something we didn't discover?
Let us know!
Objectives
- Find the device.
- Kill all of the raiders.
Walkthrough
You'll start out on the western side of the map, in a small alcove protected by walls (#1). Raiders
won't patrol near your position, so you don't have to worry about combat finding you like it did in
the previous mission.
Your main objective in this mission is pretty straightforward: kill all of the raiders on the map.
There aren't any alarms this time, so you can just make your way through the map, killing raiders
any way you'd like.
There are three ways to get into the raider's compound: through the front gate (#2), through a break
in the fence (#3), and through a locked door in the fuel depot (#5a). It doesn't make a lot of
difference which approach you choose to take, but we like to go in through the main gate. The best
way to deal with the gate guards is to head to the fuel depot (#5) and start destroying fuel tanks.
Each time you blow up a fuel tank, the gate guards will come to the fuel depot to investigate. That's
a good thing because there are some easily defensible positions between the main gate and the fuel
depot, such as the trench (#4), and with a couple competent snipers, you should be able to dispatch
the gate guards with little trouble.
Note: If the raiders stop on their way to the fuel depot, just destroy another fuel tank to get them
moving again.
Once you've gained access to the compound, you should take the time to kill all of the raiders outside
the compound, and all of the patrollers inside the compound. You can use the compound walls to your
advantage for this, especially if you came in from the side and need a way to deal with the raiders
at the main gate.
Next you should clear out each of the buildings inside the compound. Most of the buildings have
something interesting about them. For example, in the building next to the main gate (#6), you'll
encounter a raider named Daisy guarding a tribal named Nanuk. If you kill Daisy then you'll earn
200 experience points, and you'll find a
hunting rifle and a
gate key on her corpse. The
gate key isn't for the main gate (#2);
it's for the inner gate (#13). Nanuk doesn't seem to be important. When you talk to him, he'll
simply run off, and you won't get any extra experience points for freeing him. You can also pick up a
first aid kit and some
stimpaks in the building.
After clearing out the buildings, including the prison (#8) where you can pick up the device mentioned
in your objectives, you'll need to head for the headquarters (#14). To get past the inner gate
surrounding it, you'll have to enter the small building next to the gate (by using the
gate key
from Daisy) and flip the switch inside.
You'll find a bunch of raiders inside the headquarters, including Jesse the raider leader, but they
won't be any more difficult than any of the other raiders you've ever fought, and so it shouldn't be
very difficult to fight your way through the building. Once Jesse goes down, you'll be informed that
you've completed the "kill all raiders" objective, even if Jesse wasn't the last one.
Before leaving the headquarters, you should be sure to loot the safe on the ground level. It has a
semi-tough lock, but remember that you can put
lockpicks into each hand of a squad member for a 40% total bonus to lockpicking. That should give
you enough skill to open the safe, and inside you'll find
Maddock's Tricks & Traps plus some
RadAway.
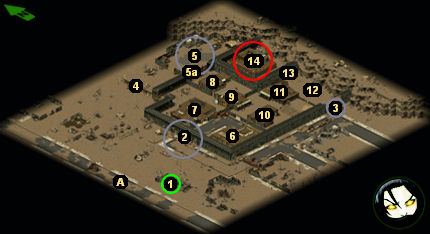
1 - Starting Position
2 - Front Gate
You'll find seven raiders guarding the front gate. Destroy fuel tanks in the fuel depot (#5) to
lure them away.
3 - Break in the Fence
Be careful of the mine field (#12) if you go through the break inthe fence.
4 - Trench
You'll find a pair of raiders hiding in the trench.
5 - Fuel Depot
You'll find three raiders in the fuel depot(#5). If you have some skill in lockingpicking, then
you can use the locked door here (#5a) to get into the raider's compound.
6 - Building
You'll find a raider named Daisy and a tribal named Nanuk here. Killing Daisy will net you 200
experience points, and you'll find a
hunting rifle and a
gate key on her corpse. The
gate key can be used to open the
inner gate (#13). Freeing Nanuk doesn't seem to gain you anything, except for perhaps karma.
7 - Building
In this building you'll find Luke the raider plus some other raiders. When you kill Luke, you'll
receive 200 experience points.
8 - Prison
The door to the prison starts out locked. You'll need to pick up the
prison key (#9) to
unlock it. Inside the prison you'll meet a scribe named Diesoon. When you talk to him, he'll give
you the device you were sent to retrieve (a
mechanical arm), and you'll also receive 350
experience points. Talking to Diesoon a second time will cause him to flee the map, so don't send
him off until it's safe.
9 - Building
Inside this building you'll find three raiders. One will drop a
prison key when it dies.
10 - Building
Inside this building you'll meet Bo the raider. Bo is a grenadier, so it's best to snipe at him
through the windows of the building. Chances are, if Bo even gets off an attack, he'll hit the
wall rather than the window, and the grenade will bounce back and explode in his face. If you kill
Bo, or if Bo kills himself, then you'll receive 200 experience points. Bo starts out with one
incendiary grenade and six
frag grenades, but he'll probably use some of them up in the fight. Inside the room you can also
loot a
big book of science from the locked chest.
11 - Barn
There are two brahmin inside the barn. If you go inside the barn, then the brahmin will run off --
right into the mine field (#12) -- and blow up.
12 - Mine Field
You'll find several mines in the mine field. The lower your characters are to the ground, the
easier time they'll have spotting the mines. You don't need to disable the mines, but if you can
(you'll need a traps skill of around 40% just to give yourself a decent chance), you'll make some
extra money when you return to the bunker. If you can't deal with the mines when you first come
to the mine field, then wait a little while. You'll probably gain a level while on the mission,
and you'll find a traps book after the final battle (at #14).
13 - Inner Gate
There is a small building next to the gate. You'll need the
gate key from Daisy the raider
(#6) to get into the building, but once inside you'll be able to activate the switch there, and
that will open the gate.
14 - Headquarters
The headquarters has two levels. Before going in, you should send a couple of squad members up
the ladder to the inner walls (the ladder is on the northern side), so that they can deal with the
two raiders up there. Then, unless you have somebody who is very good at picking locks (the door
on the ground level appears to require over 100% in lockpicking), you'll have to climb up the
stairs on the outside of the headquarters, take care of the raiders on the upper level, and then
finally deal with Jesse the raider on the lower level.
The battle with Jesse can be tough. He'll have two raiders with him, the room will be small enough
that you won't have a range advantage, and the raiders will have a better defensive position. But
these raiders, just like all raiders, are terrible shots, so if you send a trio of squad members
down the stairs to confront them, the battle should proceed quickly. Once Jesse is dead, you'll
receive 600 experience for completing the "kill all raiders" objective (even if Jesse wasn't the
last one).
Also on the ground level of the headquarters, you can loot a shelf and a chest. The shelf has some
molotov cocktails in it, and the safe contains a copy of
Maddock's Tricks & Traps, plus some
RadAway. The safe starts out locked, and its lock is semi-difficult, but remember that you can put
lockpicks into each hand of a squad member to gain a total lockpicking bonus of 40%. That should
be enough to get you into the safe.
Exits:
- Extraction area. The area extends along the entire western edge of the map.


