 Did we miss anything in this location? Is there something we didn't discover?
Let us know!
Objectives
Did we miss anything in this location? Is there something we didn't discover?
Let us know!
Objectives
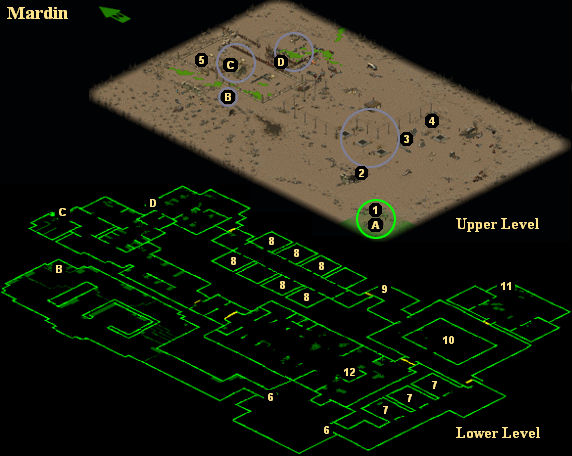
- Eliminate the beastlord emperor (#12).
- Identify the source of deathclaw control (#10).
Walkthrough
Mardin is flat and boring. You'll face a lot of melee and low-range opponents on the surface, and you should be able to dispatch them easily with
hunting rifles and the like. In fact, the battles should be easy enough that you might want to switch to continuous turn-based mode, just to get through them more quickly. The only enemy you'll need to watch out for is the beastlord with the
H&K CAWS (#2). The
CAWS is a nice weapon, and it has better stats than the
neostead combat shotgun.
After clearing the surface of enemies, you'll need to descend into the beastlords' underground lair. You'll have three choices for this (Exits B, C and D), but it doesn't really matter which one you take. Regardless, you'll have to face a lot of enemies, and you'll have to fight your way to the south.
Both of your objectives are located in the underground lair. When you talk to the deathclaw matriarch (#10), you'll learn that the matriarch is controlling the deathclaws, but that the beastlords are in turn controlling her. That gives you two ways to deal with the deathclaw objective: kill the matriarch so that nobody is controlling the deathclaws, or free the matriarch and lure her to your side so that the deathclaws will fight for you. Obviously, the latter solution is the best one: not only will the deathclaws help you in the current mission, but when you return to a bunker, you'll gain the ability to recruit deathclaws for your squad.
The other objective is to kill Emperor Daarr (#12). Daarr is a nasty melee attacker, but he only has about half the hit points of an adult deathclaw. However, he will have a bunch of beastlords and other allies around. If the deathclaws join your side, then the battle with Daarr should be pretty easy, and you probably won't have to do anything more than snipe at the enemy. If you don't help the deathclaws, then make sure that when Daarr rushes you, he rushes right into the teeth of your best shotguns. With barely over 100 hit points, it shouldn't take too many shotgun blasts to kill him.
There are also some civilian prisoners in the lair (#8), but helping them seems to be completely optional, and if there's a reward for helping them, we didn't detect it. So head into the lair, meet the objectives, kill a bunch of beastlords, collect a wide variety of equipment, and then head on back to a bunker for your next mission.
1 - Starting Point
2 - Beastlord Battle
You'll encounter a bunch of beastlords and their organic allies here. Most of the enemies will charge at you, and it'll be an easy enough but long enough battle that you might want to switch to continuous turn-based mode for it. Otherwise, it'll take forever for all of the enemies to take their turn.
What you have to watch out for here is the beastlord with the
H&K CAWS. The
H&K CAWS is a nice shotgun (better than the
neostead combat shotgun), and it can chew up your squad if you blunder into it. So be sure to hit
the beastlord using it with long-range attacks. The beastlord with the
CAWS won't move, so he should be easy to spot even if you don't have a squad member with the "awareness" perk.
You'll find beastlords wandering all over the surface of the map, but none of the other battles will be as large as the one here.
3 - Fridge / Puffer Mines
You'll find a fridge here surrounded by puffer mines. Inside the fridge you'll discover an amazing treasure -- a
stinky meat platter and two bottles of
beer!
4 - Ghoul Corpse / Antipersonnel Mines
On the corpse you'll find a copy of
Guns and Bullets.
5 - Crypt
Inside the crypt, you'll run into some baby cockroaches, but you'll also discover a dead ghoul with five
stimpaks on its corpse.
6 - Ladders
The ladders lead down into a fighting pit. Be sure to kill the baby deathclaws in the pit before climbing down.
7 - Cells
You'll find baby deathclaws in each of the three cells. If you decide to kill them, then obviously you shouldn't use the nearby switch to open their cells doors. You won't find anything to loot inside the cells.
8 - Prisoners
You'll find a bunch of civilian prisoners locked in cells here. There doesn't seem to be a key for
the cells, so you'll have to pick the locks if you want to set the civilians free. A lockpicking
skill of 40% is plenty for the cell doors, so as long as you have some sort of lockpick with you, you should be able to open the doors.
When you open the cell doors, the civilians will wander around for a bit and then run for the exit. It's probably best to kill the beastlords before freeing the civilians -- otherwise the civilians will run right to their deaths -- but there doesn't seem to be any sort of reward involved, and so you can do whatever feels right for your character.
9 - Shelf
On the shelf you'll find a
doctor's bag plus some
healing powder.
10 - Matriarch
When you approach the deathclaw matriarch, she'll automatically talk to you, and you'll learn that
she's the one who has been controlling the deathclaws, although the beastlords in turn have been
controlling her. The matriarch will first ask that you kill her to end the slavery, but then she'll
have a better idea and ask you to free her so that she can kill the beastlord leader.
If you decide to help the deathclaws, then you'll need to enter the matriarch's cage (one of the
nearby beastlords will drop the key that unlocks the cage doors) and talk to the matriarch again.
She'll consequently make a beeline for Emperor Daarr (#12) and start attacking him, and all of the deathclaws in the lair will switch their allegiance to you and start attacking nearby beastlords. Freeing the matriarch will also net you 950 experience points. Provided that you don't accidentally attack any friendly deathclaws in the ensuing battle, then after the mission is over you'll be allowed to recruit deathclaws at Brotherhood bunkers.
If you decide not to the help the deathclaws, then you'll need to kill the matriarch. The easiest way to do that is to just leave her in her cage and then fire on her from outside. For this case the deathclaws will remain your enemy, and you'll have to fight Daarr on your own.
Note: One of the beastlords next to the matriarch's cage will drop a
Walther MPL when it dies.
11 - Workbench
You'll find a variety of low-level melee weapons on the workbench.
12 - Emperor Daarr
There isn't any way to negotiate with Daarr; when you get close enough to him, he'll talk to you and then attack. Daarr is a nasty melee fighter, but he only has about half the hit points of an adult deathclaw, and so he won't last very long if he runs right into your shotgun blasts. If you free the deathclaw matriarch (#10), then this battle will be even easier because you'll probably be able to take pot shots at Daarr while he's fighting a bunch of deathclaws. When Daar goes down, you'll find three
dynamite spears on his corpse, and you'll earn 3800 experience. You'll also find 10,000 ring pulls in the chest behind his throne.
Exits:
- Extraction point.
- Staircase.
- Staircase. One of the beastlords next to the staircase will drop a
needler pistol when it dies.
- Staircase. You'll have to pass through radioactive goop to use this staircase.


